paint-brush
How to Create and Play a Simple Robot Program via Webots Robot Simulatorby@albert-alfrianta
2,522 reads
2,522 reads

How to Create and Play a Simple Robot Program via Webots Robot Simulator

by Albert AlfriantaJuly 24th, 2020
Read on Terminal Reader
Read this story w/o Javascript
tldt arrow

Too Long; Didn't Read

Webots is an open source robot simulator that provides a complete development environment to model, program and simulate robots. Thousands of institutions worldwide use it for R&D and teaching. Webots has been codeveloped by the Swiss Federal Institute of Technology in Lausanne, thoroughly tested, well documented and continuously maintained since 1996. The robot program is implemented to e-puck robot. In this simulation, we used 40 robots, and 4 targets. It's very easy to learn and use, complete tools, and realistic. I don't need to spend any money to buy real robots.

People Mentioned

Mention Thumbnail

Companies Mentioned

Mention Thumbnail
Mention Thumbnail

Coin Mentioned

Mention Thumbnail
featured image - How to Create and Play a Simple Robot Program via Webots Robot Simulator
Albert Alfrianta HackerNoon profile picture

Do you want to learn robot, but you don’t have money to buy the robot? Or you don't know where to start?

Webots simulator is the solution! You can learn with any kind of robots and environments easily. Also you can create your custom robots and environment. The most interesting is Webots is free and open source.

Here we will discuss about Webots, and create our first robot program to make it move. The robot program is implemented to e-puck robot.

My Experience using Webots

I have used Webots to help my friend in her thesis to develop obstacle avoidance algorithms in Niching Particle Swarm Optimization algorithms for multi-target search multi-robot system. Robots is locate in a search area. Then the robots move to search for a targets. With Niching Particle Swarm Optimization, robots is sharing their best location related to possible target location, so robots can find the best possible target location. In this simulation, we used 40 robots, and 4 targets.

My experience in developing this project using Webots is it's very easy to learn and use, complete tools, and realistic. Also I don't need to spend any money to buy real robots 😎

I will discuss about this project soon.

Webots: Robot Simulator

Official website: https://cyberbotics.com

Webots is an open source robot simulator that provides a complete development environment to model, program and simulate robots. Thousands of institutions worldwide use it for R&D and teaching. Webots has been codeveloped by the Swiss Federal Institute of Technology in Lausanne, thoroughly tested, well documented and continuously maintained since 1996. It is the most efficient solution to quickly get professional results. [Reference]

What Can I Do with Webots?

  • Develop custom robots or using available robot
  • Develop custom 3D environment (ground, obstacle, object, sky, physics behavior)
  • Create your robots logic
  • Simulate and testing
  • Record or Screenshot your simulation

Webots Research Area

  • Many mobile robotics projects have relied on Webots for years in the following areas:
  • Mobile robot prototyping (academic research, the automotive industry, aeronautics, the vacuum cleaner industry, the toy industry, hobbyists, etc.)
  • Robot locomotion research (legged, humanoids, quadrupeds robots, etc.)
  • Multi-agent research (swarm intelligence, collaborative mobile robots groups, etc.)
  • Adaptive behavior research (genetic algorithm, neural networks, AI, etc.).
  • Teaching robotics (robotics lectures, C/C++/Java/Python programming lectures, etc.)
  • Robot contests (e.g. Robotstadium or Rat’s Life)

Webots Simulation

  • A Webots simulation is composed of following items:
  • A Webots world file (.wbt) that defines one or several robots and their environment.
  • The .wbt file does sometimes depend on external PROTO files (.proto) and textures.
  • One or several controller programs for the above robots (in C/C++/Java/Python/MATLAB).
  • An optional physics plugin that can be used to modify Webots regular physics behavior (in C/C++)

Available robots

  • Webots have many kinds of available robot, for example:
  • e-puck (two-wheeled robot)
  • Parallax Boe-Bot (three-wheeled robot)
  • Four-wheeled robot
  • Hexapod robot
  • Robotics armSmall size car-like robot
  • Humanoid robot
  • Dog-like robot

Programming Language

You can write the webots robot controller using C++, Java, Python or MATLAB. Choose any kind of your favourite programming language.

Webots User Interface

Webots GUI is composed of four principal windows:

  • 3D window that displays and allows you to interact with the 3D simulation
  • Scene tree which is a hierarchical representation of the current world
  • Text editor that allows you to edit source code, and finally
  • Console that displays both compilation and controller outputs.

User Guide

Webots has provide a great and clean user guide. Also there is a tutorial that you can learn.

e-puck Robot

Official website: https://e-puck.org

Wiki: https://www.gctronic.com/doc/index.php/e-puck2

The e-puck robot is a mini mobile robot developed by GCtronic and EPFL. The e-puck robot is designed and has been widely used in research and educational purposes and is easy to use [Reference].

e-puck has been a very successful robot since 2005. About 3000 units used both in education and research. From January 2018 version 2 is available [Reference].

The e-puck robot is a non-holonomic wheeled robot. Non-holonomic wheeled robot is a robot that depends on the path it can reach to move and cannot move in all directions [Reference], different from the holonomic wheeled robot that can move in all directions [Reference] without changing its orientation. Therefore, if the e-puck robot wants to move to a different direction, the e-puck robot must rotate its body first to face that location.

Simple Tutorial

Here I create a simple tutorial to create the environment, add obstacle, add e-puck robot, and create the e-puck robot program to make the robot move forward.

Before, install Webots on your computer from this tutorial. I use Webots version 2019b.

1. Create Project Directory

  1. Click “Wizards” menu then click “New Project Directory” submenu
  2. Click “Next”
  3. Choose directory for your new project, then click “Next”
  4. Choose a name for the new world (here I name it “main.wbt”), and check the features you want (here I check the “Center view point”, “Add a textured background”, “Add a directional light”, and “Add a rectangle arena”. Then click “Next”
  5. Finally click “Finish”

2. Add e-puck Robot

Select the last node “RectangleArena” of the scene tree view. Click on the Add button (plus sign) at the top of the scene tree view. In the dialog box, choose “PROTO nodes (Webots) / robots / gctronic / e-puck / E-puck (Robot)”, then click “Add”. An e-puck robot should appear in the middle of the arena. Save the simulation.

3. Centering the Arena

We want to look the arena from above to make it clearly visible. You can rotate the arena in X, Y, or Z axis by “hold left click” and “move the cursor”. You can move the arena by “hold right click” and “move the cursor”. You can zoom-in or zoom-out by “scrolling your mouse up or down”.

Here I give you my setting to make the arena looked from above. Double-click on the “Viewpoint node in the scene tree. This should open the node and display its fields. Select the “orientation” field and set its “angle” value to 1.58. Select the “position field and set its “x” value to -0.034, “y” value to 2.2365, and “z” value to -0.023.

Below is the environment look:

4. Add Obstacles

Adding obstacles in this scenario is optional. I added the obstacles just to make the simulation look more real, and just for fun 😄

  1. Add rectangle obstacle.
    Select the last node “E-puck” of the scene tree view. Click on the Add button (plus sign) at the top of the scene tree view. In the dialog box, choose “PROTO nodes (Webots) / objects / factory / containers / WoodenBox (solid)”, then click “Add”. Then Double-click on the “WoodenBox node in the scene tree. This should open the node and display its fields. Select the “size” field and set its “x” value to -0.2, “y” value to 0.1, and “z” value to -0.1. Select the “translation” field and set its “x” value to 0, “y” value to 0.05, and “z” value to -0.2.
  2. Add tube obstacle.
    Select the last node “E-puck” of the scene tree view. Click on the Add button (plus sign) at the top of the scene tree view. In the dialog box, choose “PROTO nodes (Webots) / objects / obstacles / OilBarrel (Solid)”, then click “Add”. Then Double-click on the “OilBarrel” node in the scene tree. This should open the node and display its fields. Select the “radius field and set it value to -0.05. Select the “height field and set it value to 0.1 Select the “translation” field and set its “x” value to 0.2, “y” value to 0.05, and “z” value to -0.2.

Below is the environment look:

5. Create e-puck robot controller

  1. Click “Wizards” menu then click “New Robot Controller” submenu
  2. Click “Next”
  3. Choose the language for your controller program. Here I use C language. Then click “Next”
  4. Specify a name for the controller name. Here I name it “e-puck-move_forward”. Then click next.
  5. Finally click “Finish”

Below is your controller source code look:

6. Edit your controller program

You can edit the controller from webots built in text editor. Or you can edit with your favourite IDE. The controller directory is placed in “[your project directory]/controllers”. The program is placed inside this controller directory.

Here is the move forward source code, or you can view it on my from GitHub Repository. Copy and paste the source code to your controller program.

/*
 * Copyright 2019 Albert Alfrianta
 *
 * Licensed under the Apache License, Version 2.0 (the "License");
 * you may not use this file except in compliance with the License.
 * You may obtain a copy of the License at
 *
 *     http://www.apache.org/licenses/LICENSE-2.0
 *
 * Unless required by applicable law or agreed to in writing, software
 * distributed under the License is distributed on an "AS IS" BASIS,
 * WITHOUT WARRANTIES OR CONDITIONS OF ANY KIND, either express or implied.
 * See the License for the specific language governing permissions and
 * limitations under the License.
 * 
 * 
 * Created on: 2019-09-16, Bogor, Indonesia
 * 
 * Contact: [email protected] or https://www.linkedin.com/in/albert-alfrianta/
 * 
 * Description:
 * 	Simple e-puck robot program to make the robot move forward
 * 	Written in C programming language
 * 
 */


#include <stdio.h>
#include <stdlib.h>
#include <string.h>

#include <webots/device.h>
#include <webots/distance_sensor.h>
#include <webots/led.h>
#include <webots/motor.h>
#include <webots/nodes.h>
#include <webots/robot.h>

int time_step;

/* Motor device */
static WbDeviceTag left_motor, right_motor;

/* E-puck angular speed in rad/s */
#define MAX_SPEED 6.28

/* function to get simulator time step */
static int get_time_step() {
  static int time_step = -1;
  if (time_step == -1)
    time_step = (int)wb_robot_get_basic_time_step();
  return time_step;
}


/* function to set motor velocity to move forward */
static void move_forward() {
  wb_motor_set_velocity(left_motor, MAX_SPEED);
  wb_motor_set_velocity(right_motor, MAX_SPEED);
}

/* function to init robot stuff */
static void init_robot() {
  // get simulator time step
  time_step = get_time_step();
	
  // get a handler to the motors and set target position to infinity (speed control)
  left_motor = wb_robot_get_device("left wheel motor");
  right_motor = wb_robot_get_device("right wheel motor");
  wb_motor_set_position(left_motor, INFINITY);
  wb_motor_set_position(right_motor, INFINITY);
  wb_motor_set_velocity(left_motor, 0.0);
  wb_motor_set_velocity(right_motor, 0.0);
}

/* main function */
int main(int argc, char **argv) {
  /* necessary to initialize webots stuff */
  wb_robot_init();

  init_robot();

  /* main loop
   * Perform simulation steps of TIME_STEP milliseconds
   * and leave the loop when the simulation is over
   */
  while (wb_robot_step(time_step) != -1) {
    /*
     * move the robot forward
     * */
    move_forward();
  };

  /* Enter your cleanup code here */

  /* This is necessary to cleanup webots resources */
  wb_robot_cleanup();

  return EXIT_SUCCESS;
}

Then click “Build” menu, then click “Build” submenu. Make sure that your controller program is open in webots text editor before build.

The important things about this program:

  • wb_robot_get_basic_time_step()
    Webots have simulator time step. The basic time step is the time step increment used by Webots to advance the virtual time and perform physics simulation [reference].
  • wb_robot_step(time_step) 
    This command is to perform simulation steps. This needed for the controller time step. The controller time step is the time increment of time executed at each iteration of the control loop of a controller. We must call this to synchronize our program and the simulator condition. It will return -1 if the simulation is stopped. If we not call this command, the robot will do nothing. For example the wb_motor_set_velocity(left_motor, MAX_SPEED) only set the motor speed value. So we need to call and looping the wb_robot_step(time_step) command to make the robot move.

Program Flow:

  1. First we initialize the robot, and the necessary stuff like get handler to the motors.
  2. Then we make the robot move forward using the while loop. 
  3. When the while loop exit, we cleanup the webots resources. 
    Note: in this program we run an infinite while loop, so the wb_robot_cleanup is never reached.

7. Setting e-puck robot controller

Double-click on the “E-puck” node in the scene tree. This should open the node and display its fields. Select the “controller field, then click select, then choose your controller name (here my controller name is “e-puck-move_forward”).

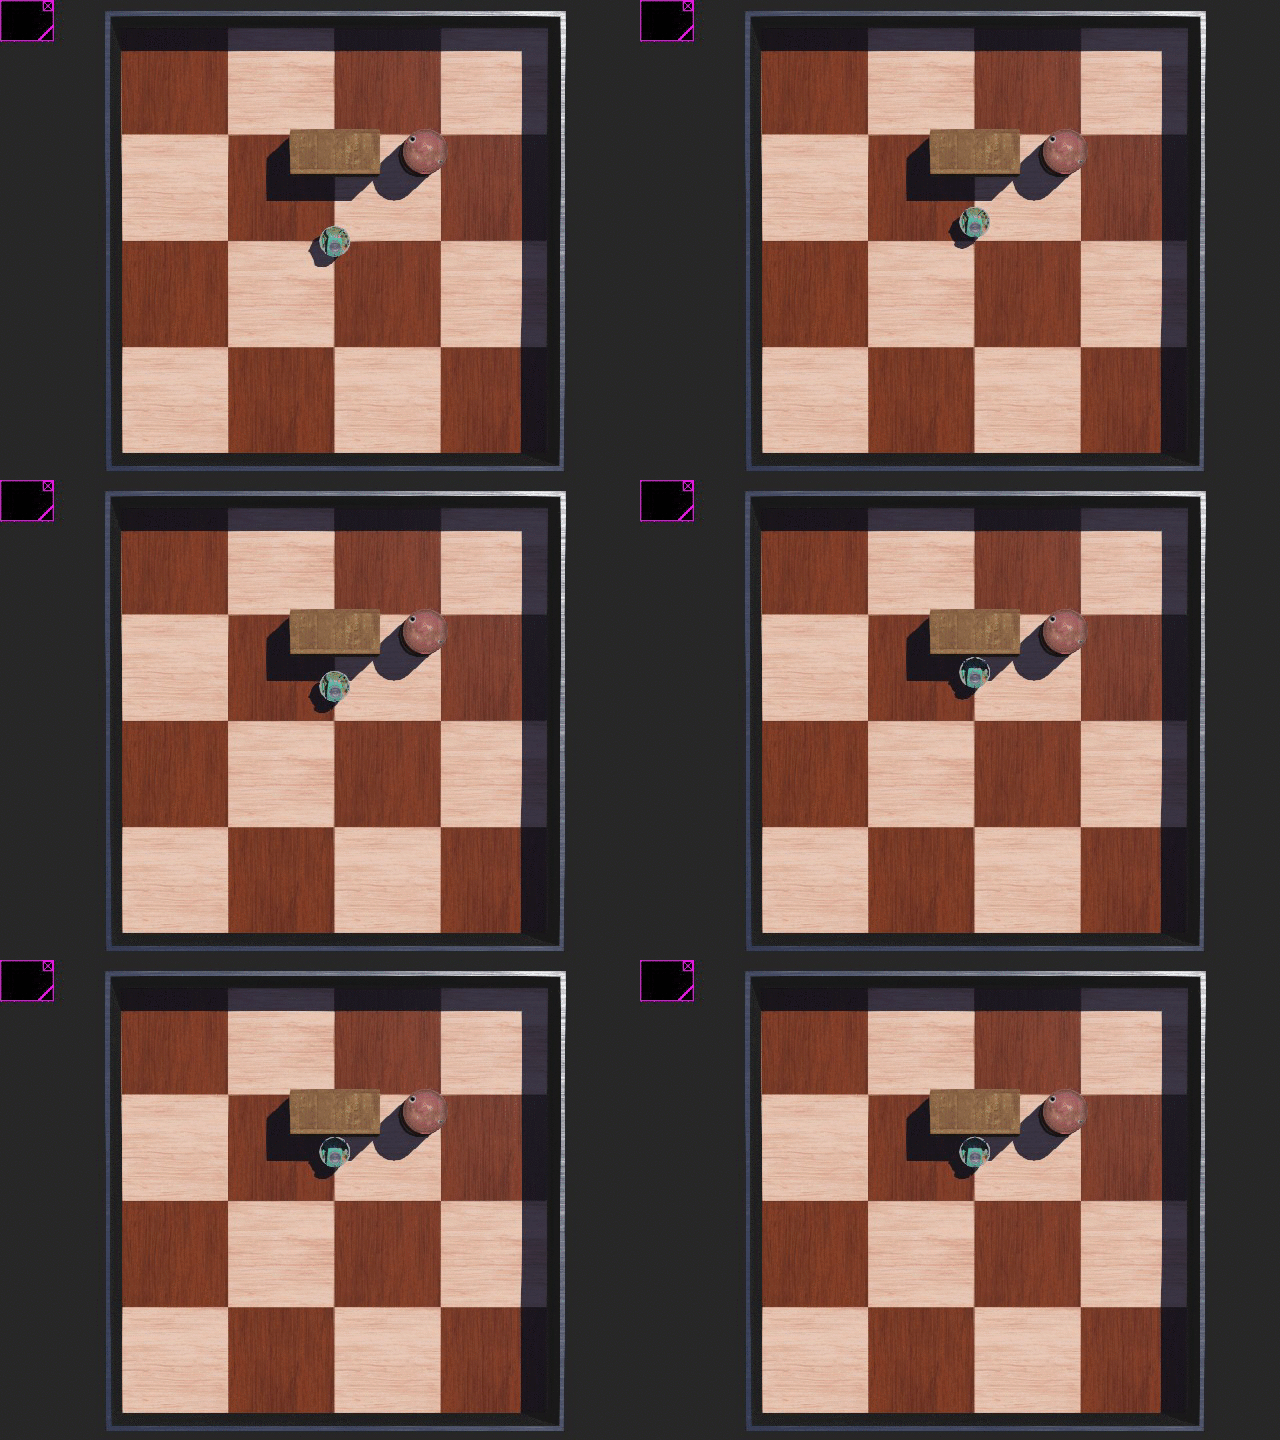
8. Play it

Above the 3D window, click play button to run the simulation in real-time). If the simulation is run, then this button is turn into pause button. Click this pause button if you want to pause the simulation.

The simulation is look like below:

9. Lastly

Don’t forget to save your world by click the save button or by menu “File -> Save World”.

When a Webots world is modified with the intention of being saved, it is fundamental that the simulation is first paused and reloaded to its initial state, i.e. the virtual time counter on the main toolbar should show 0:00:00:000. Otherwise at each save, the position of each 3D object can accumulate errors. Therefore, any modification of the world should be performed in that order: pause, reset, modify and save the simulation

Download this Project

You can download this project from my GitHub. Simply download it, and run it in your webots.

Going Further

Please read this tutorial to advance your knowledge.

Next Tutorial

Stay tuned for more tutorial.

Give response if you like or if you have any advice.

Contact me if you have any question at my LinkedIn

Thank you!