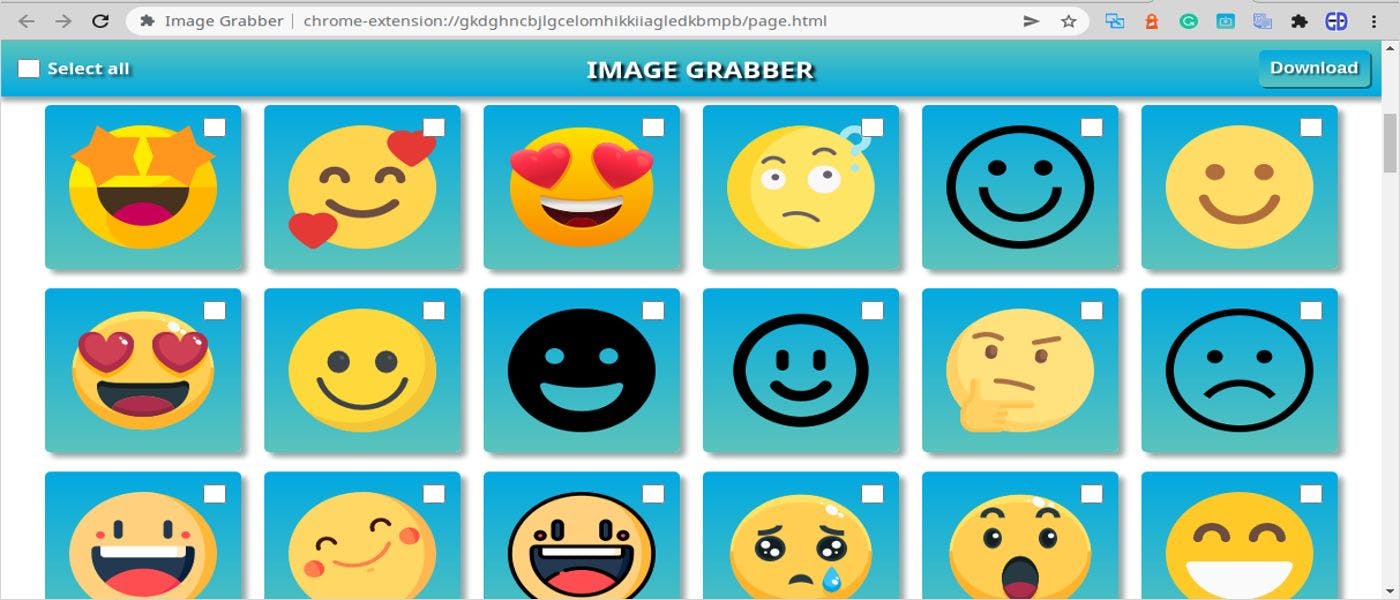
Introduction This is the second part of the article where I show how to create an Google Chrome Extension. The is an extension that allows extracting all or selected images from any web page, displayed in the Chrome browser, and downloading them as a single ZIP archive. Image Grabber Image Grabber Before reading it, you have to read the first part of this article here: https://hackernoon.com/how-to-create-a-google-chrome-extension-image-grabber?embedable=true We developed an extension in the previous article that shows a popup window with the "GRAB NOW" button. When a user clicks this button, the extension injects a script into a web page that is currently open in a browser tab. This script collects all of the page's img> elements, extracts the URLs of all images, and then sends the information back to the extension. This list of URLs was then copied by the extension to the clipboard. In this part, we will change this behavior. Instead of copying to the clipboard, the extension will open a web page with a list of images and a "Download" button. Then, the user can select which images to download. Finally, when the "Download" button on that page is clicked, a script will download all selected images, and compress them to an archive with the name . Finally, it will prompt the user to save this archive to a local computer. images.zip So, by the end of this article, if you follow all the steps, you will have an extension that looks and works like displayed in the following video. https://youtu.be/lUgfbmkc_5U?embedable=true You’ll also learn important concepts of data exchange between different parts of Chrome Web browser, some new Javascript API functions from browser namespace, concepts of working with data of binary files in Javascript, including ZIP-archives, and finally, I will explain how to prepare the extension for publishing to Chrome Web Store - a global repository of Google Chrome extensions, which will make it available for anyone in the world. chrome So, let's get started. Create and open a web page with a list of images The final step of the script in the previous part, was the function, which collected an array of image URLs and copied it to a clipboard. At the current stage, this function looks like this: popup.js onResult /** * Executed after all grabImages() calls finished on * remote page * Combines results and copy a list of image URLs * to clipboard * * @param {[]InjectionResult} frames Array * of grabImage() function execution results */ function onResult(frames) { // If script execution failed on remote end // and could not return results if (!frames || !frames.length) { alert("Could not retrieve images"); return; } // Combine arrays of image URLs from // each frame to a single array const imageUrls = frames.map(frame=>frame.result) .reduce((r1,r2)=>r1.concat(r2)); // Copy to clipboard a string of image URLs, delimited by // carriage return symbol window.navigator.clipboard .writeText(imageUrls.join("\n")) .then(()=>{ // close the extension popup after data // is copied to the clipboard window.close(); }); } So, we remove everything after the comment line including this line itself, and instead, implement a function, which opens a page with a list of images: // Copy to clipboard ... function onResult(frames) { // If script execution failed on remote end // and could not return results if (!frames || !frames.length) { alert("Could not retrieve images"); return; } // Combine arrays of image URLs from // each frame to a single array const imageUrls = frames.map(frame=>frame.result) .reduce((r1,r2)=>r1.concat(r2)); // Open a page with a list of images and send imageUrls to it openImagesPage(imageUrls) } /** * Opens a page with a list of URLs and UI to select and * download them on a new browser tab and send an * array of image URLs to this page * * @param {*} urls - Array of Image URLs to send */ function openImagesPage(urls) { // TODO: // * Open a new tab with a HTML page to display an UI // * Send `urls` array to this page } Now let's implement function step by step. openImagesPage Open a new tab with a local extension page Using the function of Google Chrome API, you can create a new tab in a browser with any URL. It can be any URL on the internet or a local Html page of an extension. chrome.tabs.create Create a page HTML Let's create a page, that we want to open. Create an HTML file with the simple name and the following content. Then save it to the root of the extension folder: page.html Image Grabber <!DOCTYPE html> <html> <head> <title>Image Grabber</title> </head> <body> <div class="header"> <div> <input type="checkbox" id="selectAll"/>&nbsp; <span>Select all</span> </div> <span>Image Grabber</span> <button id="downloadBtn">Download</button> </div> <div class="container"> </div> </body> </html> This markup defines a page, that consists of two sections (two divs): the div and the div, that have appropriate classes, which later will be used in the CSS stylesheet. part has controls to select all images from a list and download them. part, which is empty now, will be dynamically populated by images, using an array of URLs. Finally, after applying CSS styles to this page, it will look like this: header container Header Container Open a new browser tab So, it's a time to start writing the function in the , which we defined earlier. We will use function to open a new tab with the in it. openImagesPage(urls) popup.js chrome.tabs.create page.html The syntax of function is following: chrome.tabs.create chrome.tabs.create(createProperties,callback) is an object with parameters, that tell Chrome, which tab to open and how. In particular, it has the parameter, that will be used to specify which page to open in the tab createProperties url is a function that will be called after the tab is created. This function has a single argument , that contains an object of the created tab, which, among others, contains an parameter of this tab to communicate with it later. callback tab id So, let's create the tab: function openImagesPage(urls) { // TODO: // * Open a new tab with a HTML page to display an UI chrome.tabs.create({"url": "page.html"},(tab) => { alert(tab.id) // * Send `urls` array to this page }); } If you run the extension now and press the 'Grab Now' button on any browser page with images, it should open the on a new tab and activate this tab. The following content should be displayed on the new tab: page.html As you see in the previous code, we defined the function, which later should be used to send array to that page, but now it should display an alert with a created tab ID. However, if you try to run this now, it will not happen, because of one interesting effect, that needs to discuss to understand what happened, and then, understand how to fix this. callback urls So, you press the "Grab Now" button in the popup window which triggers a new tab to appear. And, in a moment when a new tab appears and activates, the popup window disappeared and is destroyed. It was destroyed BEFORE the callback was executed. This is what happens when a new tab activates and receives focus. To fix this, we should create the tab, but not activate it until doing all required actions in the callback. Only after all actions in the callback are finished, need to manually activate the tab. The first thing that needs to do, is to specify in the function to not automatically select the created tab. To do this, need to set the parameter of to : chrome.tabs.create selected createProperties false chrome.tabs.create({url: 'page.html', selected: false}, ... Then, inside the callback need to run all actions that needed to run (display an alert, or send a list of URLs) and in the last line of this callback, manually activate the tab. In terms of Chrome APIs, a tab means . To update a status of a tab, need to use the function, with a very similar syntax: activate update the tab status chrome.tabs.update chrome.tabs.update(tabId,updateProperties,callback) is the id of a tab to update tabId defines which properties of the tab to update. updateProperties function called after update operation finished. To activate a tab using this function, need to make this call: callback chrome.tabs.update(tab.id,{active:true}); We omit the callback because do not need it. Everything that is required to do with this tab should be done on previous lines of this function. function openImagesPage(urls) { // TODO: // * Open a new tab with a HTML page to display an UI chrome.tabs.create( {"url": "page.html",selected:false},(tab) => { alert(tab.id) // * Send `urls` array to this page chrome.tabs.update(tab.id,{active: true}); } ); } If you run the extension now and press the "Grab Now" button, everything should work as expected: tab is created, then alert displayed, then the tab will be selected and finally popup disappear. Now, let's remove the temporary and define, how to send a list of image URLs to the new page and how to display an interface to manage them. alert Send image URLs data to the page Now we need to create a script, which will generate an HTML markup to display a list of images inside the div on the page. container At the first glance, we can go the same way as we did in the previous part of this article. We can use API o inject the script to the tab with and this script will use image to generate images list inside the container. But injecting scripts it's not a true way. It's kind of hacking. It's not completely correct and legal. We should define script in a place, where it will be executed, we should not "send scripts". The only reason why we did this before, is because we did not have access to the source code of pages of sites, from which we grabbed images. But in the current case, we have full control on and all scripts in it and that is why, the script, which generates an interface for that should be defined in . So, let's create an empty Javascript file, put it in the same folder with , and include it to the this way: chrome.scripting page.html urls page.html page.html page.js page.html page.html <!DOCTYPE html> <html> <head> <title>Image Grabber</title> </head> <body> <div class="header"> <div> <input type="checkbox" id="selectAll"/>&nbsp; <span>Select all</span> </div> <span>Image Grabber</span> <button id="downloadBtn">Download</button> </div> <div class="container"> </div> <script src="/page.js"></script> </body> </html> Now we can write in whatever is required to init and create an interface. However, we still need data from - the array of to display images for. So, we still need to send this data to the script, that we just created. page.js popup.js urls This is a moment to introduce an important feature of Chrome API, which can be used to communicate between different parts of extension: . One part of the extension can send a message with data to another part of the extension, and that other part can receive the message, process received data and respond to the sending part. Basically, the messaging API is defined under the namespace and you can read the official documentation messaging chrome.runtime here. In particular, there is an event. If a listener is defined to this event in a script, this script will receive all events that other scripts send to it. chrome.runtime.onMessage For the purposes of Image Grabber, we need to send a message with a list of URLs from the script to the tab with the page. The script on that page should receive that message, extract the data from it and then respond to it to confirm that data was processed correctly. Now it's time to introduce API, that is required for this. popup.js page.html chrome.tabs.sendMessage(tabId, message, responseFn) is an id of tab to which message will be sent tabId the message itself. Can be any Javascript object. message is a function, that is called when the received party responded to that message. This function has only one argument which contains anything, that receiver sent as a response. callback responseObject So, this is what we need to call in to send a list of URLs as a message: popup.js function openImagesPage(urls) { // TODO: // * Open a new tab with a HTML page to display an UI chrome.tabs.create( {"url": "page.html",selected:false},(tab) => { // * Send `urls` array to this page chrome.tabs.sendMessage(tab.id,urls,(resp) => { chrome.tabs.update(tab.id,{active: true}); }); } ); } In this tab, we send as a message to the page and activate this page only after the response to this message is received. urls I would recommend wrapping this code by a function to wait a couple of milliseconds before sending the message. Need to give some time to initialize the new tab: setTimeout function openImagesPage(urls) { // TODO: // * Open a new tab with a HTML page to display an UI chrome.tabs.create( {"url": "page.html",selected:false},(tab) => { // * Send `urls` array to this page setTimeout(()=>{ chrome.tabs.sendMessage(tab.id,urls,(resp) => { chrome.tabs.update(tab.id,{active: true}); }); },100); } ); } Receive image URLs data on the page If you run this now, the popup window won't disappear, because it should only after receiving the response from receiving page. To receive this message, we need to define a event listener in the script: chrome.runtime.onMessage page.js chrome.runtime.onMessage .addListener(function(message,sender,sendResponse) { addImagesToContainer(message); sendResponse("OK"); }); /** * Function that used to display an UI to display a list * of images * @param {} urls - Array of image URLs */ function addImagesToContainer(urls) { // TODO Create HTML markup inside container <div> to // display received images and to allow to select // them for downloading document.write(JSON.stringify(urls)); } To receive a message, the destination script should add a listener to the event. The listener is a function with three arguments: chrome.runtime.onMessage - a received message object, transferred as is. (array of in this case) message urls - an object which identifies a sender of this message. sender - a function, that can be used to send a response to the sender. A single parameter of this function is anything that we want to send to the sender. sendResponse So, here, this listener passes a received message to an function, that will be used to create an HTML markup to display images. But right now it writes a string representation of the received array of URLs. Then, the listener responds to the sender by function. It sends just an "OK" string as a response because it does not matter how to respond. The only fact of response is important in this case. addImagesToContainer sendResponse After it's done, when you click "GRAB NOW" button from an extension, the new page should open with something like this, as content: (depending on which tab you clicked it): Create Image Downloader interface We have received an array of image URLs to download from the popup window into a script, connected to the and this is all that we needed from . Now, it's time to build an interface to display these images and allow download them. page.html popup.js Create UI to display and select images The function already created with a placeholder code. Let's change it to really add images to the container <div>: addImagesToContainer(urls) /** * Function that used to display an UI to display a list * of images * @param {} urls - Array of image URLs */ function addImagesToContainer(urls) { if (!urls || !urls.length) { return; } const container = document.querySelector(".container"); urls.forEach(url => addImageNode(container, url)) } /** * Function dynamically add a DIV with image and checkbox to * select it to the container DIV * @param {*} container - DOM node of a container div * @param {*} url - URL of image */ function addImageNode(container, url) { const div = document.createElement("div"); div.className = "imageDiv"; const img = document.createElement("img"); img.src = url; div.appendChild(img); const checkbox = document.createElement("input"); checkbox.type = "checkbox"; checkbox.setAttribute("url",url); div.appendChild(checkbox); container.appendChild(div) } Let's clarify this code step by step. function check if the array of URLs is not empty and stops if it does not contain anything. addImagesToContainer Then, it queries DOM to get a node of the element with the class. Then this container element will be used in a function to append all images to it. div container Next, it calls function for each URL. It passes the to it and the URL itself addImageNode container Finally, the function dynamically constructs an HTML for each image and appends it to the container. addImageNode It constructs the following HTML for each image URL: <div class="imageDiv"> <img src={url}/> <input type="checkbox" url={url}/> </div> It appends a div with class for each image. This div contains the image itself with specified and the checkbox, to select it. This checkbox has a custom attribute named , which later will be used by downloading function to identify, which URL to use to download the image. imageDiv url url If you run this right now for the same list of images, as on the previous screenshot, the page should display something like the following: Here you can see that right after the header, with the "Select all" checkbox and "Download" button, there is a list of images with checkboxes to select each of them manually. This is a full code of the file, used to receive and display this list: page.js chrome.runtime.onMessage .addListener((message,sender,sendResponse) => { addImagesToContainer(message) sendResponse("OK"); }); /** * Function that used to display an UI to display a list * of images * @param {} urls - Array of image URLs */ function addImagesToContainer(urls) { if (!urls || !urls.length) { return; } const container = document.querySelector(".container"); urls.forEach(url => addImageNode(container, url)) } /** * Function dynamically add a DIV with image and checkbox to * select it to the container DIV * @param {*} container - DOM node of a container div * @param {*} url - URL of image */ function addImageNode(container, url) { const div = document.createElement("div"); div.className = "imageDiv"; const img = document.createElement("img"); img.src = url; div.appendChild(img); const checkbox = document.createElement("input"); checkbox.type = "checkbox"; checkbox.setAttribute("url",url); div.appendChild(checkbox); container.appendChild(div) } In this step, we can select each image manually. Now, it's time to make the "Select All" checkbox work, to select/unselect all of them at once. Implement Select All function If return to the layout, you'll see that the "Select All" checkbox is an input field with the id. So, we need to react to user clicks on it. When the user switches it on, all image checkboxes should switch on. When the user switches it off, all image checkboxes also should switch off. In other words, we should listen to the "onChange" event of the "#selectAll" checkbox, and in a handler of this event, set a "checked" status of all checkboxes to be the same as the status of the "Select All" checkbox. This is how it could be implemented in the script: page.html selectAll page.js document.getElementById("selectAll") .addEventListener("change", (event) => { const items = document.querySelectorAll(".container input"); for (let item of items) { item.checked = event.target.checked; }; }); The listening function receives an instance of the event as an function argument. This instance has a link to the "Select All" node itself in the parameter, which we can use to determine the current status of this checkbox. onChange event target Then, we select all "input" fields inside div with a class, e.g. all image checkboxes, because there are no other input fields inside this container. container Then, we set the checked status to each of these checkboxes to the status of the "Select All" checkbox. So, each time the user changes the status of that checkbox, all other checkboxes reflect this change. Now, if you run the extension again, you can select the images to download either manually, or automatically. The only step left in this section is to download selected images. To do this, we need to make the button work. Download Implement Download function After the user selected the images, it should press the button, which should run the event listener of this button. The button can be identified by the ID. So, we can connect the listener function to this button, using this ID. This function should do three things: Download onClick Download downloadBtn Get URLs of all selected images, Download them and compress them to a ZIP archive Prompt the user to download this archive. Let's define a shape of this function: document.getElementById("downloadBtn") .addEventListener("click", async() => { try { const urls = getSelectedUrls(); const archive = await createArchive(urls); downloadArchive(archive); } catch (err) { alert(err.message) } }) function getSelectedUrls() { // TODO: Get all image checkboxes which are checked, // extract image URL from each of them and return // these URLs as an array } async function createArchive(urls) { // TODO: Create an empty ZIP archive, then, using // the array of `urls`, download each image, put it // as a file to the ZIP archive and return that ZIP // archive } function downloadArchive(archive) { // TODO: Create an <a> tag // with link to an `archive` and automatically // click this link. This way, the browser will show // the "Save File" dialog window to save the archive } The listener runs exactly the actions, defined above one by one. I put the whole listener body to try/catch block, to implement a uniform way to handle all errors that can happen on any step. If an exception is thrown during processing the list of URLs or compressing the files, this error will be intercepted and displayed as an alert. Also, part of the actions, that this function will do are asynchronous and return promises. I use the approach to resolve promises, instead of then/catch, to make code easier and cleaner. If you are not familiar with this modern approach, look for a simple clarification . That is why, to be able to resolve promises using , the listener function is defined as , the same as function. async/await here await async() createArchive Get selected image URLs function should query all image checkboxes inside div, then filter them to keep only checked and then, extract attribute of these checkboxes. As a result, this function should return an array of these URLs. This is how this function could look: getSelectedUrls() .container url function getSelectedUrls() { const urls = Array.from(document.querySelectorAll(".container input")) .filter(item=>item.checked) .map(item=>item.getAttribute("url")); if (!urls || !urls.length) { throw new Error("Please, select at least one image"); } return urls; } In addition, it throws an exception if there are no selected checkboxes. Then, this exception is properly handled in the upstream function. Download images by URLs The function uses argument to download image files for each . To download a file from the Internet, need to execute a GET HTTP request to an address of this file. createArchive urls url There are many ways for this from Javascript, but the most uniform and modern is by using a function. This function can be simple or complex. Depending on the kind of request you need to execute, you can construct very specific request objects to pass to that function and then analyze the responses returned. In a simple form, it requires to specify an URL to request and returns a promise with Response object: fetch() response = await fetch(url); This form we will use for Image Grabber. The full description of the function and its API can find in official docs: . fetch https://www.javascripttutorial.net/javascript-fetch-api/ The function call above will either resolve to the object or throw an exception in case of problems. The is an HTTP Response object, which contains the raw received content and various properties and methods, that allow dealing with it. response response A reference to it you can find in the This object contains methods to get content in different forms, depending on what is expected to receive. For example converts the response to a text string, converts it into a plain Javascript object. However, we need to get binary data of an image, to save it to a file. The type of object, that is usually used to work with binary data in Javascript is - Binary Large Object. The method to get the response content as is . official docs. response.text() response.json() Blob blob response.blob() Now let's implement a part of function to download the images as objects: createArchive Blob async function createArchive(urls) { for (let index in urls) { const url = urls[index]; try { const response = await fetch(url); const blob = await response.blob(); console.log(blob); } catch (err) { console.error(err); } }; } In this function, we go over each item of the selected array, download each of them to then, convert the to . Finally, just log each blob to a console. urls response response blob A is an object, which contains the binary data of the file itself and also, some properties of this data, that can be important, in particular: blob type - The type of file. This is a MIME-type of content - . Depending on MIME-type we can check is it really an image or not. We will need to filter files by their mime types and leave only , , or . We will do that later, in the next section. https://developer.mozilla.org/en-US/docs/Web/HTTP/Basics_of_HTTP/MIME_types image/jpeg image/png image/gif size - The size of the image in bytes. This parameter is also important, because if the size is 0, or less than 0, then there is no sense to save this image to a file. You can find the reference with all parameters and methods of objects [here](https://developer.mozilla.org/en-US/docs/Web/API/Blob .). Blob If you read this, you will not find a or property. Blob is only about content, it does not know the name of the file, because the content, returned by the could be not a file. However, we need to have the names of the images somehow. In the next section, we will create a utility function that will be used to construct a file name, known only as blob. name file name fetch() Determine file names for images To put files into the archive, we need to specify a file name for each file. Also, to open these files as images later we need to have an extension for each file. To handle this task, we will define a utility function with the following syntax: function checkAndGetFileName(index, blob) Where is an index of item from array and is a BLOB object with a content of a file. index urls blob To obtain a of the file we will use just an index of an URL in the input array. We will not use the URL itself, because it can be weird and include various timestamps and other garbage. So, file names will be like '1.jpeg', '2.png', and so on. name To obtain an of the file, we will use a MIME-type of object of this file, which is stored in parameter. extension blob blob.type In addition, this function will not only construct file name but also check the blob to have the correct and MIME-type. It will return a file name only if it has a positive and correct image MIME-type. The correct MIME types for images look like: , or in which the first part is a word and the second part is an extension of the image. size size image/jpeg image/png image/gif image So, the function will parse a MIME-type and will return a filename with an extension only if the mime-type begins with . The name of the file is the and the extension of the file is the second part of its MIME-type: image index This is how the function could look: function checkAndGetFileName(index, blob) { let name = parseInt(index)+1; const [type, extension] = blob.type.split("/"); if (type != "image" || blob.size <= 0) { throw Error("Incorrect content"); } return name+"."+extension; } Now, when we have names of images and their binary content, nothing can stop us from just putting this to a ZIP archive. Create a ZIP archive ZIP is one of the most commonly used formats to compress and archive data. If you compress files by ZIP and send it somewhere, you can be confident about 100% that the receiving party will be able to open it. This format was created and released by PKWare company in Here you can find not only the history but also the structure of the ZIP file and algorithm description, which can be used to implement binary data compression and decompression using this method. 1989. However, here we will not reinvent the wheel, because it's already implemented for all or almost all programming languages, including Javascript. We will just use the existing external library - JSZip. You can find it . here Next, we need to download a JSZip library script and include it in , before . This is the . It will download an archive with all source code and release versions. This is a big archive, but you really need only a single file from it: . page.html page.js direct download link dist/jszip.min.js Create a folder inside the extension path, extract this file to it, and include this script to the , before : lib page.html page.js <!DOCTYPE html> <html> <head> <title>Image Grabber</title> </head> <body> <div class="header"> <div> <input type="checkbox" id="selectAll"/>&nbsp; <span>Select all</span> </div> <span>Image Grabber</span> <button id="downloadBtn">Download</button> </div> <div class="container"> </div> <script src="/lib/jszip.min.js"></script> <script src="/page.js"></script> </body> </html> When it is included, it creates a global class, that can be used to construct ZIP archives and add content to them. This process can be described by the following code: JSZip const zip = new JSZip(); zip.file(filename1, blob1); zip.file(filename2, blob2); . . . zip.file(filenameN, blobN); const blob = await zip.generateAsync({type:'blob'}); First, it creates an empty object. Then, it starts adding files to it. File defined by name, and with binary content of this file. Finally, the method is used to generate a ZIP archive from previously added files. In this case, it returns generated archive as a blob, because we already know what is BLOB and how to work with it. However, you can learn JSZip API for other options. zip blob generateAsync documentation Now we can integrate this code to function to create an archive from all image files and return a BLOB of this archive: createArchive async function createArchive(urls) { const zip = new JSZip(); for (let index in urls) { try { const url = urls[index]; const response = await fetch(url); const blob = await response.blob(); zip.file(checkAndGetFileName(index, blob),blob); } catch (err) { console.error(err); } }; return await zip.generateAsync({type:'blob'}); } function checkAndGetFileName(index, blob) { let name = parseInt(index)+1; [type, extension] = blob.type.split("/"); if (type != "image" || blob.size <= 0) { throw Error("Incorrect content"); } return name+"."+extension; } Here, when adding each image file to the , we use the previously created function to generate a filename for this file. zip checkAndGetFileName Also, the body of the loop is placed to try/catch block, so any exception that is thrown by any line of code will be handled inside that loop. I decided to not stop the process in case of exceptions here, but just skip the file, which resulted in an exception and only showed an error message to the console. And finally, it returns generated BLOB with a zip archive, which is ready to download. Download a ZIP archive Usually, when we want to invite users to download a file, we show them the link, pointing to this file, and ask them to click it to download this file. In this case, we need to have a link, which points to the BLOB of the archive. BLOB objects can be very big, which is why web browsers store them somewhere, fortunately, there is a function in Javascript, which allows us to get a link to a BLOB object: window.URL.createObjectURL(blob) So, we can create a link to a blob of ZIP-archive. Finally, this is how the function looks: downloadArchive function downloadArchive(archive) { const link = document.createElement('a'); link.href = URL.createObjectURL(archive); link.download = "images.zip"; document.body.appendChild(link); link.click(); document.body.removeChild(link); } This code dynamically creates an 'a' element and points it to the URL of the blob. Also, it sets the name of the downloaded file to . Then it injects this invisible link into a document and clicks it. This will trigger the browser to either show the "File Save" window or automatically save a file with the name of and the content of the ZIP archive. Finally, the function removes this link from a document, because we do not need it anymore after the click. archive images.zip images.zip Code cleanup This is the final step of the "Download" function implementation. Let's clean up, comment, and memorize the whole code, which we created in : page.js /** * Listener that receives a message with a list of image * URL's to display from popup. */ chrome.runtime.onMessage .addListener((message,sender,sendResponse) => { addImagesToContainer(message) sendResponse("OK"); }); /** * Function that used to display an UI to display a list * of images * @param {} urls - Array of image URLs */ function addImagesToContainer(urls) { if (!urls || !urls.length) { return; } const container = document.querySelector(".container"); urls.forEach(url => addImageNode(container, url)) } /** * Function dynamically add a DIV with image and checkbox to * select it to the container DIV * @param {*} container - DOM node of a container div * @param {*} url - URL of image */ function addImageNode(container, url) { const div = document.createElement("div"); div.className = "imageDiv"; const img = document.createElement("img"); img.src = url; div.appendChild(img); const checkbox = document.createElement("input"); checkbox.type = "checkbox"; checkbox.setAttribute("url",url); div.appendChild(checkbox); container.appendChild(div) } /** * The "Select All" checkbox "onChange" event listener * Used to check/uncheck all image checkboxes */ document.getElementById("selectAll") .addEventListener("change", (event) => { const items = document.querySelectorAll(".container input"); for (let item of items) { item.checked = event.target.checked; }; }); /** * The "Download" button "onClick" event listener * Used to compress all selected images to a ZIP-archive * and download this ZIP-archive */ document.getElementById("downloadBtn") .addEventListener("click", async() => { try { const urls = getSelectedUrls(); const archive = await createArchive(urls); downloadArchive(archive); } catch (err) { alert(err.message) } }) /** * Function used to get URLs of all selected image * checkboxes * @returns Array of URL string */ function getSelectedUrls() { const urls = Array.from(document.querySelectorAll(".container input")) .filter(item=>item.checked) .map(item=>item.getAttribute("url")); if (!urls || !urls.length) { throw new Error("Please, select at least one image"); } return urls; } /** * Function used to download all image files, identified * by `urls`, and compress them to a ZIP * @param {} urls - list of URLs of files to download * @returns a BLOB of generated ZIP-archive */ async function createArchive(urls) { const zip = new JSZip(); for (let index in urls) { try { const url = urls[index]; const response = await fetch(url); const blob = await response.blob(); zip.file(checkAndGetFileName(index, blob),blob); } catch (err) { console.error(err); } }; return await zip.generateAsync({type:'blob'}); } /** * Function used to return a file name for * image blob only if it has a correct image type * and positive size. Otherwise throws an exception. * @param {} index - An index of URL in an input * @param {*} blob - BLOB with a file content * @returns */ function checkAndGetFileName(index, blob) { let name = parseInt(index)+1; const [type, extension] = blob.type.split("/"); if (type != "image" || blob.size <= 0) { throw Error("Incorrect content"); } return name+"."+extension.split("+").shift(); } /** * Triggers browser "Download file" action * using a content of a file, provided by * "archive" parameter * @param {} archive - BLOB of file to download */ function downloadArchive(archive) { const link = document.createElement('a'); link.href = URL.createObjectURL(archive); link.download = "images.zip"; document.body.appendChild(link); link.click(); document.body.removeChild(link); } Now, you can click the "GRAB NOW" button, then, either automatically or manually select the images to download, press the "Download" button and save a ZIP archive with these images: However, it doesn’t look perfect. It is almost impossible to use this in practice. Let's style this page properly. Styling the extension page At the current stage, all markup and functionality of the extension page are ready. All classes and IDs are defined in HTML. It's time to add CSS, to style it. Create a file at the same folder with and others and add this stylesheet to the : page.css page.html page.html <!DOCTYPE html> <html> <head> <title>Image Grabber</title> <link href="/page.css" rel="stylesheet" type="text/css"/> </head> <body> <div class="header"> <div> <input type="checkbox" id="selectAll"/>&nbsp; <span>Select all</span> </div> <span>Image Grabber</span> <button id="downloadBtn">Download</button> </div> <div class="container"> </div> <script src="/lib/jszip.min.js"></script> <script src="/page.js"></script> </body> </html> Then add the following content to the : page.css body { margin:0px; padding:0px; background-color: #ffffff; } .header { display:flex; flex-wrap: wrap; flex-direction: row; justify-content: space-between; align-items: center; width:100%; position: fixed; padding:10px; background: linear-gradient( #5bc4bc, #01a9e1); z-index:100; box-shadow: 0px 5px 5px #00222266; } .header > span { font-weight: bold; color: black; text-transform: uppercase; color: #ffffff; text-shadow: 3px 3px 3px #000000ff; font-size: 24px; } .header > div { display: flex; flex-direction: row; align-items: center; margin-right: 10px; } .header > div > span { font-weight: bold; color: #ffffff; font-size:16px; text-shadow: 3px 3px 3px #00000088; } .header input { width:20px; height:20px; } .header > button { color:white; background:linear-gradient(#01a9e1, #5bc4bc); border-width:0px; border-radius:5px; padding:10px; font-weight: bold; cursor:pointer; box-shadow: 2px 2px #00000066; margin-right: 20px; font-size:16px; text-shadow: 2px 2px 2px#00000088; } .header > button:hover { background:linear-gradient( #5bc4bc,#01a9e1); box-shadow: 2px 2px #00000066; } .container { display: flex; flex-wrap: wrap; flex-direction: row; justify-content: center; align-items: flex-start; padding-top: 70px; } .imageDiv { display:flex; flex-direction: row; align-items: center; justify-content: center; position:relative; width:150px; height:150px; padding:10px; margin:10px; border-radius: 5px; background: linear-gradient(#01a9e1, #5bc4bc); box-shadow: 5px 5px 5px #00222266; } .imageDiv:hover { background: linear-gradient(#5bc4bc,#01a9e1); box-shadow: 10px 10px 10px #00222266; } .imageDiv img { max-width:100%; max-height:100%; } .imageDiv input { position:absolute; top:10px; right:10px; width:20px; height:20px; } After styling, it defines styling for the set of selectors of the content of div, and then, for the set of selectors of the content of div. The key part of this styling is using the layout with the 'flex-wrap' option. It is used both for header and container. It makes the whole layout responsive. The components rearrange themselves properly on a screen of any size: body .header .container Flexbox . You can read about using of Flexbox layout . More information about all other CSS styles used can be easily found in any CSS reference. here Publish and distribute the extension Now the work is finished and the extension is ready for release. How do you show it to other people? Do you send them this folder with files and explain how to install the unpacked extension using tab? Of course not! chrome://extensions This is not a proper way to distribute Chrome extensions. The proper way is to publish the extension to the and send a link to a page, where it is published to everyone. Chrome Web Store For example, this is the to an extension, which I created and published recently. link Image Reader This is how it looks on the Chrome Web Store: People can read the description of the extension, see screenshots and finally press the button to install it. Add to Chrome As you see here, to publish an extension, you need to provide not only the extension itself but also an image of the extension, screenshots, descriptions, the specify a category of extension, and other parameters. The rules of publishing change from time to time, which is why it's better to use the official website to see a guide on how to set up a Chrome Web Developer Account, upload the extension to it, and then publish it. Google in the official documentation. In it, Google describes everything you need to do. The page is updated as changes occur. This is the root information I can specify a list of key points here to get started easily. (However, it's actually only valid momentarily, Google could change the rules at anytime, so do not rely on this list too much, just use it as general info): Archive your extension folder to a zip file Register as a Chrome Web Store developer. You can use an existing Google account (for example, if you have an account used for Gmail, it will work). Pay one time $5 registration fee Using the Chrome Web Store Developer console, create a new product in it and upload the created ZIP archive to it. Fill required fields in a product form with information about the product name and description. Upload a product picture and screenshots of different sizes. This information can be variable, which is why I think that you will need to prepare it in a process of filling out this form. It's not required to fill all fields in a single run. You can complete part of the form and press the "Save Draft" button. Then, return back, select your product and continue filling. After all fields are completed, press the "Submit for Review" button, and, if the form is completed without mistakes, the extension will be sent to Google for review. The review can take time. The status of the review will be displayed on the products list. You have to check from time to time the status of your submission because Google does not send any notifications by email about review progress. After a successful review, the status of the product will change to "Published" and it will be available on Google Chrome Web Store. People will be able to find it and install it. In the case of my extension on the screenshot above, the Google review took two days and it was published successfully. I hope it’s just as fast for you, or even faster. Good luck! Conclusion Creating Google Chrome Extensions is an easy way to distribute your web application worldwide, using a global worldwide platform, that just works and does not require any support and promotion. This way you can easily deliver your online ideas almost at no cost. What is more, you can enrich the features of your existing websites with browser extensions to make your users feel more comfortable working with your online resources. For example, the extension, which I recently published, used to work with an online text recognition service - "Image Reader". Using this service, you can get an image from any website, paste it to the interface and recognize the text on it. The browser extension for this service helps to send images from any browser tab to this service automatically. Without the extension, the user needs to make 5 mouse clicks to do that, but with the extension, the same can be done in just two mouse clicks. This is a great productivity improvement. You can watch this video to see how that extension helps to deliver images to the web service using the context menu: https://youtu.be/LrnVEmgvnpg?embedable=true I believe that you can find a lot of ways how to use web browser automation via extensions to increase the productivity and comfort level of your online users, to make their work with your online resources better, faster, and smarter. I hope that my tutorial opened the world of web browser extensions for you. However, I did not clarify even a few percent of the features, that exist in this area. Perhaps I will write more about this soon. Full source code of the extension you can clone from my . Image Grabber GitHub repository Please reach out in the comments, if you have something to add or found bugs or have an idea of what needs improvement. Feel free to connect and follow me on social networks where I publish announcements about my new articles, similar to this one and other software development news. / k/ LinkedIn Faceboo Twitter Happy coding guys! Also published here.