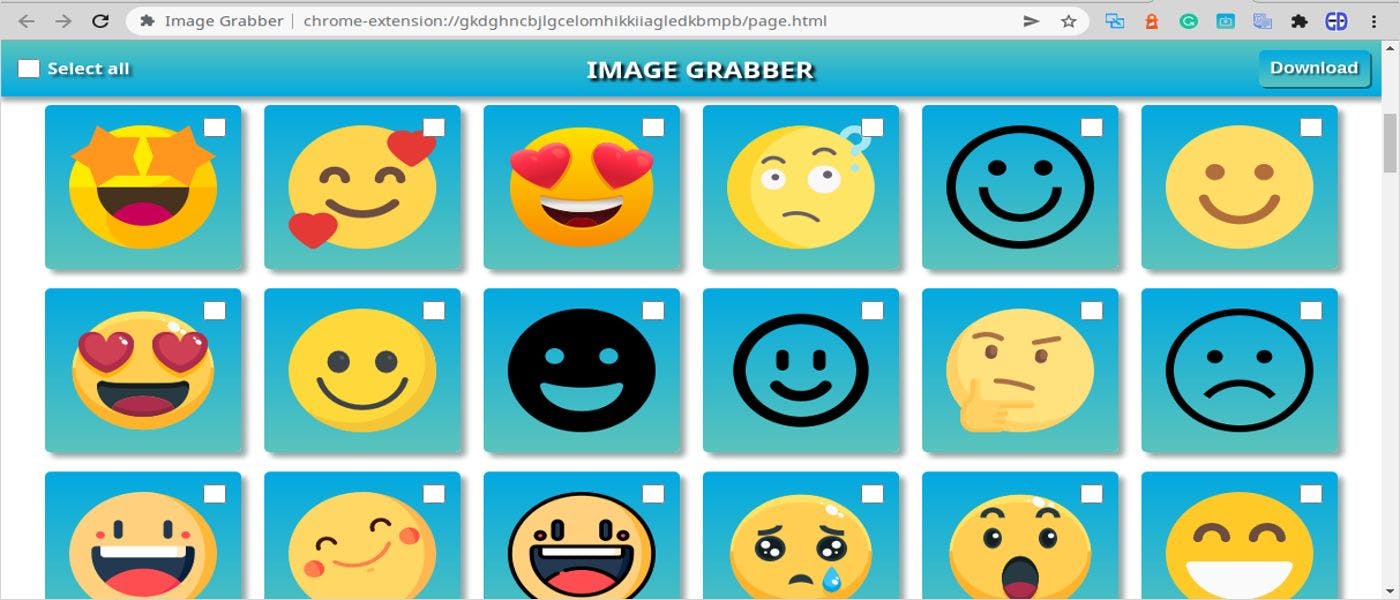
Introduction Chrome Extensions are small programs, that can be installed on the Google Chrome web browser to enrich its features. Usually, to install a Chrome Extension, a user should open , find the required extension, and install it from there. Chrome Web Store In this article, I will show, how to create a Chrome Extension from scratch. The extension which we will create today will use Chrome APIs to get access to the content of web pages, which opened in a web browser and extract different information from them. Using these APIs you can not only read content from web pages but also write content to them and interact with these pages, like, for example, automatically pressing buttons or following links. This feature can be used for a wide range of browser automation tasks like scrapping required information from websites or automating web surfing, which can be useful to automate user interface testing. In this article, I will guide you through the process of building an extension named . The resulting extension will provide an interface to connect to a website, read all images from it, grab their absolute URLs and copy these URLs to a clipboard. During this process, you will know about foundational parts of the Google Chrome extension that can be reused to build an extension of any kind. Image Grabber By the end of this article, you will build an extension that looks and works as shown in this video. https://youtu.be/whdKJ7o46n0?embedable=true This is only the first part of this tutorial. In the second part, I will show how to extend the interface of the extension to select and download grabbed images as a ZIP archive and then explain how to publish the extension to Google Chrome WebStore. Basic extension structure Google Chrome Extension is a web application, that can contain any number of HTML pages, CSS stylesheets, JavaScript files, images, any other files and a file in the same folder, which defines how this particular extension will look and work. manifest.json Minimal Chrome extension Minimal Chrome Extension consists only of the file. This is an example of a basic file that can be used as a template when start creating any new Chrome extension: manifest.json manifest.json { "name": "Image Grabber", "description": "Extract all images from current web page", "version": "1.0", "manifest_version": 3, "icons": {}, "action": {}, "permissions": [], "background":{} } The only required parameters are , , and . should be equal to 3. Values of other parameters are up to you, they should clearly describe your extension and its version. In this example, I described the extension, which will extract links of all images from a current browser page. name description version manifest_version manifest_version Image Grabber You can see a full list of options that can be specified in the file in the . manifest.json official documentation A folder with a single file is a minimal runnable Chrome Extension that can be packaged, installed to Chrome, and distributed. This minimal extension will have a default look and will do nothing until we define other parameters: , , , and . manifest.json icons action permissions background So, let's create the folder and put the file with that default content. Then, let's just install this extension to Chrome. image_grabber manifest.json Install Chrome Extension When you develop an extension, it has a form of a folder with files. In Chrome extensions terms it is called . After you finish development, you will need to the extension folder to an archive with a extension using the Chrome extensions manager. This archive then can be used to upload to from which users can install your extension to their browsers. unpacked extension pack .crx Chrome Web Store To test and debug extension during development, you can install to Chrome. To do this, type in the browser's URL string to open the Chrome Extensions Manager. unpacked extension chrome://extensions To install and debug extensions during development turn on the switch on the right side of the Extensions panel. It will show extensions management panel: Developer mode Then press the button and select a folder with the extension. Point it to our minimal extension. Right after this, a panel for the Image Grabber extension will appear in a list of installed extensions: Load unpacked image_grabber The extension panel shows a unique ID, description, and version of the extension. Every time when changing the file, you need to press the icon on the extension panel to reload the updated extension: Image Grabber manifest.json Reload To use the extension in the browser, you can find it in a list of Chrome installed extensions. To see this list, press the icon button Extensions on the right side of the Chrome URL bar and find the 'Image Grabber' item in the dropdown list. You can also press the "Pin" icon button at the right side of the extension to place an icon of the extension to the browser toolbar on the same line with other common extensions: After the extension, its default icon will appear on the toolbar: Pin That's all. We installed the minimal working Chrome extension. However, it looks like a simple "I" symbol on a gray background and nothing happens when you click on it. Let's add other missing parts to the to change this. manifest.json Add extension icons The parameter in the file has a format of Javascript object, which defines locations of icons of various sizes. Extension should have icons of different sizes: 16x16 px, 32x32 px, 48x48 px and 128x128 px. Icons are ".PNG" images that should be placed anywhere in the extension folder. Image files can have any names. I have created 4 icons of appropriate sizes in 16.png, 32.png, 48.png, and 128.png files and put them into the folder inside the extension root folder. Then, should be pointed to these locations using the parameter in a way, as shown below: icons manifest.json icons manifest.json icons { "name": "Image Grabber", "description": "Extract all images from current web page", "version": "1.0", "manifest_version": 3, "icons": { "16":"icons/16.png", "32":"icons/32.png", "48":"icons/48.png", "128":"icons/128.png" }, "action": {}, "permissions": [], "background":{} } Paths to icon files are specified as relative paths. After this is done, press the button on the Image Grabber extension panel on the tab to apply changed . As a result, you should see that the icon of the extension on the toolbar changed, as displayed below: Reload chrome://extensions manifest.json Now it looks better, but if you press this icon, nothing happens. Let's add actions to this extension. Create the extension interface An extension should do something, it should run some actions to have a sense. The extension allows to run actions in two ways: In the background, when extension starts From an interface of the extension, when a user interacts with it using buttons or other UI controls The extension can use both options at the same time. To run actions in the background, you have to create a JS script and specify its location in the parameter of . This script can define listeners for a wide range of browser events, for example: when the extension is installed, when a user opens/closes a tab in a browser when the user adds/removes a bookmark, and many others. Then this script will run in the background all the time and react to each of these events by running Javascript code from event handling functions. background manifest.json For this extension, I will not use this feature, so the parameter of will be empty. It's included only to make the file to be useful as a starting template for a Chrome extension of any kind, but in the Image Grabber extension, the only action is "Grab images" and it will run only from a user interface when the user explicitly press the "GRAB NOW" button. background manifest.json manifest.json To run actions from the interface, we need to define an interface. Interfaces for Chrome extensions are HTML pages, which can be combined with CSS stylesheets to style these pages, and Javascript files, which define actions to run when the user interacts with elements of that interface. The main interface is an interface, displayed when the user clicks on the extension icon on the toolbar and it should be defined in the parameter of the file. Depending on how the interface is defined, it can be opened as a new tab in the browser or displayed as a popup window below the extension button, when the user presses it. action manifest.json The Image Grabber extension uses the second option. It displays a popup with a header and the "GRAB NOW" button. So, let's define this in the : manifest.json { "name": "Image Grabber", "description": "Extract all images from current web page", "version": "1.0", "manifest_version": 3, "icons": { "16":"icons/16.png", "32":"icons/32.png", "48":"icons/48.png", "128":"icons/128.png" }, "action": { "default_popup":"popup.html" }, "permissions": [], "background":{} } So, as defined here, the main interface is a popup window and the content of this popup window should be in the file. This file is an ordinary HTML page. So, create the file in the extension folder with the following content: popup.html popup.html <!DOCTYPE html> <html> <head> <title>Image Grabber</title> </head> <body> <h1>Image Grabber</h1> <button id="grabBtn">GRAB NOW</button> </body> </html> This is a simple page with the "Image Grabber" header and the "GRAB NOW" button which has a "grabBtn" id. Go to to the Image Grabber extension. Now you can press the extension icon to see the popup window with the interface: chrome://extensions reload It works but looks not enough perfect. Let's style it using CSS. Create the following file in the extension folder: popup.css body { text-align:center; width:200px; } button { width:100%; color:white; background:linear-gradient(#01a9e1, #5bc4bc); border-width:0px; border-radius:20px; padding:5px; font-weight: bold; cursor:pointer; } This CSS defines that the should have a width of 200px. This way the size of the popup window should be defined for a Chrome extension. If not defined, then the extension will use a minimum size required to display the content. body Then, add this stylesheet to the header of the page: popup.css popup.html <!DOCTYPE html> <html> <head> <title>Image Grabber</title> <link rel="stylesheet" type="text/css" href="popup.css"/> </head> <body> <h1>Image Grabber</h1> <button id="grabBtn">GRAB NOW</button> </body> </html> So, when all this is in place, you can click on the extension icon again to see the styled popup window: As you could notice, you do not need to extension every time when modify HTML or any other file. You have to reload the extension only when change the . reload manifest.json Now, to make our UI complete, let's add a Javascript code to react on the "GRAB NOW" button click event. Here is one important note, Chrome does not allow to have any inline Javascript in HTML pages of extensions. All Javascript code should be defined only in separate files. .js That is why create a file in the extensions folder with the following placeholder code: popup.js const grabBtn = document.getElementById("grabBtn"); grabBtn.addEventListener("click",() => { alert("CLICKED"); }) and include this script file to the page: popup.html <!DOCTYPE html> <html> <head> <title>Image Grabber</title> <link rel="stylesheet" type="text/css" href="popup.css"/> </head> <body> <h1>Image Grabber</h1> <button id="grabBtn">GRAB NOW</button> <script src="popup.js"></script> </body> </html> This code adds the event listener to a button with ID. Now, if you open the extension popup and click the "GRAB NOW" button, it should display an alert box with "CLICKED" text. onClick grabBtn Finally, we have a complete layout of an extension with a styled interface and event handling script for it. At the current stage, this is an extension, that can be used as a base template to start building a wide range of Chrome extensions, based on a popup user interface. Now let's implement a "business logic" of this concrete extension - the onClick handler for the "GRAB NOW" button to get a list of image URLs from the current browser page and copy it to a clipboard. Implement the "GRAB NOW" function Using Javascript in extension you can do everything that you can do using Javascript on a website: open other HTML pages from current one, make requests to a remote servers, upload data from extension to the remote locations and whatever else. But in addition to this, if this script executed in a chrome extension, you can use Chrome browser APIs to communicate with the browser objects: to read from them and to change them. Most of Google Chrome APIs available through namespace. In particular, for Image Grabber extension we will use the following APIs: chrome - Chrome Tabs API. It will be used to access an active tab of the Chrome browser. chrome.tabs - Chrome Scripting API. It will be used to inject and execute JavaScript code on a web page, that opened in the active browser tab. chrome.scripting Obtain required permissions By default, for security reasons, Chrome does not permit access to all available APIs. The extension should declare, which permissions it requires in the parameter of the . There are many permissions that exist, all they described in the official documentation here: permissions manifest.json . For Image Grabber we need two permissions with the following names: https://developer.chrome.com/docs/extensions/mv3/declare_permissions/ - to obtain access to the active tab of a browser activeTab - to obtain access to the Chrome Scripting API to inject and execute JavaScript scripts in different places of the Chrome browser. scripting To obtain those permissions, need to add their names to the array parameter of the : permissions manifest.json { "name": "Image Grabber", "description": "Extract all images from current web page", "version": "1.0", "manifest_version": 3, "icons": { "16":"icons/16.png", "32":"icons/32.png", "48":"icons/48.png", "128":"icons/128.png" }, "action": { "default_popup":"popup.html", }, "permissions": ["scripting", "activeTab"], "background":{} } and the extension on panel. reload chrome://extensions This is a final for this project. Now, it has all required parts: icons, link to the main popup interface, and the permissions, that this interface requires. manifest.json Get information about the active browser tab To query information about browser tabs, we will use the function, which has the following signature: chrome.tabs.query chrome.tabs.query(queryObject,callback) The is a Javascript object with parameters that define search criteria for browser tabs, which we need to get. queryObject The - is a function, that is called after the query is complete. This function is executed with a single parameter , which is an array of found tabs, that meet specified search criteria. Each element of the array is a object. The object describes the found tab and contains a unique ID of the tab, its title, and other information. callback tabs tabs Tab Tab Here I will not completely describe format and the returned object. You can find this information in a API reference here: queryObject Tab chrome.tabs . https://developer.chrome.com/docs/extensions/reference/tabs/ For the purpose of the extension, we need to query the tab which is active. The query to search this kind of tab is . Image Grabber {active: true} Let's write a code to get information about the active tab to the "GRAB NOW" button onClick handler: const grabBtn = document.getElementById("grabBtn"); grabBtn.addEventListener("click",() => { chrome.tabs.query({active: true}, (tabs) => { const tab = tabs[0]; if (tab) { alert(tab.id) } else { alert("There are no active tabs") } }) }) This code executes a query to get all tabs that are . After the query is finished, it calls a callback with an array of found tabs in the argument. Only one tab can be active, so we can assume that this is the first and only item of the array. If the active tab exists, we show an ID of that tab in an alert box (we will replace this alert with reasonable code in the next section). However, if there are no active tabs, we alert the user about that. active tabs tabs Now, if you open the extension and press the "GRAB NOW" button, it should show an alert window with a numeric ID of the active tab. In the next section, we will use this ID to manipulate the content of a web page, displayed on that tab. Grab images from the current page The extension can communicate with open pages of the Chrome browser using Chrome Scripting JavaScript API, located in the namespace. In particular, we will use this API to inject a script to a web page of the current tab, execute this script and return the result back to the extension. When running, it has access to all content of a web page, to which this script is injected. chrome.scripting The only function of API which is used for this extension is . It has the following signature: chrome.scripting executeScript chrome.scripting.executeScript(injectSpec,callback) injectSpec This is an object of type. It defines where and how to inject the script. parameter of this object is used to specify "where" to inject the script - the ID of the browser tab to which the script should be injected. Then other parameters of this object define "how" to inject the script. The script can be injected as: ScriptInjection target file or files - in this case, need to specify an array of Javascript files to inject. The files should exist in the extension folder. function - in this case, need to specify a function to inject. The function should exist in the same ( ) file. popup.js The script, which we need to inject will be used to get all images of a target page and return their URLs. This is a small script, so we will inject it as a function, located in the same file. So, for this case will look like this: popup.js injectSpec { target:{ tabId: tab.id, allFrames: true }, func: grabImages, }, Here we use the id of the object, that we received in the previous step as a target to inject script to. Also, there is a option set, which tells that the injected script should be executed in each embedded frame of the target page if that page has embedded frames. As a script, we will inject a function which will be defined later. tab allFrames grabImages callback The injected function will do actions on a target web page and on all embedded frames of this page (each frame is a separate page as well) and will return the result. After this happens, the extension will execute the function with returned results as an argument. An argument of the function is an array of objects of type for each frame. Each object contains the "result" property, which is an actual result, that the function returns. callback InjectionResult grabImages Now, let's join all parts together: const grabBtn = document.getElementById("grabBtn"); grabBtn.addEventListener("click",() => { chrome.tabs.query({active: true}, function(tabs) { var tab = tabs[0]; if (tab) { chrome.scripting.executeScript( { target:{tabId: tab.id, allFrames: true}, func:grabImages }, onResult ) } else { alert("There are no active tabs") } }) }) function grabImages() { // TODO - Query all images on a target web page // and return an array of their URLs } function onResult(frames) { // TODO - Combine returned arrays of image URLs, // join them to a single string, delimited by // carriage return symbol and copy to a clipboard } Then, this is how the function is implemented: grabImages /** * Executed on a remote browser page to grab all images * and return their URLs * * @return Array of image URLs */ function grabImages() { const images = document.querySelectorAll("img"); return Array.from(images).map(image=>image.src); } This function will run on a target web page, so, the , specified inside it is a document DOM node of a target web page. This function queries a list of all nodes from a document, then, converts this list to an array and returns an array of URLs (image.src) of these images. This is a very raw and simple function, so as homework you can customize it: apply different filters to this list, cleanup URLS, by removing "query" strings from them, and so on, to make a resulting list look perfect. document img After this function is executed in each frame of the target web page, result arrays will be combined and sent to the callback function, which could look like this: onResult /** * Executed after all grabImages() calls finished on * remote page * Combines results and copy a list of image URLs * to clipboard * * @param {[]InjectionResult} frames Array * of grabImage() function execution results */ function onResult(frames) { // If script execution failed on the remote end // and could not return results if (!frames || !frames.length) { alert("Could not retrieve images from specified page"); return; } // Combine arrays of the image URLs from // each frame to a single array const imageUrls = frames.map(frame=>frame.result) .reduce((r1,r2)=>r1.concat(r2)); // Copy to clipboard a string of image URLs, delimited by // carriage return symbol window.navigator.clipboard .writeText(imageUrls.join("\n")) .then(()=>{ // close the extension popup after data // is copied to the clipboard window.close(); }); } Not all tabs that opened in the browser are tabs with web pages inside. For example, a tab with a list of extensions, or a tab with browser settings are not tabs with web pages. If you try to run a script with the object on these tabs it will fail and return nothing. That is why at the beginning of the function we check the result and continue only if it exists. Then we combine arrays of image URLs returned for each frame to a single array by using map/reduce combination and then, use API to copy joined to string array to a clipboard. function is asynchronous, so we have to wait until it finishes by resolving a promise, that it returns. And when it is resolved, we close the popup window of the extension. document onResult window.navigator.clipboard writeText I have explained only a single function of Chrome scripting API and only in the context of the Image Grabber extension. You can see the full documentation for Chrome Scripting API to clarify all missing parts: . https://developer.chrome.com/docs/extensions/reference/scripting/ Code cleanup The last thing that I would do with the code, that handles the "GRAB NOW" onClick event, is to extract a code that does to a separate function: chrome.scripting const grabBtn = document.getElementById("grabBtn"); grabBtn.addEventListener("click",() => { // Get active browser tab chrome.tabs.query({active: true}, function(tabs) { var tab = tabs[0]; if (tab) { execScript(tab); } else { alert("There are no active tabs") } }) }) /** * Function executes a grabImages() function on a web page, * opened on specified tab * @param tab - A tab to execute script on */ function execScript(tab) { // Execute a function on a page of the current browser tab // and process the result of execution chrome.scripting.executeScript( { target:{tabId: tab.id, allFrames: true}, func:grabImages }, onResult ) } And the final content of is following: popup.js const grabBtn = document.getElementById("grabBtn"); grabBtn.addEventListener("click",() => { // Get active browser tab chrome.tabs.query({active: true}, function(tabs) { var tab = tabs[0]; if (tab) { execScript(tab); } else { alert("There are no active tabs") } }) }) /** * Execute a grabImages() function on a web page, * opened on specified tab and on all frames of this page * @param tab - A tab to execute script on */ function execScript(tab) { // Execute a function on a page of the current browser tab // and process the result of execution chrome.scripting.executeScript( { target:{tabId: tab.id, allFrames: true}, func:grabImages }, onResult ) } /** * Executed on a remote browser page to grab all images * and return their URLs * * @return Array of image URLs */ function grabImages() { const images = document.querySelectorAll("img"); return Array.from(images).map(image=>image.src); } /** * Executed after all grabImages() calls finished on * remote page * Combines results and copy a list of image URLs * to clipboard * * @param {[]InjectionResult} frames Array * of grabImage() function execution results */ function onResult(frames) { // If script execution failed on remote end // and could not return results if (!frames || !frames.length) { alert("Could not retrieve images from specified page"); return; } // Combine arrays of image URLs from // each frame to a single array const imageUrls = frames.map(frame=>frame.result) .reduce((r1,r2)=>r1.concat(r2)); // Copy to clipboard a string of image URLs, delimited by // carriage return symbol window.navigator.clipboard .writeText(imageUrls.join("\n")) .then(()=>{ // close the extension popup after data // is copied to the clipboard window.close(); }); } Conclusion After this is done, you can open any browser web page with images, click on extension to open its popup interface and then click the "GRAB NOW" button. Then, paste the clipboard content to any text editor. It should paste a list of absolute URLs of all images from that web page. Image Grabber You can clone and use the full source code of this extension from my GitHub repository: . However, I would recommend creating this extension from scratch while reading this article. https://github.com/AndreyGermanov/image_grabber This is only the first part of the tutorial, related to this extension. In a second part, I will use this list of image URLs to build an additional interface for this extension, that will allow downloading all or selected images from this list as a single ZIP archive. This is definitely more useful than just having a list of URLs in the clipboard. Also, I will show how to package the completed extension and upload it to the Chrome Web Store which will make it available for anyone. Feel free to connect and follow me on social networks where I publish announcements about my articles, similar to this one and other software development news: LinkedIn: Facebook: Twitter: https://www.linkedin.com/in/andrey-germanov-dev/ https://web.facebook.com/AndreyGermanovDev https://twitter.com/GermanovDev My online services website: https://germanov.dev Happy coding guys! Also Published Here