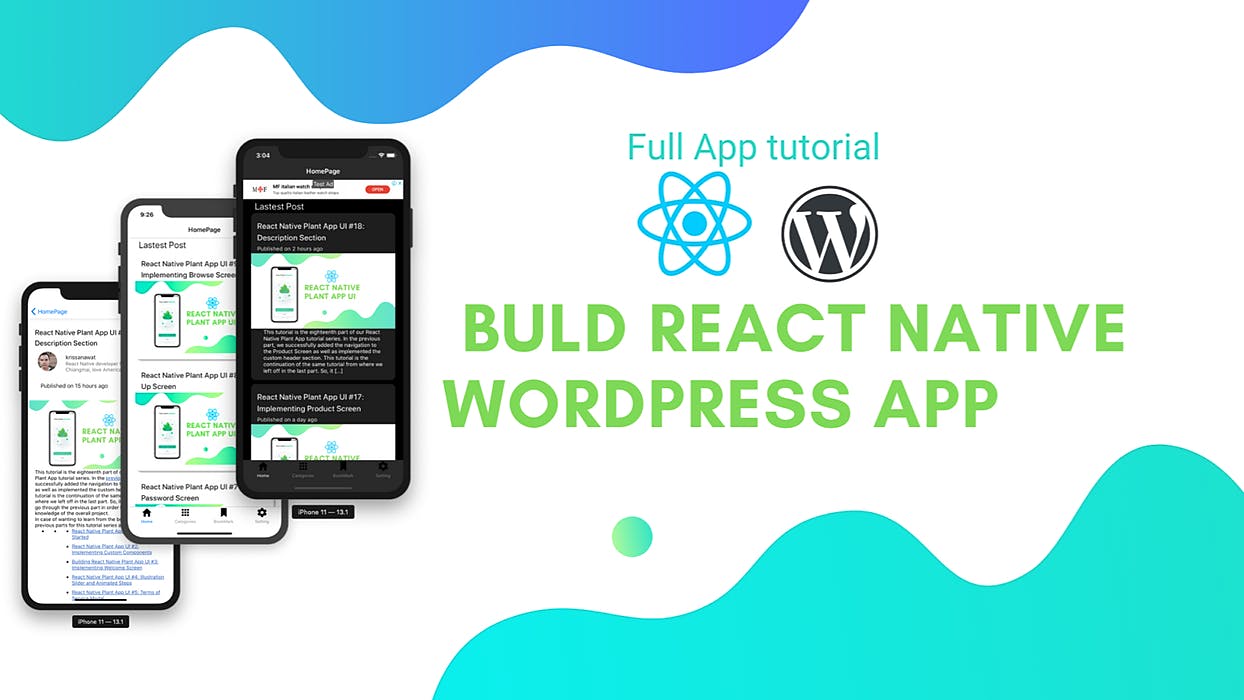
This series intends to show how I build an app to serve content from my WordPress blog by using react-native. Since my blog is talking about react-native, the series and the articles are interconnected. We will learn how to set-up many packages that make our lives comfortable and learn how to deal with WordPress APIs. Here, the most prominent features talked about in the book are the dark theme, offline mode, infinite scroll and many more. You can discover much more in this series. this inspiration to do this tutorial series came from the from instamobile React Native App Templates Here, we are going to implement the overall UI for the Home Screen in the file. Here, we are going to simply fetch data from the WordPress API and display the data on the Home screen as . We are also going to make use of package using provides us with numerous useful components. But, first, we need to install the react-native-paper package as shown in the code snippet below: Home.js FlatList react-native-paper yarn add react-native-paper Then, we can link the package to our native platforms using the configuration that we learned before while installing other packages Then, we need to import the components from the as shown in the code snippet below: react-native-paper { Avatar, Button, Card, Title, Paragraph, List, Headline, } ; import from 'react-native-paper' In render function, we are going to make use of the components from the package in order to form a list template. For that, we need to use the code from the following code snippet: react-native-paper render() { ( <Card style={{ shadowOffset: {width: 5, height: 5}, width: '90%', borderRadius: 12, alignSelf: 'center', marginBottom: 10, }}> <Card.Content> <Title>Blog post</Title> <Card.Cover style={{ width: 350, height: 190, alignSelf: 'center', }} source={{ uri: 'https://images.unsplash.com/photo-1573921470445-8d99c48c879f?ixlib=rb-1.2.1&ixid=eyJhcHBfaWQiOjEyMDd9&auto=format&fit=crop&w=1050&q=80', }} /> <Paragraph>just a blog post</Paragraph> </Card.Content> </Card> </View> ); } return < > View Here, we made use of the Card component as parent component which wraps its sub-components. All the components have some styles integrated into them in order to make them look good. Hence, we will get the following result in the emulator screen: Fetching Post Data Next, we are going to fetch the posts from the Wordpress API using the method. After fetching, we are going to parse the response into JSON format and configure it to the state called . The coding implementation is in the function called whose overall configuration is provided in the code snippet below: fetch() latestpost fetchLastestPost() componentDidMount() { .fetchLastestPost(); } fetchLastestPost() { response = fetch( ); post = response.json(); .setState({ : post}); } this async const await 'https://kriss.io/wp-json/wp/v2/posts?per_page=5' const await this lastestpost Here, we made an asynchronous call to the WordPress API from the function. Here, we have called the function in he function. Now, we also need to define the state called as shown in the code snippet below: componentDidMount lastestpost { (props) { (props); .state = { : [] }; export default . class Home extends React Component constructor super this lastestpost The data from the request is shown in the screenshot below: The data we are going to show in the template are highlighted using the red line. Next, we are going to wrap the component with component and feed the API data into the . Then, the component template will be returned by the . But first, we need to import the component as shown in the code snippet below: Card FlatList FlatList Card FlatList FlatList {View, Text, FlatList} ; import from 'react-native' Now, we are going to use the lastestpost state data into the as shown in the code snippet below: FlatList <Headline style={{ : }}>Lastest Post< Title> <Card.Cover source={{ uri: item.jetpack_featured_media_url }} /> </Card> marginLeft 30 /Headline> <FlatList data={this.state.lastestpost} renderItem={({ item }) => ( <Card style={{ shadowOffset: { width: 5, height: 5 }, width: '90%', borderRadius: 12, alignSelf: 'center', marginBottom: 10, }}> <Card.Content> <Title>{item.title.rendered}</ </ > Card.Content )} keyExtractor={item => item.id} /> Hence, we will get the following result in our emulator screens: Summary In this chapter, we learned how to implement the overall UI of the Home screen tab using the package. We also learned how to fetch the data from the WordPress server using the fetch method. react-native-paper