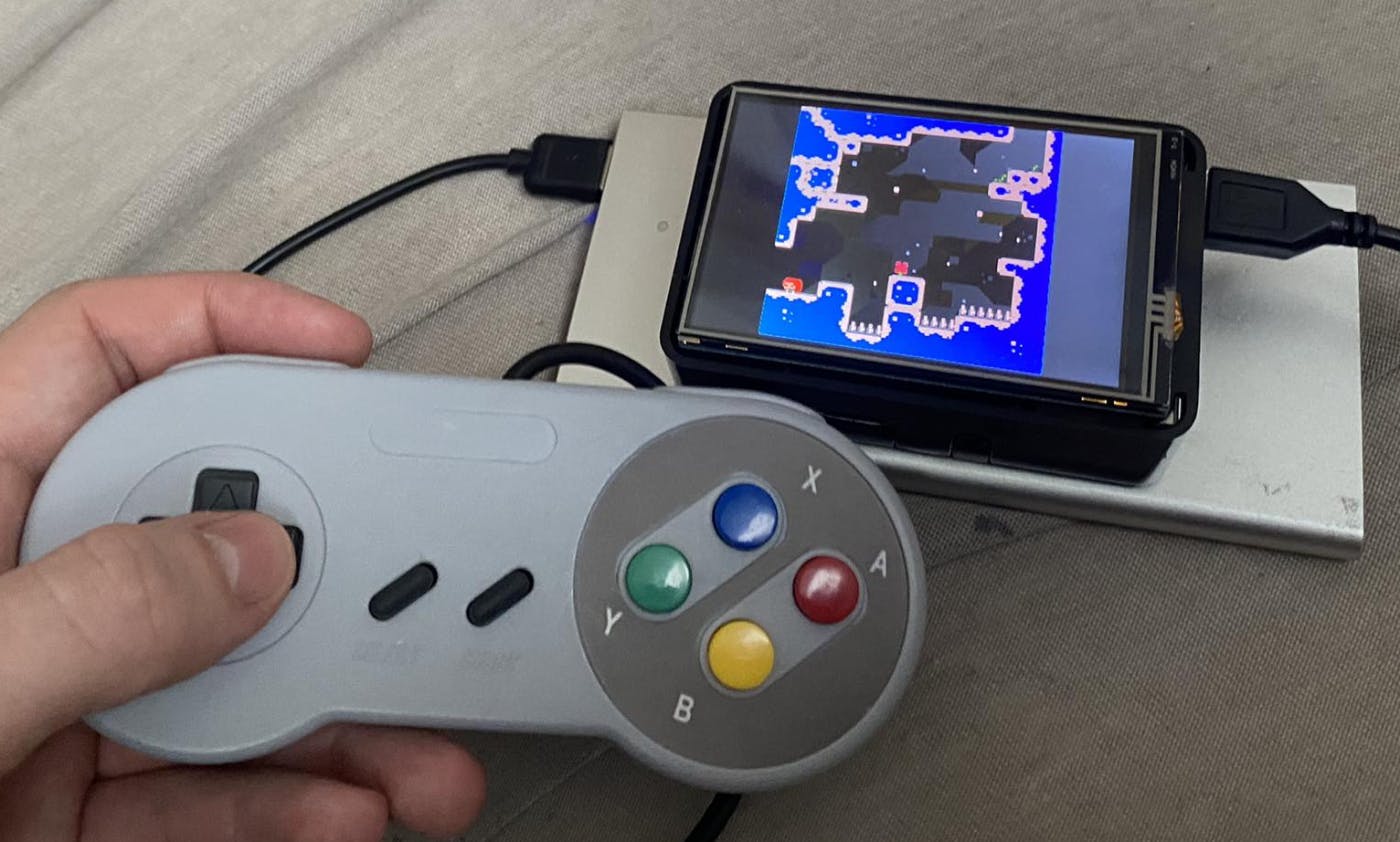
Introduction Pico-8 (p8) is a fantasy console, which its creators describe as “ “[1] like a regular console, but without the inconvenience of actual hardware. PICO-8 has everything else that makes a console a console: machine specifications and display format, development tools, design culture, distribution platform, community and playership. It is similar to a retro game emulator, but for a machine that never existed. Pico-8 is the most popular fantasy console, but many fantasy consoles have their own ideas and fanbases, to name a few: Tic-80, Pixel Vision 8 (no longer developed), pyxel, Lico-12, Wasm4, and others. In this guide, I will describe how I created the hardware for this console. Hardware parts are mostly from Aliexpress, and I tried to make it very easy to set up. But the hardware is not important. This tutorial brings the most value in describing the software process because I had to gather each part from different forums, YouTube videos, and random Reddit posts. Fantasy consoles are fairly new and niche hobby, so the documentation is not where it could be. Pico-8 is not a full-fledged OS, so I used because it can be controlled only via a controller once it's configured. Retropie is based on [2], and you can interact with it via SSH and SFTP, which makes it easier. Retropie Raspbian Components These are the components I used. They are not mandatory; you can use any Raspberry unit, monitor, and controller. 15$ - Raspberry Pi 3 Touch Screen Display 480x320 TFT 3.5" LCD - https://www.aliexpress.com/item/1005004739067617.html 35$ - Raspberry Pi 3 - https://cz.mouser.com/ProductDetail/Raspberry-Pi/SC0073 0$Usually included with RPi - Micro USB cable for RPi 0$ Usually included with RPi - Micro SD card 5$ Any USB controller 10$ Any PowerBank Also, you will need an external monitor, keyboard, and SD card reader for initial setup. Setup Without further ado, let’s head into the tutorial part. Retropie Official documentation: https://retropie.org.uk/docs/First-Installation/ Download the ISO image from here: https://retropie.org.uk/download/ I used to create a bootable SD card. Rufus Insert the card into RPi and connect to power, an external monitor, and a keyboard. You now should be in Emulstation UI. Register default bindings for the keyboard and controller. If you don’t have an ethernet cable: Hit f4 type raspi-config Connect to your WLAN. Install the core lr-retro8 To run P8 games within Retropie, you need an emulator and the RetroArch engine, which is responsible for managing them. Retroarch calls these emulators cores. The core we will use is named , it is a community-made core for Pico-8 that enables running p8 carts from the Emulstation UI. Retropie will handle handy things like support for many controllers and the easy addition of a new cartridge. lr-retro8 This core is free, but I would recommend supporting the original Pico-8 by buying it. It costs only 15$! Buy it at . https://www.lexaloffle.com/pico-8.php?#getpico8 This feature is not documented, or I didn’t find it. I found this post from 2021: , where it described how to add lr-retro8 core manually. I guess somebody added it to the normal Retropie-Setup script because I found it in the source code with the default image. https://retropie.org.uk/forum/topic/30965/pico-8-retroarch-lr-retro8-core-installation-script Go to Retropie setup. Go to Manage packages Click , which are experimental packages for RetroArch. exp Install lr-retro8 Reboot Adding cartridges Go to . https://www.lexaloffle.com/bbs/?cat=7&carts_tab=1#sub=2&mode=carts&orderby=featured Select the game you want and click on the cart image in the bottom left corner. It will redirect you to PNG, in which the game is embedded. Example: . https://www.lexaloffle.com/bbs/cposts/so/sokoblox-0.p8.png Download the PNG. Transfer it via SFTP from your Windows Explorer, or add it directly to your SD Card. The path is roms/pico8/ If you don’t see Retropie in your file explorer, follow this tutorial: https://retropie.org.uk/docs/Transferring-Roms/ Install drivers for the LCD35 Repository: https://github.com/goodtft/LCD-show The display I bought needs special drivers; otherwise, you will see only white output: Either enable SSH to your RPi and connect with user: pi password: raspberry Or hit on keyboard. f4 Type the following commands: sudo rm -rf LCD-show git clone https://github.com/goodtft/LCD-show.git cd LCD-show/ sudo ./LCD35-show Reboot This might break the connection to your normal HDMI monitor, but the mini display should work. Disclaimer: Result Now you can play your Pico-8 games. I will be honest, and these are my impressions: Is it playable? Definitely! The display is laggy, and it looks like you are playing on 20 FPS. You have no simple way to turn off this console properly, and turning it off by disconnecting the power cable sometimes corrupts cartridges. Is it a good player experience? Not so much. Investing more into this project is a way to go, but if you have more $ lying around and want to play pico-8 on a handheld. Buy something like Miyoo Mini Plus[2]. These consoles usually don’t support p8 games immediately, but you should be able to get it running with some tweaking. If you want to run p8 games on Raspberry Pi or extend your existing Retropie station, this tutorial will help. Resources [1]: https://www.lexaloffle.com/pico-8.php?page=faq [2]: https://miyoominiv2.com/ [3]: https://retropie.org.uk/forum/topic/30736/how-to-install-pico-8-on-a-raspberry-pi-3-or-4-for-dummies-2021-version [4]: https://retropie.org.uk/forum/topic/30965/pico-8-retroarch-lr-retro8-core-installation-script [5]: Nice video about P8 - https://www.youtube.com/watch?v=xqgvmDOKKE4&t=635s [6]: Similiar approach - https://www.youtube.com/watch?v=lEECUe_t51o&t=345s