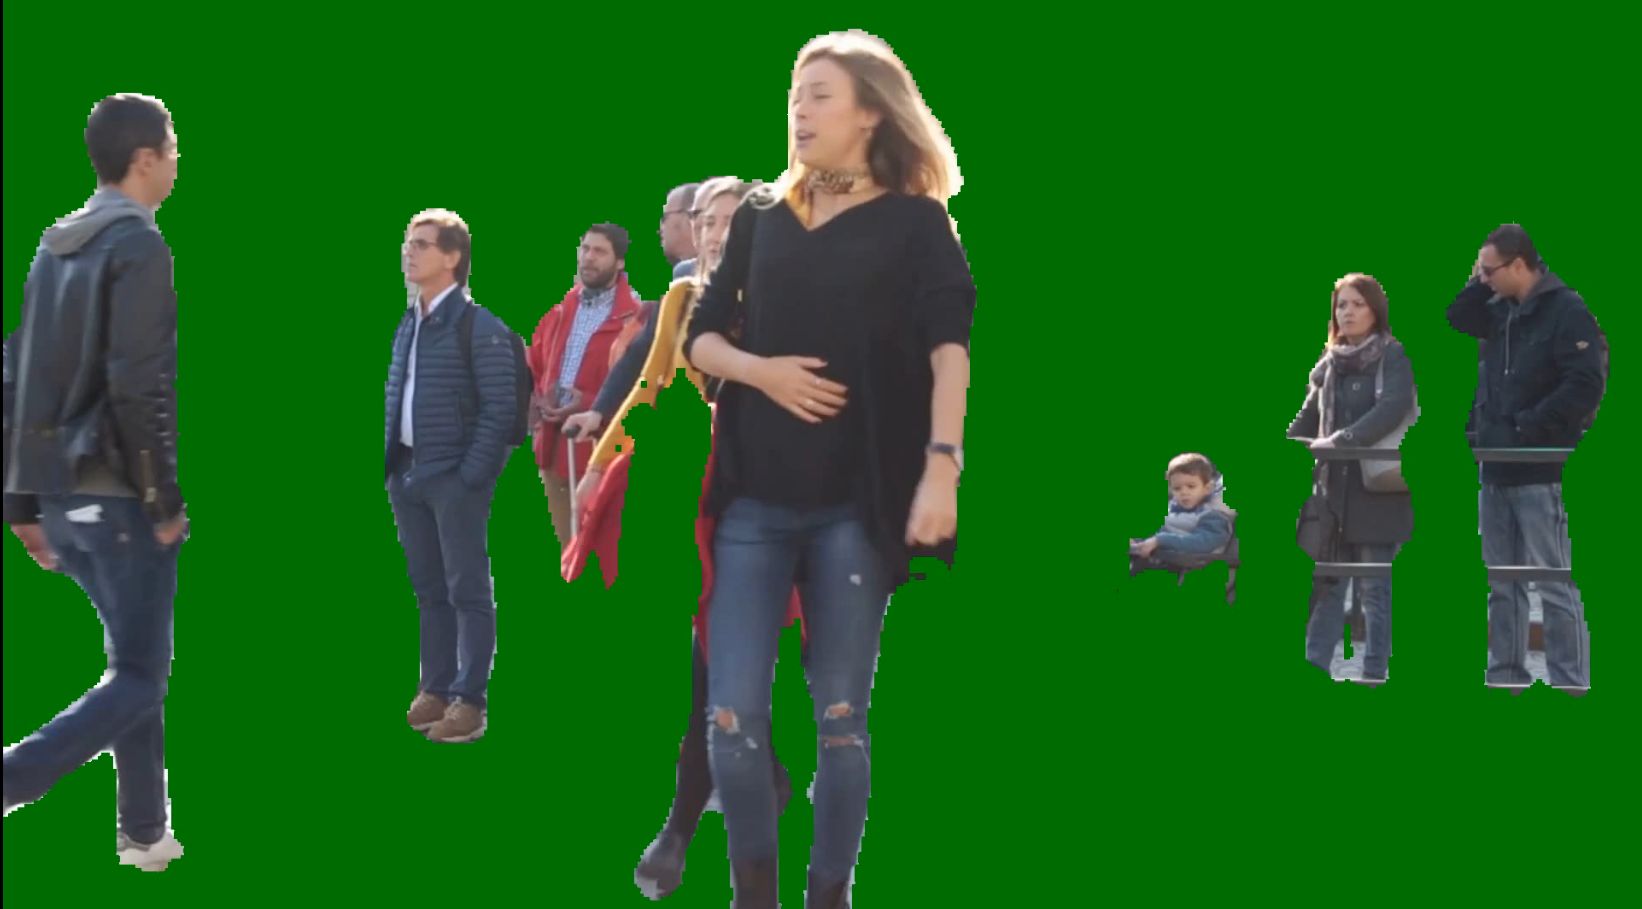
PixelLib is a library created to enable easy implementation of object segmentation in real life applications. PixelLib supports image tuning, which is the ability to alter the background of any image. PixelLib now supports video tuning, which is the ability to alter the background of videos and camera’s feeds. PixelLib employs the technique of object segmentation to perform excellent foreground and background subtraction. PixelLib makes use of deeplabv3+ model trained on pascalvoc dataset and the dataset supports 20 object categories. person,bus,car,aeroplane, bicycle, ,motorbike,bird, boat, bottle, cat, chair, cow, dinningtable, dog, horse pottedplant, sheep, sofa, train, tv Background effects supported are as follows: Changing the background of an image with a picture 1 Assigning a distinct color to the background of an image and a video. 2 Blurring the background of an image and a video. 3 Grayscaling the background of an image of an image and a video. 4 Creating a virtual background for a video. 5 Install PixelLib and its dependencies: Install Tensorflow with:(PixelLib supports tensorflow 2.0 and above) pip3 install tensorflow Install PixelLib with pip3 install pixellib If installed, upgrade to the latest version using: pip3 install pixellib — upgrade Detection of a target object In some applications, you may want to target the detection of a particular object in an image or a video. The deeplab model by default detects all the objects it supports in an image or video. It is now possible to filter out unused detections and target a particular object in an image or a video. source We intend to blur the background of the image above. Code to blur image’s background pixellib pixellib.tune_bg alter_bg change_bg = alter_bg(model_type = ) change_bg.load_pascalvoc_model( ) change_bg.blur_bg( , extreme = , output_image_name= ) import from import "pb" "xception_pascalvoc.pb" "sample.jpg" True "output_img.jpg" Our goal is to completely blur the background of the person in this image, but we are not satisfied with the presence of other objects. Therefore, there is need to modify the code to detect a target object. pixellib pixellib.tune_bg alter_bg change_bg = alter_bg(model_type = ) change_bg.load_pascalvoc_model( ) change_bg.blur_bg( , extreme = , output_image_name= , detect = ) import from import "pb" "xception_pascalvoc.pb" "sample.jpg" True "output_img.jpg" "person" It is still the same code except we introduced an extra parameter in the function. detect blur_bg change_bg.blur_bg( , extreme = , output_image_name= , detect = ) "sample.jpg" True "output_img.jpg" "person" This is the parameter that determines the target object to be detected. The value of detect is set to . This means that the model will detect only person in the image. detect: person This is the new image with only our target object shown. If we intend to show only the cars present in this image, we just have to change the value of from to detect person car . change_bg.blur_bg( , extreme = , output_image_name= , detect = ) "sample.jpg" True "output_img.jpg" "car" Color background of target object Target detections can be done with color effect. change_bg.color_bg( , colors = ( , , ), output_image_name= , detect = ) "sample.jpg" 0 128 0 "output_img.jpg" "person" Change the background of a target object with a new picture background image source change_bg.change_bg_img( , , output_image_name= , detect = ) "sample.jpg" "background.jpg" "output_img.jpg" "person" Grayscale the background of a target object change_bg.gray_bg( , output_image_name= , detect = ) "sample.jpg" "output_img.jpg" "person" Read this to have a comprehensive knowledge about background editing in images with PixelLib. article Video tuning with PixelLib Video tuning is the ability to alter the background of any video. Blur Video background PixelLib makes it convenient to blur the background of any video using just five lines of code. sample_video code to blur the background of a video file pixellib pixellib.tune_bg alter_bg change_bg = alter_bg(model_type = ) change_bg.load_pascalvoc_model( ) change_bg.blur_video( , extreme = , frames_per_second= , output_video_name= ) import from import "pb" "xception_pascalvoc.pb" "sample_video.mp4" True 10 "blur_video.mp4" pixellib pixellib.tune_bg alter_bg change_bg = alter_bg(model_type = ) change_bg.load_pascalvoc_model( ) import from import "pb" "xception_pascalvoc.pb" We imported pixellib, and from pixellib we imported in the class . Instance of the class was created, and within the class, we added a parameter and set it to We finally called the function to load the model. alter_bg model_type pb . PixelLib supports two types of deeplabv3+ models, keras and tensorflow models. The keras model is extracted from the tensorflow model’s checkpoint. The tensorflow model performs better than the keras model extracted from its checkpoint. We will make use of tensorflow model. Download the tensorflow model from . Note: here There are three parameters that determine the degree to which the background is blurred. When it is set to true, the background is blurred slightly. low: When it is set to true, the background is moderately blurred. moderate: When it is set to true, the background is deeply blurred. extreme: change_bg.blur_video( , extreme = , frames_per_second= , output_video_name= , detect = ) "sample_video.mp4" True 10 "blur_video.mp4" "person" This is the line of code that blurs the video’s background. This function takes in five parameters: This is the path to the video file we want to blur its background. video_path: It is set to true and the background of the video would be extremely blurred. extreme: This is the parameter to set the number of frames per second for the output video file. In this case, it is set to 10 i.e the saved video file will have 10 frames per second. frames_per_second: This is the saved video. The output video will be saved in your current working directory. output_video_name: This is the parameter that chooses the target object in the video. It is set to . detect: person output video Blur the Background of Camera’s Feeds pixellib pixellib.tune_bg alter_bg cv2 capture = cv2.VideoCapture( ) change_bg = alter_bg(model_type = ) change_bg.load_pascalvoc_model( ) change_bg.blur_camera(capture, frames_per_second= ,extreme = , show_frames = , frame_name = , check_fps = , output_video_name= , detect = ) import from import import 0 "pb" "xception_pascalvoc.pb" 10 True True "frame" True "output_video.mp4" "person" cv2 capture = cv2.VideoCapture( ) import 0 We imported cv2 and included the code to capture camera’s frames. change_bg.blur_camera(capture, extreme = , frames_per_second= , output_video_name=”output_video.mp4 person True 5 ", show_frames= True,frame_name= “frame”, check_fps = True, detect = " ") In the code for blurring camera’s frames, we replaced the video’s filepath to capture i.e we are going to process a stream of camera’s frames instead of a video file.We added extra parameters for the purpose of showing the camera’s frames: This is the parameter that handles showing of blurred camera’s frames. show_frames: This is the name given to the shown camera’s frame. frame_name: If you want to check the number of frames processed, just set the parameter check_fps to true.It will print out the number of frames per seconds. In this case, it is 30 frames per second. check_fps: Output Video Wow! PixelLib successfully blurred my background in the video. Create a Virtual Background for a Video PixelLib makes it super easy to create a virtual background for any video, and you can make use of any image to create a virtual background for a video. sample video Image to serve as background for a video pixellib pixellib.tune_bg alter_bg change_bg = alter_bg(model_type= ) change_bg.load_pascalvoc_model( ) change_bg.change_video_bg( , , frames_per_second = , output_video_name= , detect = ) import from import "pb" "xception_pascalvoc.pb" "sample_video.mp4" "space.jpg" 10 "output_video.mp4" "person" change_bg.change_video_bg(“sample_video.mp4”, “bg.jpg”, frames_per_second = , output_video_name=”output_video.mp4 10 ", detect = “person”) It is still the same code except we called the function to create a virtual background for the video. The function takes in the path of the image we want to use as background for the video. change_video_bg Output Video Beautiful demo! We are able to successfully create a virtual space background for the video. Create a Virtual Background for Camera’s Feeds pixellib pixellib.tune_bg alter_bg cv2 cap = cv2.VideoCapture( ) change_bg = alter_bg(model_type= ) change_bg.load_pascalvoc_model( ) change_bg.change_camera_bg(cap, , frames_per_second = , show_frames= , frame_name= , output_video_name= , detect = ) import from import import 0 "pb" "xception_pascalvoc.pb" "space.jpg" 5 True "frame" "output_video.mp4" "person" change_bg.change_camera_bg(cap, “space.jpg”, frames_per_second = , show_frames= , frame_name=”frame”, output_video_name=”output_video.mp4 5 True ", detect = “person”) It is similar to the code we used to blur camera’s frames. The only difference is that we called the function . We performed the same routine, replaced the video’s filepath to capture, and added the same parameters. change_camera_bg Output Video Wow! PixelLib successfully created a virtual background for my video. Color Video background PixelLib makes it possible to assign any color to the background of a video. code to color the background of a video file pixellib pixellib.tune_bg alter_bg change_bg = alter_bg(model_type = ) change_bg.load_pascalvoc_model( ) change_bg.color_video( , colors = ( , , ), frames_per_second= , output_video_name= , detect = ) import from import "pb" "xception_pascalvoc.pb" "sample_video.mp4" 0 128 0 10 "output_video.mp4" "person" change_bg.color_video( , colors = ( , , ), frames_per_second= , output_video_name= , detect = ) "sample_video.mp4" 0 128 0 15 "output_video.mp4" "person" It is still the same code, except we called the function to give the video’s background a distinct color. The function takes the parameter and colors’s RGB value is set to green. The RGB value of green color is (0, 128, 0). color_video color_bg colors, output video change_bg.color_video( , colors = ( , , ), frames_per_second= , output_video_name= , detect = ) "sample_video.mp4" 0 128 0 15 "output_video.mp4" "person" The same video with a white background Color the Background of Camera’s Feeds pixellib pixellib.tune_bg alter_bg cv2 capture = cv2.VideoCapture( ) change_bg = alter_bg(model_type = ) change_bg.load_pascalvoc_model( ) change_bg.color_camera(capture, frames_per_second= ,colors = ( , , ), show_frames = , frame_name = , check_fps = , output_video_name= , detect = ) import from import import 0 "pb" "xception_pascalvoc.pb" 15 0 128 0 True "frame" True "output_video.mp4" "person" change_bg.color_camera(capture, frames_per_second= ,colors = ( , , ), show_frames = , frame_name = “frame”, check_fps = ,output_video_name=”output_video.mp4 person 10 0 128 0 True True ", detect = " ") It is similar to the code we used to create a virtual background for camera’s frames. The only difference is that we called the function . We performed the same routine, replaced the video’s filepath to capture, and added the same parameters. color_camera Output Video Beautiful demo! My background was successfully colored green with PixelLib. Grayscale Video background code to grayscale the background of a video file pixellib pixellib.tune_bg alter_bg change_bg = alter_bg(model_type = ) change_bg.load_pascalvoc_model( ) change_bg.gray_video( , frames_per_second= , output_video_name= , detect = ) import from import "pb" "xception_pascalvoc.pb" "sample_video.mp4" 10 "output_video.mp4" "person" change_bg.gray_video( , frames_per_second= , output_video_name= , detect = ) "sample_video.mp4" 10 "output_video.mp4" "person" output video The background of the video would be altered and the objects present would maintain their original quality. Note: Grayscale the Background of Camera’s Feeds pixellib pixellib.tune_bg alter_bg cv2 capture = cv2.VideoCapture( ) change_bg = alter_bg(model_type = ) change_bg.load_pascalvoc_model( ) change_bg.gray_camera(capture, frames_per_second= , show_frames = , frame_name = , check_fps = , output_video_name= , detect = ) import from import import 0 "pb" "xception_pascalvoc.pb" 10 True "Ayo" True "output_video.mp4" "person" It is similar to the code we used to color camera’s frames. The only difference is that we called the function . We performed the same routine, replaced the video filepath to capture, and added the same parameters. gray_camera Visit PixelLib’s official github repository Visit PixelLib’s offical documentation Reach to me via: Email: olafenwaayoola@gmail.com Linkedin: Ayoola Olafenwa Twitter: @AyoolaOlafenwa Facebook: Ayoola Olafenwa