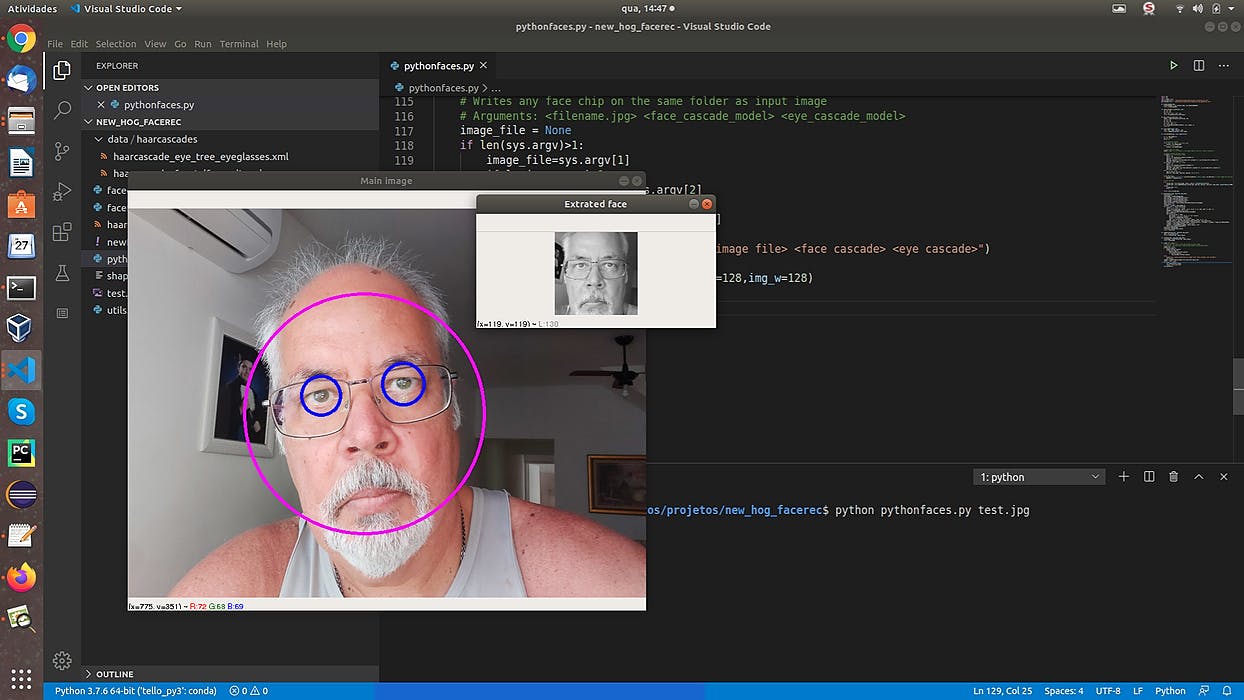
(histogram of oriented gradients) is an image descriptor format, capable of summarizing the main characteristics of an image, such as faces for example, allowing comparison with similar images. HOG - Histogram of Oriented Gradients This article and tutorial is from two years ago and I decided to update and modernize the source code to publish again. Java / C++ vs Python In this demonstration I will use the library, in a C ++ program, to compare the matrix of two face images, returning the degree of similarity between them. I will also use Java to "encapsulate" my C ++ function, since the JNI - Java Native Interface integration is done and has high performance. dlib HOG inprocess I have seen several image processing solutions, especially about face comparison or even facial recognition, based on . These solutions use Python as the main language, invoking functions from dlib or . Practically, all of these solutions are based on some Python libraries available on Github, like these: Python OpenCV https://github.com/ageitgey/face_recognition; ; https://github.com/chanddu/Face-Recognition Although they have the merit of facilitating development, these libraries can compromise the performance of an image processing solution, especially if the host computer has no . It is known that the main Python interpreters, such as and , have , as I mentioned in a previous article. In addition to this aspect, the performance of Python applications, compared to Java applications, can be another problem. GPU CPython PyPy - Global Interpreter Lock GIL Therefore, it makes much more sense to implement the recognition function in C ++, encapsulating it in Java code, to expose it as service, after all, doing this in C ++ will not add value to the solution, only complexity. RESTful In addition to the best performance, Java is the most popular programming language in the world, according to the list ( ). TIOBE https://www.tiobe.com/tiobe-index/ HOG Returning to this technique, we will see how to extract the HOG descriptor from an image and make comparisons between different image descriptors, the basis for a facial comparison application. Briefly, we extract a matrix of direction and magnitude of change in pixel intensity (gradients), and generate a histogram with this data. There are several ways to extract the HOG from an image, but the original article is this: http://lear.inrialpes.fr/people/triggs/pubs/Dalal-cvpr05.pdf Method The first step is to convert an original image to shades of gray and then filter the lines to remove the background and other features that we are not interested in. We can do this with libraries like or , or even with : OpenCV dlib Gimp In this picture, we see the original image in the left corner, then the one converted to monochrome, and finally, the image with the margin filter. It can be or any other filter that highlights the lines. To have a better result, it is recommended to cut and work only the face, as the rest is irrelevant and may hinder the comparison. Sobel For each extracted gradient, we calculate the direction of change in intensity and magnitude, for example, in this article there is a good explanatory image: https://www.learnopencv.com/histogram-of-oriented-gradients/ Then we calculate a histogram, in which the classes are the angles of inclination (0.20,40,60,80,100,120,140,160) and the values (votes) are the magnitudes (changes in intensity). Plotting this (it doesn't make sense, but it shows better) we would have this version of the image: Here we see the best possible representation of what the HOG characteristics would be. Using dlib To start working with dlib, we have to see what are the objects and functions that help us in the work of analyzing an image and extracting its HOG matrix. 1 - Detect faces: Dlib has the frontal_face_detector, which is a model trained with HOG and SVG, using the iBUG 300-W dataset. It returns a vector of rectangles containing the faces found in the image. dlib::frontal_face_detector detector = dlib::get_frontal_face_detector(); … (auto face : detector(dlibImage)) for 2 - Extract and prepare faces: It is necessary to take the resulting rectangles and extract the faces from the original image, rotating and scaling appropriately. For this, we use a model with 68 facial features, or “face landmarks”, previously trained: ... dlib::frontal_face_detector detector = dlib::get_frontal_face_detector(); dlib::shape_predictor sp; dlib::deserialize(path + ) >> sp; ... matrix<rgb_pixel> face_chip; dlib::extract_image_chip(dlibImage, ::get_face_chip_details(shape, , ), face_chip); "/shape_predictor_5_face_landmarks.dat" dlib 150 0.25 3 - Extraction of characteristics vector: Dlib has a very interesting example that extracts a HOG vector from an image, using a neural network implemented in code and the pre-trained ResNet v1 model ("dlib_face_recognition_resnet_model_v1.dat"). The original source code that uses this technique can be accessed at: http://dlib.net/dnn_face_recognition_ex.cpp.html ResNet model that generates the output: < < , < > < < , < > < N, < > < N, SUBNET> ares = relu<residual<block,N,affine,SUBNET>>; < N, SUBNET> ares_down = relu<residual_down<block,N,affine,SUBNET>>; < SUBNET> alevel0 = ares_down< ,SUBNET>; < SUBNET> alevel1 = ares< ,ares< ,ares_down< ,SUBNET>>>; < SUBNET> alevel2 = ares< ,ares< ,ares_down< ,SUBNET>>>; < SUBNET> alevel3 = ares< ,ares< ,ares< ,ares_down< ,SUBNET>>>>; < SUBNET> alevel4 = ares< ,ares< ,ares< ,SUBNET>>>; anet_type = loss_metric<fc_no_bias< ,avg_pool_everything< alevel0< alevel1< alevel2< alevel3< alevel4< max_pool< , , , ,relu<affine<con< , , , , , input_rgb_image_sized< > >>>>>>>>>>>>; template template int template typename , , > , , <typename> , > = <block<N,BN,1,tag1<SUBNET>>>; class int typename class block int N template class BN typename SUBNET using residual add_prev1 template template int template typename , , > , , <typename> , > = <avg_pool<2,2,2,2,skip1<tag2<block<N,BN,2,tag1<SUBNET>>>>>>; class int typename class block int N template class BN typename SUBNET using residual_down add_prev2 template int template typename , , > = <con<N,3,3,1,1,relu<BN<con<N,3,3,stride,stride,SUBNET>>>>>; class BN int stride typename SUBNET using block BN template int typename using template int typename using template typename using 256 template typename using 256 256 256 template typename using 128 128 128 template typename using 64 64 64 64 template typename using 32 32 32 using 128 3 3 2 2 32 7 7 2 2 150 Now, let's load the pre-trained ResNet model: anet_type net; dlib::deserialize(path + ) >> net; "/dlib_face_recognition_resnet_model_v1.dat" Finally, let's extract the feature matrix from a face image: :: <matrix< ,0,1>> face_descriptors1 = net(faces1); std vector float 4 - Compare vectors If you want to compare faces so that they are from the same person, you can calculate the Euclidean distance from the matrix vectors. If it's less than 0.6, then the images are probably from the same person: :: <sample_pair> edges; ( i = ; i < face_descriptors.size(); ++i) { ( j = i; j < face_descriptors.size(); ++j) { (length(face_descriptors[i]-face_descriptors[j]) < ) edges.push_back(sample_pair(i,j)); } } std vector for size_t 0 for size_t // Faces are connected in the graph if they are close enough. Here we check if // the distance between two face descriptors is less than 0.6, which is the // decision threshold the network was trained to use. Although you can // certainly use any other threshold you find useful. if 0.6 You can pre-calculate and store the image matrices of people you know, and then, when you need to recognize a face, search a database. In fact, I developed and implemented such a system using my home security cameras. It works well, with reasonable accuracy. Example code This article is accompanied by an example code, with parts in Java and C++, which compares two images and says if they are from the same person. See the execution with images of the same person: These are two images of me, taken at least 7 years apart and in one of them I am wearing a goatee and mustache, which did not prevent recognition. The return of the C++ function was “true”, that is, it correctly considered that the two images are from the same person. Now, let's see an example with different images: Here, I used an image of Thomas Edison, from Wikipedia ( ) and the result was negative. I tested with several other images, obtaining the same results. https://nn.wikipedia.org/wiki/Thomas_Edison I could have used only the OpenCV library, which also does the same thing, but I found the dlib example code more accurate. How to compile and run the project Dude, you're going to need patience… MUCH PATIENCE! My machine is a Samsung laptop, I7 8th generation, with 12 GB RAM and chipset, although I did not use the compiled dlib or OpenCV for this. If you want to develop a “production grade” solution, don't waste any time: Compile both with Instruction set and using GPU! Nvidia AVX Don't even waste your time trying to compile this on another operating system! The original was made on , but I adapted everything to run on Ubuntu (18.xx). There were less problems! I tried to run on MS Windows, however, it takes more work to adapt and the performance was not so good. MacOS 1 - Clone the repository: git https://github.com/cleuton/hogcomparator.git clone The dlib code is already included. It has the Java application code and the C ++ function that implements the native method invoked. 2 - The Java application: to compile the application just run: mvn clean package Or, import the Maven project into an Eclipse workspace. This application uses JNI to invoke a native method: { nu.pattern.OpenCV.loadShared(); System.loadLibrary( ); } ; static "hogcomparator" // Native method implemented by a C++ library: private native boolean compareFaces ( addressPhoto1, addressPhoto2) long long For Java to invoke the “compareFaces” method, we need to create a Shared Library (or DLL, if you insist on MS Windows), called “ ”. This library should implement the native method “compareFaces” in a manner established by the JNI - Java Native Interface. For this, we need to create a C++ header that contains the method declaration. In this case, all of this has already been done, but if you need to create another application, it is better to see how I did it. hogcomparator To create the header, we used to use the javah program: Javah -jni -classpath C:\ProjectName\src com.abc.YourClassName Except that javah doesn't exist since Java 10! We now use the javac compiler -h option. But, as I'm using Maven, just configure the build plugin correctly in pom.xml: maven-compiler-plugin 3.7.0 -h target/headers 11 11 < > plugin < > artifactId </ > artifactId < > version </ > version < > configuration < > compilerArgs < > arg </ > arg < > arg </ > arg </ > compilerArgs < > source </ > source < > target </ > target </ > configuration </ > plugin When compiling the program (mvn clean package or by eclipse) we will see a target / headers folder with our file: “com_obomprogramador_hog_HogComparator.h”. This file needs to be copied to plasta hog / cplusplus, and will be imported in cpp source. I am using OpenCV to read the images and pass them to the native method. I use the Mat class, from OpenCV to read the images with the imread function, also from OpenCV: Mat photo1 = imread(args[ ]); Mat photo2 = imread(args[ ]); HogComparator hg = HogComparator(); System.out.println( + hg.compareFaces(photo1.getNativeObjAddr(),photo2.getNativeObjAddr())); 0 1 new "Images are from the same person? " The native method receives the addresses of Mat structures in memory, which can be obtained with the getNativeObjAddr () method. It makes communication with C ++ much easier. 3 - The C++ part of the app In fact, you could do everything directly in Java, without needing C ++. We could have used OpenCV itself to calculate the HOG matrix. But for reasons of performance and practicality, certain things are better in C ++. I created a “Java binding”, that is, a small C ++ code that compiles generating a Shared Library. In order to communicate with the Java part, I need to import that header generated in the previous step: # include <jni.h> # include <iostream> # include <cstdlib> # include "com_obomprogramador_hog_HogComparator.h" The C ++ code receives the addresses of the Mat structures, transforming them into the type array2d, used by dlib: { * pPath = getenv ( ); :: ; cv::Mat* pInputImage = (cv::Mat*)addFoto1; cv::Mat* pInputImage2 = (cv::Mat*)addFoto2; dlib::array2d<rgb_pixel> dlibImage; dlib::array2d<rgb_pixel> dlibImage2; dlib::assign_image(dlibImage, dlib::cv_image<bgr_pixel>(*pInputImage)); dlib::assign_image(dlibImage2, dlib::cv_image<bgr_pixel>(*pInputImage2)); JNIEXPORT jboolean JNICALL Java_com_obomprogramador_hog_HogComparator_compareFaces (JNIEnv * env, jobject obj, jlong addFoto1, jlong addFoto2) const char "HOGCOMPARATOR_PATH" std string path (pPath) An important detail is that I will need to load the two model files, which can be obtained from: http://dlib.net/files/shape_predictor_5_face_landmarks.dat.bz2 http://dlib.net/files/dlib_face_recognition_resnet_model_v1.dat.bz2 Just unzip and then create an environment variable called , pointing to the path where you unzipped the two files. HOGCOMPARATOR_PATH The rest has already been explained when I spoke about dlib: Detect faces, extract faces, calculate matrices and then compare distances: thereIsAmatch = ; ( i = ; i < face_descriptors1.size(); ++i) { ( j = i; j < face_descriptors2.size(); ++j) { (length(face_descriptors1[i]-face_descriptors2[j]) < ) thereIsAmatch = ; } } thereIsAmatch; bool false for size_t 0 for size_t if 0.6 true return Compiling the C ++ part is kind of painful… As I said, dlib is already built into our but you need to install OpenCV on your station. As I said, I am using Ubuntu 18 and . If you want to use a newer version of OpenCV, know that there is no Java library for it. I use the org.openpnp project, from the Maven repository, to facilitate the integration of Java code with OpenCV. CmakeLists.txt, OpenCV 3.4.2-1 The website below teaches you how to install and compile OpenCV: https://docs.opencv.org/3.4.2/d7/d9f/tutorial_linux_install.html Once OpenCV is installed, you can compile the C ++ part. To do this, copy the generated header file into the cplusplus folder (if you changed it), and open a terminal: hog/cplusplus mkdir build build cmake .. cmake --build . --config Release cd cd When you finish compiling, you will have a file “libhogcomparator.so” inside the build folder. This is the library that implements the native method. To run the project in eclipse, open the RUN menu and then RUN CONFIGURATIONS. Create a configuration to run “Java Application”, select the main class (HogComparator) and add two arguments, which are the paths of the images you want to compare. Also add an argument for the JVM, which is -Djava.library.path, pointing to the cplusplus / build folder. Finally, create the environment variable pointing to the path where you unzipped the two template files. Command line arguments, for example: /home/cleuton/Documentos/projetos/hog/etc/cleuton.jpg /home/cleuton/Documentos/projetos/hog/etc/thomas_edison.jpg Location argument of “libhogcomparator”: -Djava.library.path = / home / cleuton / Documents / projects / hog / cplusplus / build Environment variable: HOGCOMPARATOR_PATH = / home / cleuton / Documents / projects / hog / cplusplus / build Conclusion This brief tutorial showed you how to include facial recognition in your application, using Java and C ++, with excellent performance. Now, you can turn the Java part into a RESTful service and place it as part of your mobile application, offering facial recognition as a means of authentication. Read in Spanish on obomprogramador.com