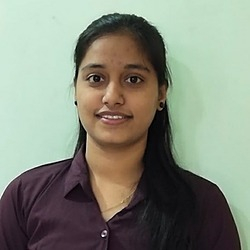
In this blog, I am going to show you how we can use rekognition for image analysis using AWS CLI. So you can test the image analysis on your local machine. We will be going to perform label detection and object detection for an image so basically we are performing image analysis in this blog by using AWS CLI. How will be the flow for Image Analysis: In My blog, I already explained what is Rekognition and the benefits and use cases of Rekognition. So here will directly start with the implementation part. Image analysis using AWS Rekognition via Lambda function For Image analysis, we are using the following services of AWS. IAM S3 Rekognition[This service we are using via AWS CLI] So The flow for image analysis will be: First We are going to read an image from the S3 bucket via AWS CLI command. Once you read and image from an S3 bucket then by using rekognition service will read that image via calling rekognition API and in response, rekognition API will return labels. Step 1: Creating a User by using IAM: Login inside your AWS account using your credentials. Go to the AWS Management console. Search for the service and enter. IAM On the left-hand side, you can see the [inside the access management] click on the users. users Click on the button. Add user Give the of your choice[for eg demouser]. user name In the select both the access type[ Select AWS access type Programmatic access as well as AWS Management Console access]. For the select a and type the password of your choice. console password custom password keep a check by default and click on button. Require password reset Next: Permission In the select . And from policy choose option and click on button. Set permissions Attach existing policies directly Administrator access Next: Tags Add Tags part is optional so directly click on button. Next: Review Check all your details and click on button. Create: user Once you clicked on create: user button you will get one file please download that file. In that file only you will get access_key and secret_key of the user that you will be going to use in a further step. Download.csv Finally, click on the button. Your user is ready now. close Step 2: Create an S3 bucket to store images: Go to the AWS Management console. Search for the service and enter. S3 Click on the button. Create bucket give any unique to your bucket[for eg rekognition]. name Keep all default settings as it is and click on the button. Create bucket Once your bucket is created . In that click on the and drag and drop any image that you want and click on the upload button directly. Once the image is uploaded you can see the image as follows: click on your bucket name upload button For the image analysis, I uploaded the following image. Step 3: Set Up the AWS CLI By running this command you will get to know whether python and pip are present on your pc or not. if not then plz first install it. pip3 -- -- Or -- version python version python3 version Install the AWS CLI with Pip by using the following command pip3 awscli sudo apt- awscli install --upgrade --user OR get install Verify that the AWS CLI installed correctly. aws --version Configure the AWS CLI aws configure In this command, you need to provide the access_key and secret_key that you downloaded while creating the user.and also provide the region name that you are using [for e.g I am using ‘us-east-1’]. Finally to perform the image analysis type the following command: aws rekognition detect- -- -- region_name labels image "S3Object={Bucket=buket_name,Name=image_name}" region Note: In place of the bucket name provide s3 bucket name that you created in step 2 and for image name give the image name that is present inside the s3 bucket. In place of region give your region name for e.g[us-east-1] Once you run the above command you will get the response of image analysis based on the image that you uploaded in s3. { : [ { : [], : [], : , : }, { : [], : [ { : { : , : , : , : }, : } ], : , : }, { : [ { : } ], : [], : , : }, { : [ { : } ], : [], : , : }, { : [ { : } ], : [], : , : }, { : [ { : }, { : } ], : [], : , : }, { : [ { : } ], : [], : , : }, { : [ { : } ], : [], : , : }, { : [ { : }, { : } ], : [], : , : }, { : [ { : }, { : }, { : }, { : }, { : }, { : } ], : [], : , : }, { : [ { : } ], : [], : , : }, { : [ { : }, { : } ], : [], : , : }, { : [ { : } ], : [], : , : }, { : [], : [], : , : }, { : [ { : }, { : }, { : } ], : [], : , : } ], : } "Labels" "Parents" "Instances" "Name" "Human" "Confidence" 98.7396011352539 "Parents" "Instances" "BoundingBox" "Left" 0.4745420217514038 "Top" 0.12450992316007614 "Height" 0.8302116990089417 "Width" 0.42319080233573914 "Confidence" 98.7396011352539 "Name" "Person" "Confidence" 98.7396011352539 "Parents" "Name" "Person" "Instances" "Name" "Sitting" "Confidence" 98.73041534423828 "Parents" "Name" "Person" "Instances" "Name" "Female" "Confidence" 97.1566162109375 "Parents" "Name" "Person" "Instances" "Name" "Dating" "Confidence" 90.18348693847656 "Parents" "Name" "Female" "Name" "Person" "Instances" "Name" "Woman" "Confidence" 85.65811157226562 "Parents" "Name" "Person" "Instances" "Name" "Child" "Confidence" 82.99960327148438 "Parents" "Name" "Person" "Instances" "Name" "Teen" "Confidence" 82.99960327148438 "Parents" "Name" "Female" "Name" "Person" "Instances" "Name" "Girl" "Confidence" 82.99960327148438 "Parents" "Name" "Teen" "Name" "Girl" "Name" "Female" "Name" "Woman" "Name" "Kid" "Name" "Person" "Instances" "Name" "Blonde" "Confidence" 82.99960327148438 "Parents" "Name" "Person" "Instances" "Name" "Kid" "Confidence" 82.99960327148438 "Parents" "Name" "Electronics" "Name" "Computer" "Instances" "Name" "Pc" "Confidence" 71.96940612792969 "Parents" "Name" "Electronics" "Instances" "Name" "Computer" "Confidence" 71.96940612792969 "Parents" "Instances" "Name" "Electronics" "Confidence" 71.96940612792969 "Parents" "Name" "Electronics" "Name" "Pc" "Name" "Computer" "Instances" "Name" "Laptop" "Confidence" 55.87724685668945 "LabelModelVersion" "2.0" In response, you will get a list of labels and a corresponding numeric confidence index. You can compare the image that I have mentioned above with the response. In my image, one lady is reading a book and also some electronic objects are present in the image. So in response, you can see different labels are shown related to images like a person, female, and computer. In this way, you can try image analysis on different images based on your use case. Enjoy Coding 😃


![Building User Interfaces with React [A How-To Guide]](https://hackernoon.imgix.net/drafts/pj2c3024.jpeg?auto=format&fit=max&w=3840)


