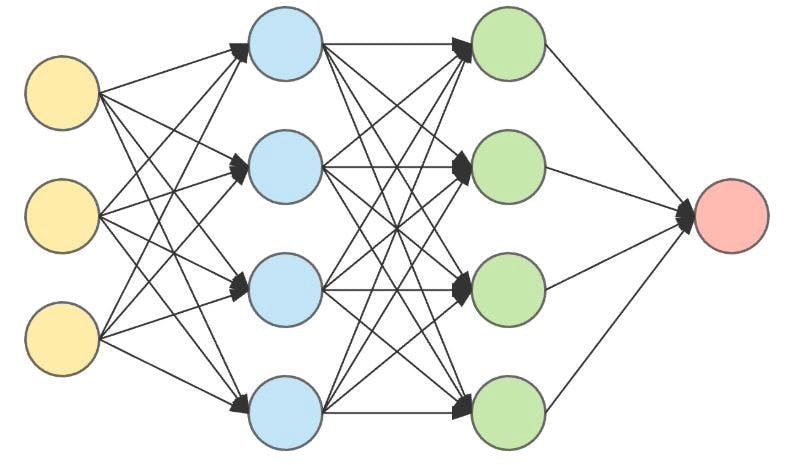
Machine learning and AI as a whole can seem hugely daunting when you're first getting started. Over a weekend, I sifted through all of the "beginner" guides on how to get started, so that you don't have to. painstakingly If you like this post, feel free to or check out my other posts subscribe here Most people recommend an image classifier using the MNIST dataset as your 'hello world'/first machine learning program - I'm not sure if there is just an obscenely high barrier to entry, or if I'm simply just stupid, but for someone who wants to go from zero to something in the world of machine learning, this project seems a bit tricky. Now, of course, I attempted it. I read anything and everything that I could get my hands on about the inner workings of how neural networks ACTUALLY work. I thought I had a pretty rudimentary understanding of what was going on, but with pre-made datasets and perplexing technical jargon, it's often hard to dilute what is actually happening - I'm still not entirely sure what the f*ck a 2D convolutional layer is. So without further ado, here's how a beginner can get started with machine learning, by a REAL beginner. This will cover everything, from what libraries and frameworks to use, to how to save and load your trained model. By the end of this project, you should have a rough idea as to how it all works, which will send you on your merry way to more complex projects. What Framework to Use There are countless machine learning frameworks and libraries out there, but the main players are TensorFlow, PyTorch, and Keras (now part of TensorFlow). As usual, I ended up in a state of paralysis as to which to pick, and which one was the best - this is what inspired me to adopt the mentality of . just starting In the end, I went with PyTorch. I would recommend this as you get control of everything and it makes it easy to visualise what's going on, but in the grand scheme of things they all work well and it doesn't really matter which one you go with - so just pick one and get started! First Project Neural Networks function around arrays, or tensors if you're cool (yes, I know that there is a difference, but it's not that important at this stage). Long story short, you give a trained model an input as an array, and it gives you an output, that is hopefully correct. The simplest way that I could think to demonstrate this was to count the number of occurrences in a list. The end goal of this model is to give it a binary list, and it outputs the number of ones, for example; input: [ , , , , , , , , , ], : 1 0 0 1 0 0 0 0 1 1 output 4 Neural networks require an input and an expected output in order to train. You can generate arrays of random 1's and 0's like so, which also includes labels (expected outputs) for easy training later down the line: def genData(vol, ): = [] = [] data = [] i (vol): rand = .randint( , ) data = rand * [ ] + ( - rand) * [ ] .shuffle(data) . (data.count( )) . (data) , length values labels for in range random 0 length 1 length 0 random labels append 1 values append return values labels We then can assign the values and labels to variables, which we convert to tensors so that the neural network can easily read and process them: x, y = genData( , ) xTensor = torch.Tensor(np.array(x)) yTensor = torch.Tensor(np.array(y)) 100 10 Simple so far right? Now we structure our network! We will use PyTorches nn.Module to include all of the layers we could ever need, and then just piece them together. For this network, I only used 1 layer, it takes in 10 inputs (I used a random binary array of length 10), and 1 output (0-10, number of 1's in the given list). We then have a forward method, which tells the network how to process the inputs as they pass through the layers, we're keeping it simple by just passing them through layer 1 and using a relu function: super(Net, self).__init__() self.l1 = nn.Linear( , ) out = F.relu(self.l1(x)) out model = Net() : class Net (torch.nn.Module) : def __init__ (self) 10 1 : def forward (self, x) return Now, we need a loss function, which will tell our network how far off the expected output it was so that it can correct itself and become more accurate, we will also add an optimiser to you know... optimise this process: criterion = torch.nn.MSELoss() optimizer = torch.optim.SGD(model.parameters(), lr= ) 0.01 You can do a lot of reading for yourself on the different loss functions, there are hundreds of them, but I enjoyed the MSE or cross-entropy loss function for linear NN's. Now, TRAIN, TRAIN, TRAIN! Think of an epoch as a training loop, so in this example, I'm cycling through the data 1000 times: epoch (t := trange( )): i range(len(x)): values = xTensor labels = yTensor output = model(values) optimizer.zero_grad() loss = criterion(output, labels.unsqueeze( )) loss.backward() optimizer.step() for in 1000 for in 1 We can finally save the model like this: torch.save(model, ) "cnn.pt" That's it! you've successfully created and trained your first neural network, from the ground up! Running the Model Now that we've trained and saved our model, we can start to pass in real inputs, and see what it predicts! Make a new file, and initialise a simple array, and turn it into a tensor like before: in_data = [ , , , , , , , , , ] inTensor = torch.Tensor(np.array(in_data)) 1 1 1 0 1 1 1 0 0 0 Next, we need to copy the model from our previous file, so that we can add the weights and biases from our saved neural network to it: super(Net, self).__init__() self.l1 = nn.Linear( , ) x = F.relu(self.l1(x)) x : class Net (torch.nn.Module) : def __init__ (self) 10 1 : def forward (self, x) return Finally, we can load our saved model, evaluate it, and pass in our new input data! model = torch.load( ) model.eval() out = model(inTensor) 'cnn.pt' If you print the value of the "out" variable, you should see a 6 in this case! If you've made it this far and have been following along, you should hopefully have a better understanding of how PyTorch and machine learning work as a whole. For me, this project was a good jumping-off point, and after it, I felt more comfortable pursuing image classification with MNIST! Previously published at https://torbet.co/posts/Weekend-Machine-Learning