paint-brush
How to Generate Dynamic Preview Images for Social Media Sharingby@jonarnes
6,229 reads
6,229 reads

How to Generate Dynamic Preview Images for Social Media Sharing

by Jon Arne SæteråsFebruary 18th, 2021
Read on Terminal Reader
Read this story w/o Javascript
tldt arrow

Too Long; Didn't Read

Pretty preview of your page when shared on Facebook, Twitter, Slack etc. A Netlify function and the image CDN ImageEngine for storing and image optimimisation.

Companies Mentioned

Mention Thumbnail
Mention Thumbnail
featured image - How to Generate Dynamic Preview Images for Social Media Sharing
Jon Arne Sæterås HackerNoon profile picture

If you’ve been sharing a link on any social media, embedding it on a webpage or even sending it by iMessage, you’ve probably seen the preview “card”. Either a version without an image like this:

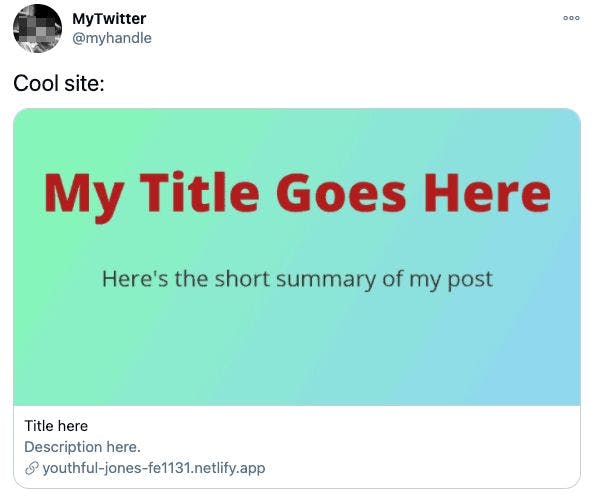
Even more handy - and beautiful - a preview of the page, consisting of an image, heading and a short intro:

This is achieved by using some specific “meta tags” that will magically enhance the link with a richer presentation. The actual meta tags to make use of Open Graph and Twitter cards is well described in the link above. For images specifically, ensure that these are included on your webpage:

<meta property="og:image" content="https://foo.com/thumbnail.jpg">
<meta name="twitter:image" content=" https://foo.com/thumbnail.jpg">
<meta name="twitter:card" content="summary_large_image">
<meta name="twitter:image:alt" content="Alt text for image">

Most Content Management Systems (CMS) offer some level of social preview images, but what if your article doesn’t have a featured image suitable for social media usage? Further, the impact might be better with some relevant text on the image.

In the following we’ll see how to make use of the JAMstack hosting service Netlify and ImageEngine as the image CDN for caching.

Generate Social Share Images with Netlify and ImageEngine

This guide is inspired by Ryan Filler’s post on how to make use of Netlify’s serverless functions to generate a preview image and upload to Cloudinary. However, it struck me as very inconvenient and unnecessarily complex to explicitly upload every image to Cloudinary.

This is where ImageEngine comes in with a higher “plug and play”-factor and improved performance.

Aside from using ImageEngine as the alternative to Cloudinary, the architecture, tools and approach is very similar to Ryan’s: 

TL;DR; We’re making a webpage containing the preview text, screenshotting it and caching it on  ImageEngine’s image CDN.

We’re going to use Svelte and Netlify to make a simple JAMstack webpage.

Here’s a simple overview of the all the moving parts:

Set Up a Webpage on Netlify

We’ll work our way from the right to the left in the diagram above. First we need to develop a page that can dynamically display a heading and a short description. We’ll make it dynamic by making it accept url parameters that holds the content of the page:

?tilte=My%20title&desc=Summary

We can use the example from svelte.dev to generate a template that we can adapt to our needs:

npx degit sveltejs/template my-svelte-project
# or download and extract this .zip file
cd my-svelte-project
npm install
npm run dev

I’ll not go into further details, assuming that node and npm is known territory. 

In order to make the page display the contents from the query string, change the file

main.js
like this:

import App from './App.svelte';

//Read the URL parameters
const params = new URLSearchParams(window.location.search)
const app = new App({
	target: document.body,

	//Put the values of the URL params into props
	props: {
		title: params.get('title'),
		desc: params.get('desc')
	}
});
export default app;

App.svelte
will hold the markup of the webpage. We need to reference the “props” from
main.js
:

<script>
	export let title;
	export let desc;
</script>
<main>
	<h1>{title}</h1>
	<p>{desc}</p>
</main>

For your convenience, here is a github repository with the Svelte project

After you’ve decided on a look and feel of the page, you’ll need to upload to githib.com too. Simply because we need it in github for the next step; Put it on Netlify. Again, assuming this part is known territory. If not, the process is well documented.

At the end of the process, you’ll have a webpage that can be accessed like this:

https://youthful-jones-fe1131.netlify.app/?title=My%20Title&desc=Her%27s%20the%20short%20symmary

Capture screenshot with a Netlify function

Now, moving one step to the left in the diagram above, we’re ready to craft a function in Netlify which can access that url and capture a screenshot. I’ll refer to the sample function in our github project. You’ll also need to add some lines to the package.json file for that to work. 

After committing the updates to github, Netlify must be configured to pick up the function. Main thing is to tell Netlify which folder the function is located in, through the UI or a netlify.toml file. In our example, there is a folder called 'functions' at the root of the project with a file named capture.js.

The function will now capture an image of the page we made earlier:

https://youthful-jones-fe1131.netlify.app/.netlify/functions/capture?title=My%20Title&desc=Her%27s%20the%20short%20symmary 

Sign Up with ImageEngine 

Now, we just created the origin we’ll use when we set up ImageEngine as we move to the left in our diagram above. To get an ImageEngine account, simply sign up for a free trial at imageengine.io. At the step where you’re asked for the image origin, input your Netlify hostname:


When you complete the configuration, you’ll get an ImageEngine delivery address assigned. To access the preview image you can just replace the Netlify hostname with your ImageEngine delivery address. 

For example if your ImageEnigne delivery address is `xxxx.cdn.imgeng.in`, the complete url to the preview images is:

https://xxxx.cdn.imgeng.in/.netlify/functions/capture?title=My%20Title&desc=Her%27s%20the%20short%20symmary 

Refer to the Preview Image on your Webpage

Finally, we’re at the left most step in the diagram above. The link above is the one we’ll put into the

<meta>
tags on our blog page that we will share in social media:

<meta property="og:image" content="https://xxxx.cdn.imgeng.in/.netlify/functions/capture?title=My%20Title&desc=Her%27s%20the%20short%20smmary">
<meta name="twitter:image" content=”https://xxxx.cdn.imgeng.in/.netlify/functions/capture?title=My%20Title&desc=Her%27s%20the%20short%20summary">
<meta name="twitter:card" content="summary_large_image">
<meta name="twitter:image:alt" content="Alt text for image">

When someone shares that page on twitter, facebook, or other social media, the preview image will be displayed. Then we’re moving from the left to the right in our diagram. At least the first time. Subsequent requests, once the image with appropriate text has been generated, the image will be served by the ImageEngine CDN directly.

There is one more thing that is recommended to do: Make sure ImageEngine is caching your preview image for a long time. By doing so, our Netlify function will not have to capture a new screenshot that often, and the image will simply load faster.  You can adjust the “time to live” (TTL) in the control panel of your ImageEngine account documented here

Final Result

The review of the link looks much better when shared on social media. Maybe even better than with an image from the actual article!

Try sharing this article on any social media so see a demo: https://youthful-jones-fe1131.netlify.app/demoblog.html 

For reference, the complete project with all the plumbing, is available here.

To use this on a “production” site, some features should be added. For example, some security to make sure the functionality is not abused by other sites than yours. Some security features can also be enabled in ImageEngine.