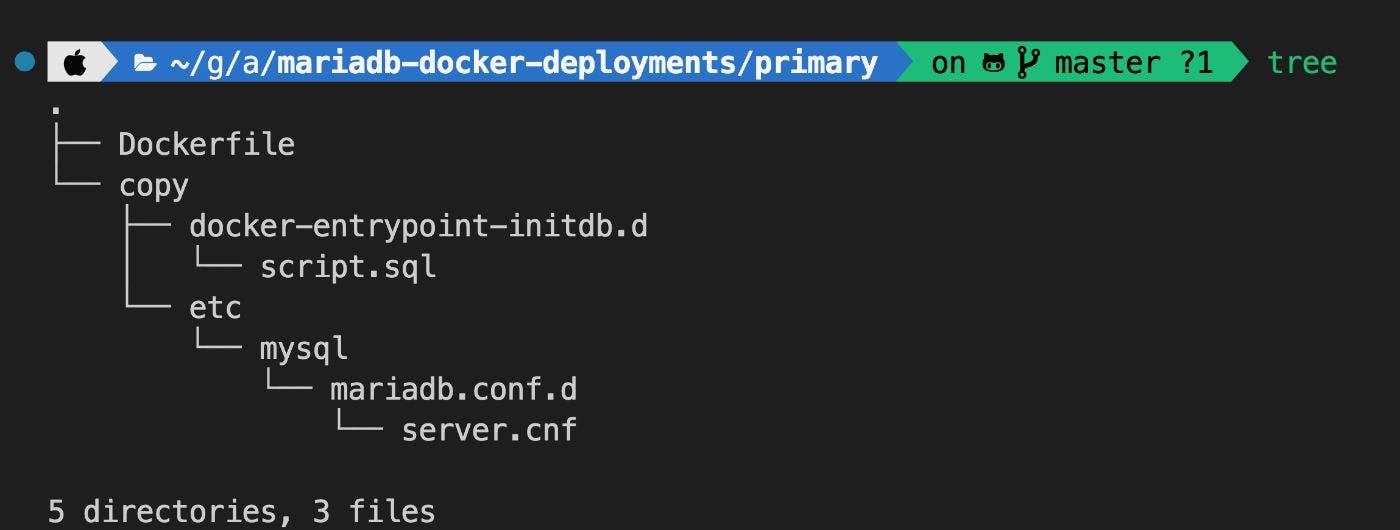
Frequently, I have to deploy MariaDB for development on my working laptop, a , and even on devices. I try to use Docker when possible to reduce clutter on these machines—it’s very easy to create and delete containers without having to deal with installation and uninstallation procedures. dedicated server Raspberry Pi MariaDB publishes for all the products I use, including , , , , and . Although these images offer flexible configuration options that are great for development or evaluation environments, sometimes it’s useful to have custom images tailored to specific applications. Here are some tips and tricks on how to customize your MariaDB Docker images for development environments. Docker images MariaDB Community Server MariaDB Enterprise Server ColumnStore MaxScale XPand Using MariaDB Docker images It’s always recommended to use the as they are maintained by the team that best knows MariaDB. Here are some of these images: official MariaDB Docker images MariaDB Community Server MariaDB Community Server with ColumnStore MariaDB MaxScale ) MariaDB Xpand (single node It’s worth mentioning that there also is a which provides Docker images for (a hardened, optimized version of MariaDB plus additional components for high levels of scalability, security, reliability, and uptime). MariaDB Enterprise Docker Registry MariaDB Enterprise Server Spinning up a MariaDB container for development doesn’t require major configurations. Typically you’ll need to expose a port and set a root password. This can be done using environment variables. Check each image documentation to learn about the available parameters. Additionally, you might want to set up a custom and . For example, this is how to start a MariaDB database in a Docker container for an application running on the same machine: Docker network volume docker run --name mariadb-database \ --detach \ --volume mariadb-database-volume:/var/lib/mysql \ --publish 3333:3306 \ --env MARIADB_ROOT_PASSWORD='the_root_password' \ --env MARIADB_DATABASE=the_database \ --env MARIADB_USER=the_app_user \ --env MARIADB_PASSWORD='the_user_password' \ mariadb:latest This configures a detached (running in the background) container with a MariaDB database using a Docker volume named . The database is, accessible on port 3333 ( means “forward requests on port 3333 to 3306 in the container”). The root user has . is automatically created and can access this database using . If you want the database to start automatically when Docker starts, add the option somewhere before the image name ( ). mariadb-database-volume 3333:3306 the_root_password the_database the_app_user the_user_password --restart unless-stopped mariadb:latest Using custom configurations MariaDB can be configured using and ( ). system variables option files .cnf Configuring via command line You can pass system variables in the command line when you run a container. For example, to enable the , and set a custom and port, you can run the container as follows: binary log server ID docker run --name mariadb-database \ --detach \ --env MARIADB_ROOT_PASSWORD='the_root_password' \ mariadb:latest \ --log_bin=primary_log_bin --server_id=1 --port=3333 Check the result using: docker exec -it mariadb-database \ mariadb --port 3333 --password='the_root_password' \ --execute='select @@log_bin, @@server_id' Configuring via config files To pass custom configuration files, use Docker volumes. Custom files should be placed in the directory inside the container. For example, you can enable the binary log and set a server ID using the following file: .cnf /etc/mysql/conf.d/ my-server.cnf [mariadb] log_bin = primary_log_bin server_id = 1 To pass this file to the container, place the config file in the current directory and run the container as follows: docker run --name mariadb-database \ --detach \ --volume $PWD:/etc/mysql/conf.d \ --env MARIADB_ROOT_PASSWORD='the_root_password' \ mariadb:latest Check the result using: docker exec -it mariadb-database \ mariadb --password='the_root_password' \ --execute='select @@log_bin, @@server_id' Running shell and SQL scripts after container creation Any , (as well as , and ) files in the directory inside the container, are run after the container is created and initialized. Let’s combine this feature with option files to configure a primary server with a user for and a user for (check if you want to quickly learn about automatic read-write splitting with MaxScale). We need to enable the binary log, set a server ID, and run a SQL script like the following: .sql .sh .sql.gz .sql.xz .sql.zst /docker-entrypoint-initdb.d/ replication MaxScale this tutorial CREATE USER 'replication_user'@'%' IDENTIFIED BY 'password'; GRANT REPLICATION REPLICA ON *.* TO 'replication_user'@'%'; RESET MASTER; CREATE USER 'maxscale_user'@'%' IDENTIFIED BY 'password'; GRANT SELECT ON mysql.* TO 'maxscale_user'@'%'; GRANT SHOW DATABASES, SLAVE MONITOR ON *.* to 'maxscale'@'%'; To keep things tidy, we can create two directories in the host machine. One to store files and one to store files: .cnf .sql A directory structure with separate subdirectories for config and SQL files To pass these files to the container, run it as follows: docker run --name mariadb-database \ --detach \ --volume mariadb-database-volume:/var/lib/mysql \ --volume $PWD/sql:/docker-entrypoint-initdb.d \ --volume $PWD/cnf:/etc/mysql/conf.d \ --env MARIADB_ROOT_PASSWORD='the_root_password' \ mariadb:latest All the SQL scripts in your local directory and all the config files in are passed to the container. For examples of how to use files see . ./sql ./cnf .sh this GitHub repository Creating a custom image for demos MariaDB Docker images, like any Docker image, can be extended using . Let’s create a custom MariaDB image for demo purposes (don’t use it in production!). We need the directory structure and files shown in the previous section placed in a new directory ( ) alongside a new file: Dockerfiles ./copy Dockerfile A Dockerfile alongside a “copy” directory that follows the structure of the container’s filesystem Instead of using Docker volumes, we can simply copy the files to the image filesystem using the instruction. This instruction is placed in a custom : COPY Dockerfile FROM mariadb ENV MARIADB_ROOT_PASSWORD="password" ENV MARIADB_DATABASE="demo" ENV MARIADB_USER="user" ENV MARIADB_PASSWORD="password" COPY primary/copy/ / EXPOSE 3306 Since the and files are placed in the expected subdirectories inside the directory, they will work as described in the previous sections. .sql .cnf copy/ What’s next? After getting a MariaDB database running in a Docker container, you might want to connect to it externally. Remember to publish the port on which MariaDB Server is listening (the default is 3306) using something like when you run the container. The following examples use 3333 but you can also use any free port in the host, even 3306 ( ). --publish 3333:3306 --publish 3306:3306 Connecting to the database from SQL clients You can connect to the database using any SQL client that directly supports MariaDB, ODBC, or JDBC. For example , or one of the . Configure the host as , the port as , the user as (or ), and the password as (or ). DBeaver SQL client extensions for VSCode 127.0.0.1 3333 the_app_user root the_user_password the_root_password You can also use the CLI client to connect to the database as follows: mariadb mariadb --host 127.0.0.1 --port 3333 --user the_app_user -p If the container is running on a remote machine and assuming the port is open on the network, just replace the IP address. Connecting to the database from Java, Python, and Node.js apps You can connect to the database from Java, Python, Node.js, and others using the . MariaDB connectors In Java you can use the following connection string (omitting credentials): JDBC jdbc:mariadb://localhost:3333/the_database From Python apps: import mariadb connection = mariadb.connect( host="127.0.0.1", port=3333, database="the_database" user="the_app_user", password="the_user_password") And form Node.js apps: const mariadb = require('mariadb'); connection = await mariadb.createConnection({ host: 127.0.0.1', port: '3333', database: 'the_database', user: 'the_app_user', password: 'the_user_password' }); You can find more examples on the of the MariaDB . quick start page Developer Hub