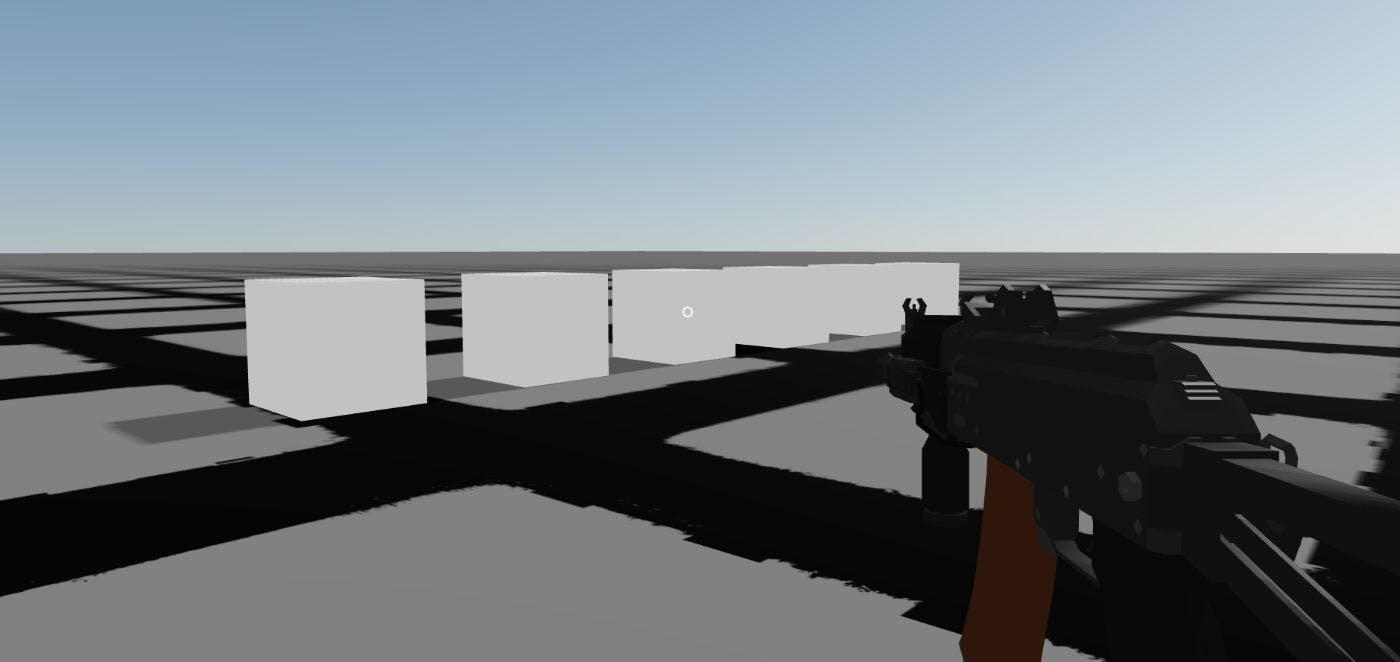
In modern web development, the boundaries between classic and web applications are blurring every day. Today we can create not only interactive websites, but also full-fledged games right in the browser. One of the tools that makes this possible is the library - a powerful tool for creating 3D graphics based on using technology. React Three Fiber Three.js React About the React Three Fiber stack is a wrapper over that uses the structure and principles of to create 3D graphics on the web. This stack allows developers to combine the power of with the convenience and flexibility of , making the process of creating an application more intuitive and organised. React Three Fiber Three.js React Three.js React At the heart of is the idea that everything you create in a scene is a component. This allows developers to apply familiar patterns and methodologies. React Three Fiber React One of the main advantages of is its ease of integration with the ecosystem. Any other tools can still be easily integrated when using this library. React Three Fiber React React Relevance of Web-GameDev has undergone major changes in recent years, evolving from simple 2D games to complex 3D projects comparable to desktop applications. This growth in popularity and capabilities makes Web-GameDev an area that cannot be ignored. Web-GameDev Flash One of the main advantages of web gaming is its accessibility. Players do not need to download and install any additional software - just click on the link in their browser. This simplifies the distribution and promotion of games, making them available to a wide audience around the world. Finally, web game development can be a great way for developers to try their hand at gamedev using familiar technologies. Thanks to the available tools and libraries, even without experience in 3D graphics, it is possible to create interesting and high-quality projects! Game performance in modern browsers Modern browsers have come a long way, evolving from fairly simple web browsing tools to powerful platforms for running complex applications and games. Major browsers such as , , and are constantly being optimised and developed to ensure high performance, making them an ideal platform for developing complex applications. Chrome Firefox Edge others One of the key tools that has fuelled the development of browser-based gaming is . This standard allowed developers to use hardware graphics acceleration, which significantly improved the performance of 3D games. Together with other webAPIs, opens up new possibilities for creating impressive web applications directly in the browser. WebGL WebGL Nevertheless, when developing games for the browser, it is crucial to consider various performance aspects: resource optimisation, memory management and adaptation for different devices are all key points that can affect the success of a project. On your mark! However, words and theory are one thing, but practical experience is quite another. To really understand and appreciate the full potential of web game development, the best way is to immerse yourself in the development process. Therefore, as an example of successful web game development, we will create our own game. This process will allow us to learn key aspects of development, face real problems and find solutions to them, and see how powerful and flexible a web game development platform can be. In a series of articles, we'll look at how to create a first-person shooter using the features of this library, and dive into the exciting world of web-gamedev! Final demo https://codesandbox.io/p/github/JI0PATA/fps-game?embedable=true Repository on GitHub Now, let's get started! Setting up the project and installing packages First of all, we will need a project template. So let's start by installing it. React npm create vite@latest select the library; React select . JavaScript Install additional npm packages. npm install three @react-three/fiber @react-three/drei @react three/rapier zustand @tweenjs/tween.js Then everything unnecessary from our project. delete Section code Customising the Canvas display In the file, add a div element that will be displayed on the page as a scope. Insert a component and set the field of view of the camera. Inside the component place the component. main.jsx Canvas Canvas App Let's add styles to to stretch the UI elements to the full height of the screen and display the scope as a circle in the centre of the screen. index.css In the component we add a component, which will be displayed as the background in our game scene in the form of a sky. App Sky Section code Floor surface Let's create a component and place it in the component. Ground App In , create a flat surface element. On the Y axis move it downwards so that this plane is in the field of view of the camera. And also flip the plane on the X axis to make it horizontal. Ground Even though we specified grey as the material colour, the plane appears completely black. Section code Basic lighting By default, there is no lighting in the scene, so let's add a light source , which illuminates the object from all sides and does not have a directed beam. As a parameter set the intensity of the glow. ambientLight Section code Texture for the floor surface To make the floor surface not look homogeneous, we will add texture. Make a pattern of the floor surface in the form of cells repeating all along the surface. In the folder add a PNG image with a texture. assets To load a texture on the scene, let's use the hook from the package. And as a parameter for the hook we will pass the texture image imported into the file. Set the repetition of the image in the horizontal axes. useTexture @react-three/drei Section code Camera movement Using the component from the package, fix the cursor on the screen so that it does not move when you move the mouse, but changes the position of the camera on the scene. PointerLockControls @react-three/drei Let's make a small edit for the component. Ground Section code Adding physics For clarity, let's add a simple cube to the scene. <mesh position={[0, 3, -5]}> <boxGeometry /> </mesh> Right now he's just hanging in space. Use the component from the package to add "physics" to the scene. As a parameter, configure the gravity field, where we set the gravitational forces along the axes. Physics @react-three/rapier <Physics gravity={[0, -20, 0]}> <Ground /> <mesh position={[0, 3, -5]}> <boxGeometry /> </mesh> </Physics> However, our cube is inside the physics component, but nothing happens to it. To make the cube behave like a real physical object, we need to wrap it in the component from the package. RigidBody @react-three/rapier After that, we will immediately see that every time the page reloads, the cube falls down under the influence of gravity. But now there is another task - it is necessary to make the floor an object with which the cube can interact, and beyond which it will not fall. Section code The floor as a physical object Let's go back to the component and add a component as a wrapper over the floor surface. Ground RigidBody Now when falling, the cube stays on the floor like a real physical object. Section code Subjecting a character to the laws of physics Let's create a component that will control the character on the scene. Player The character is the same physical object as the added cube, so it must interact with the floor surface as well as the cube on the scene. That's why we add the component. And let's make the character in the form of a capsule. RigidBody Place the component inside the Physics component. Player Now our character has appeared on the scene. Section code Moving a character - creating a hook The character will be controlled using the keys, and jump using the . WASD Spacebar With our own react-hook, we implement the logic of moving the character. Let's create a file and add a new function there. hooks.js usePersonControls Let's define an object in the format {"keycode": "action to be performed"}. Next, add event handlers for pressing and releasing keyboard keys. When the handlers are triggered, we will determine the current actions being performed and update their active state. As a final result, the hook will return an object in the format {"action in progress": "status"}. Section code Moving a character - implementing a hook After implementing the hook, it should be used when controlling the character. In the component we will add motion state tracking and update the vector of the character's movement direction. usePersonControls Player We will also define variables that will store the states of the movement directions. To update the character's position, let's provided by the package. This hook works similarly to and executes the body of the function about 60 times per second. useFrame @react-three/fiber requestAnimationFrame Code Explanation: Create a link for the player object. This link will allow direct interaction with the player object on the scene. 1. const playerRef = useRef(); When a hook is used, an object with boolean values indicating which control buttons are currently pressed by the player is returned. 2. const { forward, backward, left, right, jump } = usePersonControls(); The hook is called on each frame of the animation. Inside this hook, the player's position and linear velocity are updated. 3. useFrame((state) => { ... }); Checks for the presence of a player object. If there is no player object, the function will stop execution to avoid errors. 4. if (!playerRef.current) return; Get the current linear velocity of the player. 5. const velocity = playerRef.current.linvel(); Set the forward/backward motion vector based on the pressed buttons. 6. frontVector.set(0, 0, backward - forward); Set the left/right movement vector. 7. sideVector.set(left - right, 0, 0); Calculate the final vector of player movement by subtracting the movement vectors, normalising the result (so that the vector length is 1) and multiplying by the movement speed constant. 8. direction.subVectors(frontVector, sideVector).normalize().multiplyScalar(MOVE_SPEED); "Wakes up" the player object to make sure it reacts to changes. If you don't use this method, after some time the object will "sleep" and will not react to position changes. 9. playerRef.current.wakeUp(); Set the player's new linear velocity based on the calculated direction of movement and keep the current vertical velocity (so as not to affect jumps or falls). 10. playerRef.current.setLinvel({ x: direction.x, y: velocity.y, z: direction.z }); As a result, when pressing the keys, the character started moving around the scene. He can also interact with the cube, because they are both physical objects. WASD Section code Moving a character - jump In order to implement the jump, let's use the functionality from the and packages. In this example, let's check that the character is on the ground and the jump key has been pressed. In this case, we set the character's direction and acceleration force on the Y-axis. @dimforge/rapier3d-compat @react-three/rapier For we will add mass and block rotation on all axes, so that he will not fall over in different directions when colliding with other objects on the scene. Player Code Explanation: Gaining access to the physics engine scene. It contains all physical objects and manages their interaction. const world = rapier.world; Rapier This is where "raycasting" (raycasting) takes place. A ray is created that starts at the player's current position and points down the y-axis. This ray is "cast" into the scene to determine if it intersects with any object in the scene. const ray = world.castRay(new RAPIER.Ray(playerRef.current.translation(), { x: 0, y: -1, z: 0 })); The condition is checked if the player is on the ground: const grounded = ray && ray.collider && Math.abs(ray.toi) <= 1.5; - whether the was created; ray ray - whether the ray collided with any object on the scene; ray.collider - the "exposure time" of the ray. If this value is less than or equal to the given value, it may indicate that the player is close enough to the surface to be considered "on the ground". Math.abs(ray.toi) You also need to modify the component so that the raytraced algorithm for determining the "landing" status works correctly, by adding a physical object that will interact with other objects in the scene. Ground Let's raise the camera a little higher for a better view of the scene. Section code First commit Second commit Moving the camera behind the character To move the camera, we will get the current position of the player and change the position of the camera every time the frame is refreshed. And for the character to move exactly along the trajectory, where the camera is directed, we need to add . applyEuler Code Explanation: The method applies rotation to a vector based on specified Euler angles. In this case, the camera rotation is applied to the vector. This is used to match the motion relative to the camera orientation, so that the player moves in the direction the camera is rotated. applyEuler direction Let's slightly adjust the size of and make it taller relative to the cube, increasing the size of and fixing the "jump" logic. Player CapsuleCollider Section code First commit Second commit Generation of cubes To make the scene not feel completely empty, let's add cube generation. In the json file, list the coordinates of each of the cubes and then display them on the scene. To do this, create a file , in which we will list an array of coordinates. cubes.json [ [0, 0, -7], [2, 0, -7], [4, 0, -7], [6, 0, -7], [8, 0, -7], [10, 0, -7] ] In the file, create a component, which will generate cubes in a loop. And component will be directly generated object. Cube.jsx Cubes Cube import {RigidBody} from "@react-three/rapier"; import cubes from "./cubes.json"; export const Cubes = () => { return cubes.map((coords, index) => <Cube key={index} position={coords} />); } const Cube = (props) => { return ( <RigidBody {...props}> <mesh castShadow receiveShadow> <meshStandardMaterial color="white" /> <boxGeometry /> </mesh> </RigidBody> ); } Let's add the created component to the component by deleting the previous single cube. Cubes App Section code Importing the model into the project Now let's add a 3D model to the scene. Let's add a weapon model for the character. Let's start by looking for a 3D model. For example, let's take . this one Download the model in GLTF format and unpack the archive in the root of the project. In order to get the format we need to import the model into the scene, we will need to install the add-on package. gltf-pipeline npm i -D gltf-pipeline Using the package, reconvert the model from the to the , since in this format all model data are placed in one file. As an output directory for the generated file we specify the folder. gltf-pipeline GLTF format GLB format public gltf-pipeline -i weapon/scene.gltf -o public/weapon.glb Then we need to generate a react component that will contain the markup of this model to add it to the scene. Let's use the from the developers. official resource @react-three/fiber Going to the converter will require you to load the converted file. weapon.glb Using drag and drop or Explorer search, find this file and download it. In the converter we will see the generated react-component, the code of which we will transfer to our project in a new file , changing the name of the component to the same name as the file. WeaponModel.jsx Section code Displaying the weapon model on the scene Now let's import the created model to the scene. In file add component. App.jsx WeaponModel Section code Adding shadows At this point in our scene, none of the objects are casting shadows. To enable on the scene you need to add the attribute to the component. shadows shadows Canvas Next, we need to add a new light source. Despite the fact that we already have on the scene, it cannot create shadows for objects, because it does not have a directional light beam. So let's add a new light source called and configure it. The attribute to enable the " " shadow mode is . It is the addition of this parameter that indicates that this object can cast a shadow on other objects. ambientLight directionalLight cast castShadow After that, let's add another attribute to the component, which means that the component in the scene can receive and display shadows on itself. receiveShadow Ground Similar attributes should be added to other objects on the scene: cubes and player. For the cubes we will add and , because they can both cast and receive shadows, and for the player we will add only . castShadow receiveShadow castShadow Let's add for . castShadow Player Add and for . castShadow receiveShadow Cube Section code Adding shadows - correcting shadow clipping If you look closely now, you will find that the surface area on which the shadow is cast is quite small. And when going beyond this area, the shadow is simply cut off. The reason for this is that by default the camera captures only a small area of the displayed shadows from . We can for the component by adding additional attributes to expand this area of visibility. After adding these attributes, the shadow will become slightly blurred. To improve the quality, we will add the attribute. directionalLight directionalLight shadow-camera-(top, bottom, left, right) shadow-mapSize Section code Binding weapons to a character Now let's add first-person weapon display. Create a new component, which will contain the weapon behaviour logic and the 3D model itself. Weapon import {WeaponModel} from "./WeaponModel.jsx"; export const Weapon = (props) => { return ( <group {...props}> <WeaponModel /> </group> ); } Let's place this component on the same level as the of the character and in the hook we will set the position and rotation angle based on the position of the values from the camera. RigidBody useFrame Section code Animation of weapon swinging while walking To make the character's gait more natural, we will add a slight wiggle of the weapon while moving. To create the animation we will use the installed library. tween.js The component will be wrapped in a group tag so that you can add a reference to it via the hook. Weapon useRef Let's add some to save the animation. useState Let's create a function to initialise the animation. Code Explanation: Creating an animation of an object "swinging" from its current position to a new position. const twSwayingAnimation = new TWEEN.Tween(currentPosition) ... Creating an animation of the object returning back to its starting position after the first animation has completed. const twSwayingBackAnimation = new TWEEN.Tween(currentPosition) ... Connecting two animations so that when the first animation completes, the second animation automatically starts. twSwayingAnimation.chain(twSwayingBackAnimation); In we call the animation initialisation function. useEffect Now it is necessary to determine the moment during which the movement occurs. This can be done by determining the current vector of the character's direction. If character movement occurs, we will refresh the animation and run it again when finished. Code Explanation: Here the object's movement state is checked. If the direction vector has a length greater than 0, it means that the object has a direction of movement. const isMoving = direction.length() > 0; This state is executed if the object is moving and the "swinging" animation has finished. if (isMoving && isSwayingAnimationFinished) { ... } In the component, let's add a where we will update the tween animation. App useFrame updates all active animations in the library. This method is called on each animation frame to ensure that all animations run smoothly. TWEEN.update() TWEEN.js Section code: First commit Second commit Recoil animation We need to define the moment when a shot is fired - that is, when the mouse button is pressed. Let's add to store this state, to store a reference to the weapon object, and two event handlers for pressing and releasing the mouse button. useState useRef Let's implement a recoil animation when clicking the mouse button. We will use library for this purpose. tween.js Let us define constants for recoil force and animation duration. As with the weapon wiggle animation, we add two useState states for the recoil and return to home position animation and a state with the animation end status. Let's make functions to get a random vector of recoil animation - and . generateRecoilOffset generateNewPositionOfRecoil Create a function to initialise the recoil animation. We will also add , in which we will specify the "shot" state as a dependency, so that at each shot the animation is initialised again and new end coordinates are generated. useEffect And in , let's add a check for "holding" the mouse key for firing, so that the firing animation doesn't stop until the key is released. useFrame Section code Animation during inactivity Realise the animation of "inactivity" for the character, so that there is no feeling of the game "hanging". To do this, let's add some new states via . useState Let's fix the initialisation of the "wiggle" animation to use values from the state. The idea is that different states: walking or stopping, will use different values for the animation and each time the animation will be initialised first. Conclusion In this part we have implemented scene generation and character movement. We also added a weapon model, recoil animation when firing and at idle. In the next part we will continue to refine our game, adding new functionality. Also published . here