What is digital forensics in forensic science? Digital forensics plays a major role in forensic science. It’s a combination of people, process, technology, and law. Some notable methodologies are used to identify, collect, protect, preserve, analyze, extract, incident activity, recovery, and document a digital evidence report as per regional and international jurisdictions where the cybercrime occurred. Throughout the investigation data acquisition, data analysis, data integrity, data extraction, and reporting play a crucial role in the process. The digital forensic industrial practices and services vary from one region to other regions across the globe. In 2012, ISO (the International Organization for Standardization) and IEC (the International Electrotechnical Commission) launched an for Guidelines for identification, collection, acquisition, and preservation of digital evidence. Since then, different organizations frame their policies and implement them based on the Codes of Practice and Conduct for digital Forensic standards. There are some other notable used in practice, such as for and , and standards for conducting a conformity assessment on the evidence. ISO/IEC 27037:2012 common framework ISO/IEC frameworks ISO/IEC 17025 digital testing laboratory setup ISO/IEC 17020:2012 There are several branches in digital forensics that play an active role in cybercrime divisions. As per ISO/IEC 27037 framework, the examiner should adhere to the use of tools validated by the body. Data Acquisition, Data Validation and verification (V&V), Evidence Extraction, Data Reconstruction, and Documentation. There are many open-source and proprietary Digital Forensics Tools available in the market such as the Sleuth Kit, FTK Imager, Xplico, osForensics, Winhex, etc., What is NIST definition of digital forensics? Digital forensics is used to identify, collect, protect, preserve, analyze, extract, incident activity, recovery, and document a digital evidence report for cybercrime activities on the victim and criminal offender’s evidence for legal liabilities, civil, administrative, and criminal proceedings. Digital forensic investigation is carried out by law enforcement, and individual and private entities. Throughout the investigation data acquisition, data analysis, data integrity, data extraction, and reporting play a crucial role in the process. The key characteristics that one should possess to become a successful digital forensics examiner? Anything comes to your mind now? In the digital forensic field, the roles and responsibilities of a forensic practitioner adhere to the digital service delivery of cybercrimes, security incidents, and other related crimes. This role required several skill sets to achieve high-level forensics examiner experience in capturing, analyzing, and extracting the digital data from the evidence. The following skill sets are requisite to be a forensic practitioner. ✓Investigative strategy ✓Education and experience in Information technology, Cybersecurity, cybercrime, and forensics field. ✓Existing and new forensic Tools and Techniques (T&T). ✓Laws and Industry regulations knowledge. ✓Industry practices. ✓Ethics in professionalism. ✓Emotional intelligence. ✓Competent and problem-solving. ✓Professional certifications in Cybersecurity, digital forensics, and hacking. ✓Subject-matter expert (SME) to the team. ✓Chain of custody. ✓Communications skills. Introduction: Since the formation of intellectual property rights. The main purpose and objectives vary from country to country across the globe with consideration such as types are patents, copyrights, trademarks, and trade secrets etc., Our main investigational focus is to examine a USB drive belonging to an employee who left the company and now works for a competitor. Investigation and Development Procedures: To conduct internal digital investigations and forensics examinations on company computing systems. Our main investigational focus is to examine a USB drive belonging to an employee who left the company and now works for a competitor. We have received additional instructions with the keyword “ ” to look for the documents in the USB drive. In this section, we examine the USB drive that might relate to this case. All the required procedures such as i various operations are documented with , it’s an open-source tool . confidential to identify any evidentiary artefacts dentifying, analyzing, investigating, developing, and testing Autopsy [1] Hands-On Project 1/Hands-On Project 2/Hands-On Project 3 Assessment Scope: The assessment scope of the Digital forensic investigations for this case is as follows: To analyze the digital media with respect to the evidence on Company proprietary materials. Giggig Tech To capture a disk image using “Access Data FTK Imager Lite” for digital forensic investigations. To analyze the USB to discover evidence related to M57 Patent Case. To discover the metadata using WinHex editor. To explore different types of File Headers. Hands-On Project 1–3 First, Open the “Autopsy tool” Home screen window on your PC. As shown in Figure 1. Step 1: Start Autopsy for Windows and click the icon. In the New Case Information window, enter in the Case Name text box. Step 2: Create New Case C1Prj01 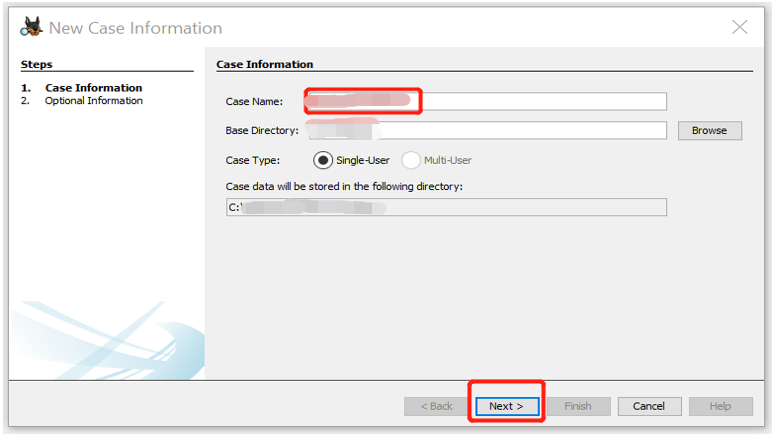 Now, Click next to the Base Directory text box. Navigate to and click your work folder, and then click . Step 3: Browse Next In the Select Data Source window, click the list arrow, and click . Click the button next to the “Browse for an image file” text box, navigate to and click your work folder and the file, and then click . Click . In the Configure Ingest Modules window, click . Click and then . Step 4: Select data source type Disk Image or VM file Browse C1Prj01.E01 Open Next Select All Next Finish 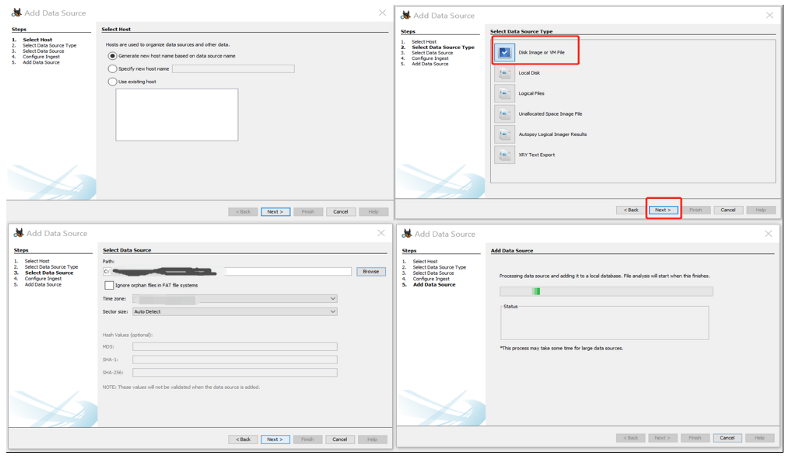 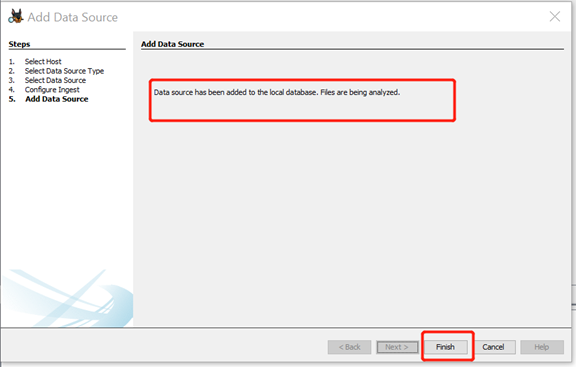 In the Tree Viewer pane, expand , , , and . We examine each subfolder under the Tree pane section to determine which folder might contain to this case. Step 5: Views File Types By Extension Documents files of interest If you found any files related to the case, select the files as a group, right-click the selection, and click . In the Save dialogue box, click to save the files automatically in Autopsy’s case subfolder: \Chap01\Projects\C1Prj01\Export. Step 6: Extract File(s) Save Work Write a short report of no more than one paragraph in the report, including facts from any content you found. When you’re finished, leave Autopsy running if you’re continuing to the next project. Step 7 Conclusion: In this USB investigation case, we identified and analyzed the seized USB drive for any potential breakthrough in this case. As a result, we successfully extracted the two files (one text file and one Excel sheet). Based on the extracted files from Autopsy, we identified Sylvia left a suicide note as shown in Figure 8. Furthermore, in Figure 9, an Excel sheet briefs about the asset auditing information. Sylvia’s life insurance is valued at $1 million set along with the rest of the assets. That concludes this case is related to a possible murder by her boyfriend to claim the insurance and other assets as a partner. Hands-On Project 2–2 Investigation and Development Procedures: To conduct internal digital investigations and forensics examinations on company computing systems. Our main investigational focus is to examine a USB drive belonging to an employee who left the company and now works for a competitor. We have received additional instructions with the keyword “confidential” to look for the documents in the USB drive. In this section, we examine the USB drive to identify any evidentiary artefacts that might relate to this case. First, Open the “Autopsy tool” Home screen window on your PC. As shown in Figure 1. Step 1: Special Note: Please, refer to Hands-on project 1–2, and repeat the same procedures from step2 to step5. To create, browse, select folders and create a workspace, procedures are similar to Hands-on project 2–2. Click the button at the far upper right, type “confidential” in the text box, and then click . Step 6: Keyword Search Search In the Result Viewer pane, a new tab named opens. Click each file to view its contents in the Content Viewer pane. Step 7: Keyword search 1 to select the files in the Keyword search 1 tab. Right-click this selection, point to , and click . In the Create Tag dialogue box, click the button, type in the Tag Name text box, and then click . Step 8: Ctrl + right-click Tag File Tag and Comment New Tag Name Recovered Office Documents OK In the Create Tag dialogue box, click the button, type in the Tag Name text box, and then click . New Tag Name Recovered Office Documents OK Click at the top. In the Generate Report window, click the option button in the Report Modules section, and then click . Step 9: Generate Report Results — Excel Next In the Configure Artefacts Report window, click the button, click the check box, and then click . Step 10: Tagged Results Recovered Office Documents Finish In the Report Generation Progress Complete window, click the pathname to open the Excel report. This Excel file should have several tabs of information about the files you tagged for this project. Step 11: Results — Excel Write a memo to Ms. Jones, including facts from any content you found, make sure to list the filenames where you found a hit for the keyword. List the cluster numbers for hits that occurred in unallocated space. Include the Excel spreadsheet with the report. Step 12: Conclusion: In this USB investigation case, we identified, and analyzed the seized USB drive for any potential breakthrough in this case. As a result, we successfully extracted the Nine files with the given keyword “ ” and generated an Excel sheet. Confidential Based on the extracted files from Autopsy, we identified Ex-Employee taking the company’s confidential and trade secret documents as shown in Figure 8. And Figure 13. Furthermore, an Excel sheet briefs about the Confidential file information to put forward the case legally with the proceedings. That concludes, this case is related to Intellectual property (IP) theft by an Ex-employee and shared with the competitor for grants in exchange. Hands-On Project 3–3 Investigation and Development Procedures: To conduct internal digital investigations and forensics examinations on the company’s trade secret theft. Our main investigational focus is that was to the HR department belonging to , Ralph Williams, who left the company and We have received additional instructions Ralph Williams that contained from April 2006, to in the USB drive which was shared with the new employer Smith Sloop Boats, a competitor of ACE Sailboats. Ms. Olsen specified; another specialist has already made an image of the USB drive in the Expert Witness format (with an . E01 extension). In this section, we need to examine its contents for any photograph files and other artefacts that might relate to this case to justify whether the anonymous complaint is true or a false flag. to examine a USB drive received through an anonymous letter a former employee now works for a competitor. to take photos belonging to ACE Sailboats Pvt ltd., trade secrets look for the Photos First, Open the “Autopsy tool” Home screen window on your PC. As shown in Figure 1. Step 1: Special Note: Please, refer to Hands-on project 1–2, and repeat the same procedures from step2 to step5. To create, browse, select folders and create a workspace, procedures are similar to Hands-on project 3–2. In the Result Viewer pane, scroll to the right, if necessary, until the Modified Time column is in view. Sort the column by clicking the header. Step 6: Modified Time Scroll down until you find the first file with a starting month of April 2006, and then click the file to view it in the Content Viewer. Press the on the keyboard to view all files created or modified in April 2006. Step 7: down arrow + every file that has a photo of a boat or part of a boat. Right-click this selection, point to and then , and click . Step 8: Ctrl Right click Tag File Quick Tag Follow Up In the Tree Viewer pane, scroll down and expand , , and . In the Result Viewer pane, click the tab to view the tagged photos. Step 9: Tags Follow Up File Tags Thumbnail To create a report, click Generate Report at the top. In the window, click the option button in the Report Modules section, and then click . Step 10: Generate Report Results — HTML Next In the Configure Artefacts Report window, click the button, click the check box, and then click . Step 11: Tagged Results Follow-Up Finish In the Report Generation Progress window, click the pathname to view the report. When viewing the report, click the links to examine the tagged files. When you’re finished, click in the Report Generation Progress window. Step 12: Results — HTML Close Right-click on the Html Report and Click Open to view the report in detail. Step 13: Contains thumbnails of images that are associated with tagged files and results. Step 14: Conclusion: In this USB investigation case, we identified and analyzed the USB drive for any potential breakthrough in this case. As a result, we successfully extracted the Thirty-seven files with the given instruction “Photos” and generated an HTML report. Based on the extracted files from Autopsy, we identified Ex-Employee didn’t take the company’s confidential and Trade secret documents as shown in Figure 15 summary. Furthermore, an Excel sheet briefs about the Confidential file information to put forward the case legally with the proceedings. That concludes, this case is not related to Intellectual property (IP) theft by an Ex-employee, and this claim is a false flag. — — — — — — — — — — — — — — — — — — — — — — — — — THE END Thanks for reading! Have a pleasant day! Quote of the day: **Growth is often a painful process.** 成長は往々にして苦痛を伴う過程である。