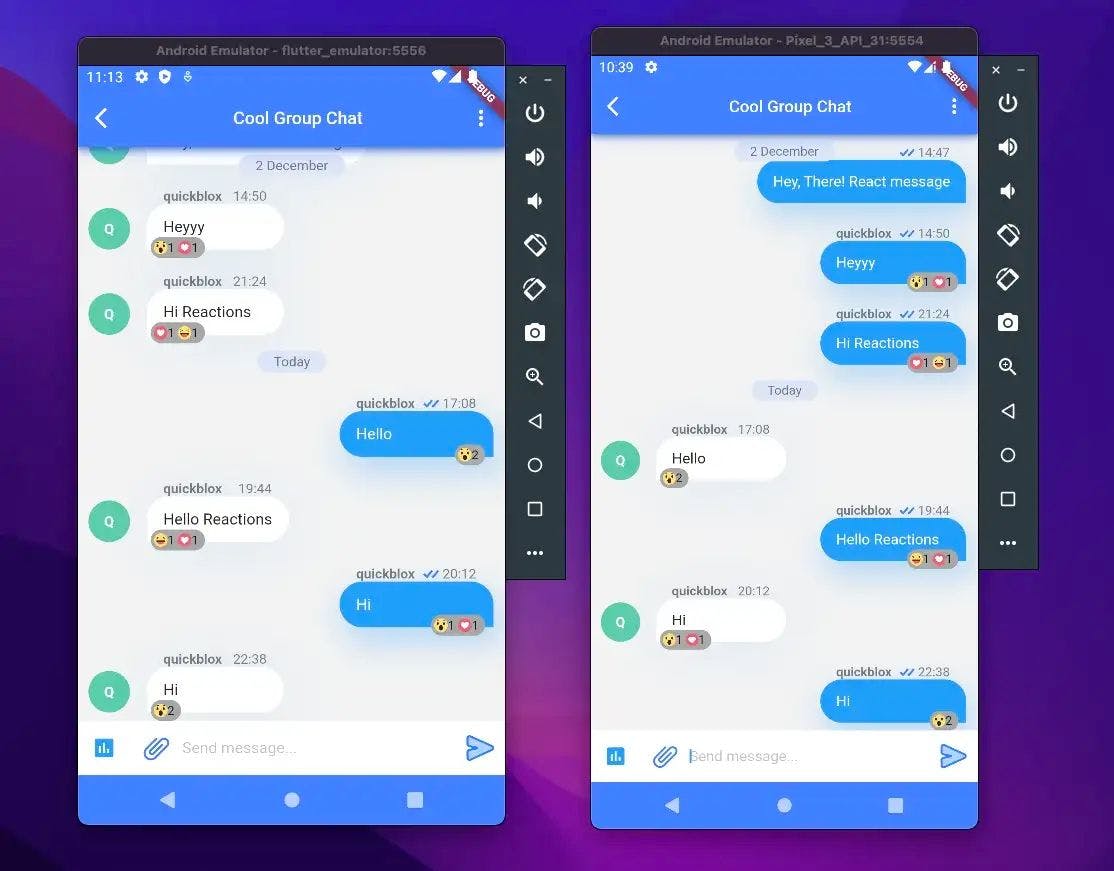
This article is in the continuation of our series of articles, in which we are building cool chat features on top of SDK. The last article can be found . In this article, we are going to extend the existing functionalities of Quickblox SDK to build a react-to-message feature like Facebook. Quickblox here The format of this article is going to be the same as of last one, So if you have read the last one, please feel free to skip the first section. Here is an index of the sections we will be covering. Please feel free to skip some or read throughout for maximum value. 😃 Getting Started Quickblox Custom Objects and Data Models Writing the logic to support reactions. Building the UI Combining everything Next steps Getting Started This section is all about setting up the template application on which we can start building the polls functionality. We have taken some code from the official application of Quickblox to get started quickly with the chat screen. chat_sample For simplicity of this article, We only have 3 screens. Splash, Login, and Chat screen. We have also hard-coded the on the Chat screen so that we are directly taken to the required Group chat. _dialogId The template application code can be found . here Initial Setup Create a new account following . You can also use your Google or GitHub accounts to sign in. this link Create an app by clicking the button. New app Configure your app. Type in the information about your organization into corresponding fields and click button. Add Go to Dashboard => => Overview section and copy your Application ID, Authorization Key, Authorization Secret, and Account Key. YOUR_APP Once you have the application credentials, You can paste them into a the file, which is present in the template application. main.dart If you have followed the above steps correctly, you can now run the application by using the following commands: We have put our credentials in the file and added them to the for security reasons, we recommend you do the same too. keys.env .gitignore flutter packages get flutter run Voila! You should have a basic chat application up and running now. Quickblox Custom Objects and Data Models In this section, we will first understand the data models provided by Quickblox, followed by creating our own models on top of it to extend functionalities and build polls. Let’s begin by understanding the provided data models by Quickblox. is a default data object provided by Quickblox that stores id(message identifier), body(text message), properties(extra metadata) etc. QBMessage In this project, we have also created a which is a wrapper around the QBMessage with additional fields like senderName, date etc that come in handy to display the messages data in the chat screen. QBMessageWrapper While with its parameter is great to render static text messages, location, weblink etc, it cannot be used to host interactive polls that update over time. QBMessage properties For this, Quickblox provides us with which is basically a custom schema key-value database that can be updated in realtime and hence is a perfect fit to host polls. Custom Objects To set it up, let’s head over to our and prepare a custom schema class as below. Quickblox Dashboard > Custom > Add > Add New Class Reaction Once created, open and change the permission level and checkboxes as follows. Edit Permission Without open permissions, the users cannot update the Poll values from the app. Let’s create some data models to hold the properties, which is a map of user ids of users and the reaction ids of the reactions which they reacted with on a message. we also have a method, which will return us a Map of this class which is required to create our custom object. MessageReactProperties reacts toJson Reaction which holds , , , and . These properties will help us in updating our custom object. we also have a getter that will the reacts with the user-chosen option and returns the updated value. MessageActionReact messageReactId reacts currentUserId chosenReactionId updatedReacts recalculate All the map values are jsonEncoded into strings, since quickblox custom objects doesn’t support map datatype. import 'dart:convert'; class MessageReactProperties { const MessageReactProperties({ required this.reacts, }); final Map<String, String> reacts; Map<String, String> toJson() { return { "reacts": jsonEncode({}), }; } factory MessageReactProperties.fromData() { return const MessageReactProperties( reacts: {}, ); } } class MessageActionReact { const MessageActionReact({ required this.messageReactId, required this.reacts, required this.currentUserId, required this.chosenReactionId, }); final String messageReactId; final Map<String, String> reacts; final String chosenReactionId; final String currentUserId; Map<String, String> get updatedReacts { reacts[currentUserId] = chosenReactionId; return {"reacts": jsonEncode(reacts)}; } } The above models are used to parse and send the data, we also need a model that will come in handy when we receive the data. Let’s create a class extending to hold the reaction-specific properties. ReactionMessage QBMessageWrapper import 'dart:convert'; import 'package:quickblox_polls_feature/models/message_wrapper.dart'; import 'package:quickblox_sdk/models/qb_custom_object.dart'; import 'package:quickblox_sdk/models/qb_message.dart'; class ReactionMessage extends QBMessageWrapper { ReactionMessage( super.senderName, super.message, super.currentUserId, { required this.messageReactId, required this.reacts, }); final String messageReactId; final Map<String, String> reacts; factory ReactionMessage.fromCustomObject(String senderName, QBMessage message, int currentUserId, QBCustomObject object) { return ReactionMessage( senderName, message, currentUserId, messageReactId: message.properties!['messageReactId']!, reacts: Map<String, String>.from( jsonDecode(object.fields!['reacts'] as String), ), ); } ReactionMessage copyWith({Map<String, String>? reacts}) { return ReactionMessage( senderName!, qbMessage, currentUserId, messageReactId: messageReactId, reacts: reacts ?? this.reacts, ); } } const REACTION_ID_MAP = { "#001": "assets/images/love.png", "#002": "assets/images/laugh.png", "#003": "assets/images/sad.png", "#004": "assets/images/angry.png", "#005": "assets/images/wow.png", }; You might have already noticed that we also have a constant map, which contains the reaction ids and maps them to the image path of the reactions. This will come in handy when we will get the ids and want to get the corresponding reaction. 😉 All done with the models, Let’s begin with the logic part! Writing the logic to support reactions. In this section, we will write the logic to support reactions by utilizing the data models that we have created in the last section. Let’s create a roadmap of steps that are required for this section We want to support reactions on text messages only for now. Before we send a text message, we want to create a custom object for that message to hold the reactions on it, and the id of the custom object will be passed as a property to the message. When someone reacts, we want to send a reaction message and update the custom object with an updated value of . reacts On the receiver’s end, when we receive a reaction message, we want to get the total reacts and convert it into a . ReactionMessage For the first point, let’s head over to in . This method is called when we send a text message, we will modify it to take additional properties. _sendTextMessage chat_screen_bloc Future<void> _sendTextMessage( String text, { required MessageReactProperties reactProperties, }) async { if (text.length > TEXT_MESSAGE_MAX_SIZE) { text = text.substring(0, TEXT_MESSAGE_MAX_SIZE); } await _chatRepository.sendMessage( _dialogId, text, reactProperties: reactProperties, ); } We have added the named parameter , let’s add it to function in and modify the method according to the second point on the roadmap. reactProperties sendMessage chat_repository Future<void> sendMessage( String? dialogId, String messageBody, { Map<String, String>? properties, required MessageReactProperties reactProperties, }) async { if (dialogId == null) { throw RepositoryException(_parameterIsNullException, affectedParams: ["dialogId"]); } //Create custom object to hold reactions for the message final List<QBCustomObject?> reactObject = await QB.data.create( className: 'Reaction', fields: reactProperties.toJson(), ); //Get the id of custom object final messageReactId = reactObject.first!.id!; //Add the id to message properties properties ??= <String, String>{}; properties['messageReactId'] = messageReactId; //Send message await QB.chat.sendMessage( dialogId, body: messageBody, saveToHistory: true, markable: true, properties: properties, ); } The above code is mostly self-explanatory, we are basically creating a custom object to hold reactions, and passing the id of that object as a property to the message. Moving on, let’s send a reaction message and update the custom object when a user reacts. Let’s create a in . we will push this event from our UI to the BLoC which will trigger the repository call to communicate with Quickblox servers. ReactMessageEvent chat_screen_events class ReactMessageEvent extends ChatScreenEvents { final MessageActionReact data; ReactMessageEvent(this.data); } Now in the , let’s check for . chat_screen_bloc ReactMessageEvent if (receivedEvent is ReactMessageEvent) { try { await Future.delayed(const Duration(milliseconds: 300), () async { await _sendReactMessage( data: receivedEvent.data, ); }); } on PlatformException catch (e) { states?.add( SendMessageErrorState(makeErrorMessage(e), 'Can\'t react to message'), ); } on RepositoryException catch (e) { states ?.add(SendMessageErrorState(e.message, 'Can\'t react to message')); } } Future<void> _sendReactMessage({required MessageActionReact data}) async { await _chatRepository.sendReactMessage( _dialogId, data: data, ); } Now in , create the method and update the reactions in our custom object. chat_repository sendReactMessage Future<void> sendReactMessage( String? dialogId, { required MessageActionReact data, }) async { if (dialogId == null) { throw RepositoryException(_parameterIsNullException, affectedParams: ["dialogId"]); } await QB.data.update( "Reaction", id: data.messageReactId, fields: data.updatedReacts, ); await QB.chat.sendMessage( dialogId, markable: true, properties: { "action": "messageActionReact", "messageReactId": data.messageReactId }, ); } One thing to note here is, we are not saving this reaction message to history. This is because the only purpose of here is to notify the current clients that the reactions on a message has been updated. sendMessage should be used sensibly. Otherwise, for larger groups of more than 100 people, we can find ourselves paginating multiple times only to find a series of useless react messages. Important note: saveToHistroy To know more about params like and you can refer to the official of Quickblox. markable saveToHistory docs This was about the sender’s end, Now let’s think about the receiver’s end. On the receiver’s end, we will have to check if we receive a react message, and update the reactions on the text message. Let’s write the steps to do so. In the file, we have a HashSet < > which stores all the messages sorted by time. chat_screen_bloc QBMessageWrapper _wrappedMessageSet We also have a method , which is called every time when we receive new messages and is responsible for wrapping the (s) in the List< >. We will now update this method to handle the reactions. _wrapMessages() QBMesssage QBMessageWrappers Upon receiving a: : check if message properties contain a . Fetch the corresponding reaction custom object for that id, add the reactions to the message and convert it into a object. TextMessage messageReactId ReactionMessage : if we receive a message with properties having as , then we will get the custom object with the id, get the reactions for the custom object, find the corresponding text message with the id, update the reactions, remove it from the list and add the updated to the list. React message action messageActionReact ReactionMessage Future<List<QBMessageWrapper>> _wrapMessages( List<QBMessage?> messages) async { List<QBMessageWrapper> wrappedMessages = []; for (QBMessage? message in messages) { if (message == null) { break; } QBUser? sender = _getParticipantById(message.senderId); if (sender == null && message.senderId != null) { List<QBUser?> users = await _usersRepository.getUsersByIds([message.senderId!]); if (users.isNotEmpty) { sender = users[0]; _saveParticipants(users); } } String senderName = sender?.fullName ?? sender?.login ?? "DELETED User"; if (message.properties?['action'] == 'pollActionVote') { //SOME CODE HERE } else if (message.properties?['action'] == 'pollActionCreate') { //SOME CODE HERE //OUR CODE HERE } else if (message.properties?['action'] == 'messageActionReact') { //Get the ID out of react message. final id = message.properties!['messageReactId']!; try { //Get the custom object. final reactObject = await _chatRepository .getCustomObject(ids: [id], className: 'Reaction'); //Get updated reactions and update the message. if (reactObject != null) { final reacts = Map<String, String>.from( jsonDecode(reactObject.first!.fields!['reacts'] as String), ); final reactMessage = _wrappedMessageSet.firstWhere((element) => element is ReactionMessage && element.messageReactId == id) as ReactionMessage; _wrappedMessageSet.removeWhere((element) => element is ReactionMessage && element.messageReactId == id); wrappedMessages.add( reactMessage.copyWith(reacts: reacts), ); } } catch (e) { wrappedMessages .add(QBMessageWrapper(senderName, message, _localUserId!)); } } else { if (message.properties?['messageReactId'] != null) { //Get the ID out of react message. final id = message.properties!['messageReactId']!; try { //Get the custom object and add the Reaction Message. final reactObject = await _chatRepository .getCustomObject(ids: [id], className: 'Reaction'); if (reactObject != null) { wrappedMessages.add( ReactionMessage.fromCustomObject( senderName, message, _localUserId!, reactObject.first!, ), ); } } catch (e) { wrappedMessages .add(QBMessageWrapper(senderName, message, _localUserId!)); } } else { wrappedMessages .add(QBMessageWrapper(senderName, message, _localUserId!)); } } } return wrappedMessages; } To keep the code snippets short and crisp, We have commented the remaining code as “SOME CODE HERE”. Building the UI We now have the data models ready, we have the reactions logic ready, Let’s now focus on building a good-looking UI for our reactions feature. Let’s start by building a way to long press on a message and have various reactions to react with. when we long press on a message, we already have a list of , which contains options like , , etc. PopupMenuItem Forward Delivered to Now, is basically a widget that holds a child widget and a value to later identify it in the list, but we want to make it hold a list of reaction images placed horizontally. So let’s create our own widget for that by extending the base class of i.e. . PopupMenuItem PopupMenuItem PopupMenuEntry import 'package:flutter/material.dart'; class PopupMenuWidget<T> extends PopupMenuEntry<T> { const PopupMenuWidget({ Key? key, required this.height, required this.child, }) : super(key: key); final Widget child; @override final double height; @override PopupMenuWidgetState createState() => PopupMenuWidgetState(); @override bool represents(T? value) => true; } class PopupMenuWidgetState extends State<PopupMenuWidget> { @override Widget build(BuildContext context) => widget.child; } In chat_screen, we have a GestureDetector around ChatListItem, which we are using to detect long presses on the message. Let’s create a new list of reactions here. onLongPress: () { RenderBox? overlay = Overlay.of(context) ?.context .findRenderObject() as RenderBox; //OUR CODE List<PopupMenuEntry> messageMenuItems = [ PopupMenuWidget( height: 20, child: Row( mainAxisAlignment: MainAxisAlignment.spaceEvenly, children: [ for (var reaction in REACTION_ID_MAP.entries) _reactWidget( reaction.value, () { //TODO: FIGURE OUT LATER. }, ), ], ), ), //SOME CODE HERE } Widget _reactWidget( String imagePath, VoidCallback onPressed, ) { return InkWell( onTap: onPressed, child: Ink.image( image: AssetImage( imagePath, ), height: 25, width: 25, ), ); } The assets used in this project can be downloaded from the attached GitHub repository. We have a TODO in the above code, that we will figure out in the next section. With this, we have a simple (yet cool-looking), popup menu with reactions that look something like this. But when we react to a message, how would we or the receiver know that we have reacted to it? Let’s also create a minimal UI for that. return GestureDetector( child: message is ReactionMessage ? Stack( children: [ ChatListItem( Key( RandomUtil.getRandomString( 10), ), message, _dialogType, ), Positioned( right: message.isIncoming ? null : 20, left: message.isIncoming ? 70 : null, bottom: 0, child: message.reacts.isEmpty ? const SizedBox.shrink() : Container( decoration: BoxDecoration( color: Colors.grey, borderRadius: const BorderRadius .all( Radius.circular(10), ), border: Border.all( width: 3, color: Colors.grey, style: BorderStyle .solid, ), ), child: Row( children: [ for (var reaction in reactionCountMap .entries) Row( children: [ Image.asset( REACTION_ID_MAP[ reaction .key]!, height: 13, width: 13, ), Text( '${reaction.value} ', style: const TextStyle( fontSize: 12.0, ), ), ], ), ], ), ), ), ], ) : ChatListItem( Key( RandomUtil.getRandomString(10), ), message, _dialogType, ), // SOME CODE HERE ); We are checking if the message is a reaction message, and showing the reactions on the bottom right corner of the message. With this our message with some reactions looks like this: Well, that looks cool, right? but we don’t yet know how many people reacted with which reaction. 🤔 Let’s create a map to hold the unique reactions and the number of reactions and update the loop to utilize that map. //Map to hold unique reactions and their count var reactionCountMap = <String, int>{}; if (message is ReactionMessage) { var elements = message.reacts.values.toList(); //Populating the map for (var x in elements) { reactionCountMap[x] = !reactionCountMap.containsKey(x) ? (1) : (reactionCountMap[x]! + 1); } } return GestureDetector( child: Stack( children: [ ChatListItem( Key( RandomUtil.getRandomString(10), ), message, _dialogType, ), if (message is ReactionMessage) Positioned( right: message.isIncoming ? null : 20, left: message.isIncoming ? 70 : null, bottom: 0, child: message.reacts.isEmpty ? const SizedBox.shrink() : Container( decoration: BoxDecoration( color: Colors.grey, borderRadius: const BorderRadius .all( Radius.circular(10), ), border: Border.all( width: 3, color: Colors.grey, style: BorderStyle.solid, ), ), //Iterating over map and displaying reactions and counts. child: Row( children: [ for (var reaction in reactionCountMap .entries) Row( children: [ Image.asset( REACTION_ID_MAP[ reaction .key]!, height: 13, width: 13, ), Text( '${reaction.value} ', style: const TextStyle( fontSize: 12.0, ), ), ], ), ], ), ), ), ], ), // SOME CODE HERE ); That looks even better right? and with this, we are done with the UI part.😄 Combining everything We are almost there, it’s finally time to combine our UI with our logic. Although it’s going to be simple, I would still write down the steps that are required to do it. When we press any reaction on a message, we need to push an event to our BLoC to update the custom object and send a react message. We also need to take care of the older reactions to preserve the reactions and not overwrite them. If we/any user is reacting twice, we need to update the corresponding entry to hold the latest reaction only. In the GestureDetector, let’s figure out the TODO onLongPress: () { RenderBox? overlay = Overlay.of(context) ?.context .findRenderObject() as RenderBox; //OUR CODE List<PopupMenuEntry> messageMenuItems = [ PopupMenuWidget( height: 20, child: Row( mainAxisAlignment: MainAxisAlignment.spaceEvenly, children: [ for (var reaction in REACTION_ID_MAP.entries) _reactWidget( reaction.value, () { //Add ReactMessageEvent to the BLoC with chosen reaction. //Pass the old reactions map to preserve them. bloc?.events?.add( ReactMessageEvent( MessageActionReact( chosenReactionId: reaction.key, currentUserId: message .currentUserId .toString(), messageReactId: message .qbMessage .properties![ "messageReactId"]!, reacts: (message as ReactionMessage) .reacts, ), ), ); //Dismiss the popup menu Navigator.of(context).pop(); }, ), ], ), ), We are pushing the reaction event to the BLoC, which will basically inform the system that a reaction has been made. Rest is already handled by our logic part, where we are just detecting the event and calling the method from class to communicate with Quckblox servers. chat_repository With this, we are finally done and if you have followed all the steps correctly, you should have the reaction feature ready and working. In any case, if you see any errors or any left-out pieces, you can always match your code with the full source code available in our . repository Next Steps This article was more focused on building the functionality of the basic reaction, instead of refining the UI/UX and focusing on nitty gritty details, Here are a few things that we think could be improved. Animations in the reactions (like Facebook). Showing a list of users and their reactions when tapped on reactions. Highlighting the previous reaction, when a user tries to react again. Removing the reaction. You let us know. 😉 References https://docs.quickblox.com/docs https://github.com/PixelAppsMobile/quickblox-chat-fun-feature https://www.pixelapps.io/ Also published . here


![How To Build a Chat Application using Libp2p [A Step By Step Guide]](https://hackernoon.imgix.net/drafts/db6o2a4g.png?auto=format&fit=max&w=3840)