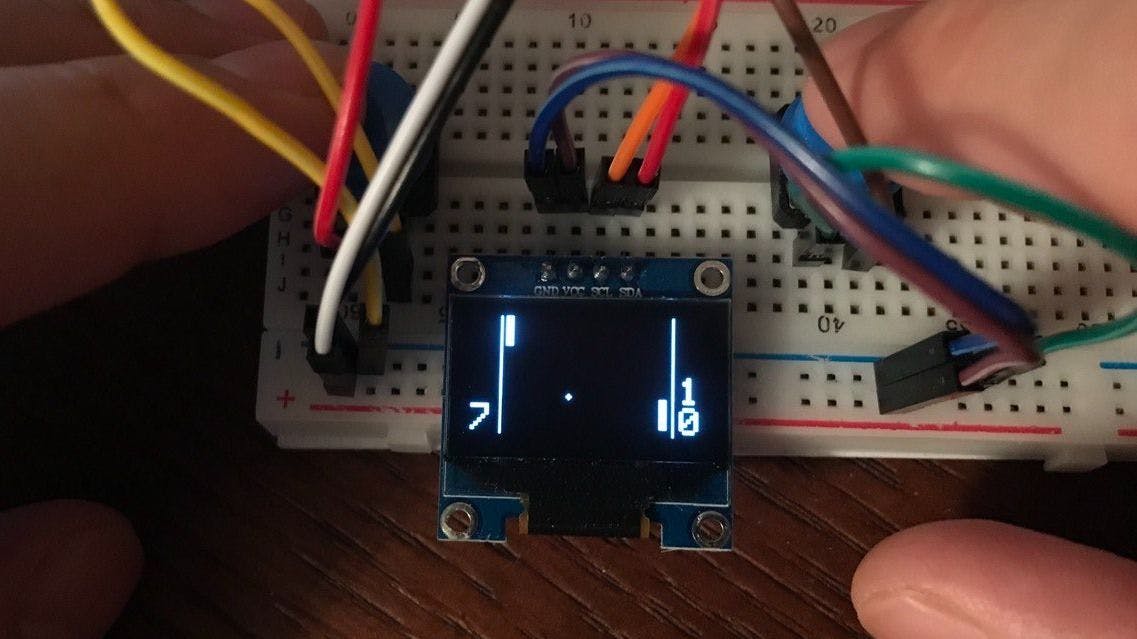
मैंने Arduino बोर्ड पर लोकप्रिय पोंग गेम को विकसित करने का एक तरीका निकाला है। खेल जटिल नहीं है लेकिन विकसित करने और खेलने के लिए दिलचस्प है। यहां 0.96 इंच OLED डिस्प्ले और दो बटन का इस्तेमाल किया गया है। डिस्प्ले छोटा है लेकिन हमारे प्रोजेक्ट के लिए काफी है। हमारे रैकेट को ऊपर और नीचे ले जाने के लिए दो बटनों का उपयोग किया जाएगा। पहले और आखिरी 16 पिक्सल का इस्तेमाल स्कोर दिखाने के लिए किया जाएगा. डिस्प्ले का साइज 128x64 पिक्सल है। स्कोर लंबवत प्रदर्शित किए जाएंगे। एक रैकेट खिलाड़ी द्वारा नियंत्रित किया जाएगा, और दूसरा, प्रतिद्वंद्वी को Arduino द्वारा नियंत्रित किया जाएगा। हम कोड लिखेंगे ताकि वह गेंद की ओर बढ़ने की कोशिश करे। खेल की शुरुआत में, यह धीरे-धीरे आगे बढ़ेगा, और फिर, यह धीरे-धीरे तेज हो जाएगा। हम गेंद की दिशा को ball_direction_X और ball_direction_Y चर के माध्यम से नियंत्रित करेंगे। गेंद प्रत्येक क्षण एक निश्चित दिशा में गति करेगी। यदि गेंद दीवार से टकराती है, तो ball_direction_Y उलट जाएगी और ball_direction_X और रैकेट के लिए भी यही तर्क होगा। प्रोजेक्ट कोड मेरे GitHub पर प्रकाशित हुआ है। 'Arduino Ping Pong Game' प्रोजेक्ट पेज संबंध बटन का एक पैर GND से जुड़ा होगा। दूसरे पैर Arduino के पिन 6 और 5 से जुड़े होंगे। डिस्प्ले I2C पिन से जुड़ा होगा: V - 5V, GND - GND, SCL - A5, SDA - A4। Arduino पर पोंग विकसित करना आइए पुस्तकालयों को शामिल करें और उन सभी चरों को आरंभ करें जिनकी हमें आवश्यकता है। यहां हमारे पास बटन, स्कोर, खिलाड़ी, प्रतिद्वंद्वी और गेंद से संबंधित चर हैं। //oled libraries: #include <SPI.h> #include <Wire.h> #include <Adafruit_GFX.h> #include <Adafruit_SSD1306.h> //oled vars: #define SCREEN_WIDTH 128 // OLED display width, in pixels #define SCREEN_HEIGHT 64 // OLED display height, in pixels #define OLED_RESET 4 // Reset pin # (or -1 if sharing Arduino reset pin) #define SCREEN_ADDRESS 0x3C ///< See datasheet for Address; 0x3D for 128x64, 0x3C for 128x32 Adafruit_SSD1306 display(SCREEN_WIDTH, SCREEN_HEIGHT, &Wire, OLED_RESET); //Button pins: const int buttonUP = 6; const int buttonDOWN = 5; //button vars: int lastButtonStateUP = LOW; // the previous reading from the input pin int lastButtonStateDOWN = LOW; // the previous reading from the input pin unsigned long debounceDelay = 10; // the debounce time; increase if the output flickers //GAME vars: //scores: int player_score = 0; int enemy_score = 0; //player: int player_position_X = 19; // static int player_position_Y = 0; int player_width = 16; int player_thickness = 4; //enemy: int enemy_position_X = 104; // static int enemy_position_Y = 47; int enemy_width = 16; int enemy_thickness = 4; long enemy_last_move_time = 0; long enemy_speed_of_moving = 2000;//update time in ms //ball: //void fillCircle(uint16_t x0, uint16_t y0, uint16_t r, uint16_t color); int ball_position_X = 63; int ball_position_Y = 31; int ball_radius = 1; int ball_direction_X = 3; int ball_direction_Y = 3; int ball_speed = 8;//9,8,7...1 long ball_last_move_time = 0; में, हम बटन, सीरियल, रैंडमसीड और डिस्प्ले शुरू करेंगे। उसके बाद, हम एक स्टार्टर स्क्रीन दिखाएंगे और गेम शुरू करेंगे: सेटअप void setup() { pinMode(buttonUP, INPUT_PULLUP); pinMode(buttonDOWN, INPUT_PULLUP); Serial.begin(9600); Serial.println("Start"); //initiate random randomSeed(analogRead(0)); ball_direction_X = -3; ball_direction_Y = random(-5, 5); //ball_direction_Y = -5;//test // SSD1306_SWITCHCAPVCC = generate display voltage from 3.3V internally if(!display.begin(SSD1306_SWITCHCAPVCC, SCREEN_ADDRESS)) { Serial.println(F("SSD1306 allocation failed")); for(;;); // Don't proceed, loop forever } // Show initial display buffer contents on the screen -- // the library initializes this with an Adafruit splash screen. display.display(); // Clear the buffer display.clearDisplay(); //draw lines: display.drawLine(16, 0, 16, 63, SSD1306_WHITE); display.drawLine(111, 0, 111, 63, SSD1306_WHITE); display.display(); //scores field init: display.setTextSize(2); display.setTextColor(SSD1306_WHITE); // Draw white text player_score = 8888; // test enemy_score = 8888; // test print_score(player_score, 0); print_score(enemy_score, 115); display.setTextSize(3); display.setCursor(28, 0); display.write("Ping"); display.setCursor(28, 31); display.write("Pong"); display.display(); display.setTextSize(2); delay(2000); // Pause for 2 seconds //NEW GAME: // Clear the buffer display.clearDisplay(); //draw lines: display.drawLine(16, 0, 16, 63, SSD1306_WHITE); display.drawLine(111, 0, 111, 63, SSD1306_WHITE); display.display(); //Write scores: player_score = 0; //reset player_score enemy_score = 0; //reset enemy_score print_score(player_score, 0); print_score(enemy_score, 115); //Display players: //void fillRect(uint16_t x0, uint16_t y0, uint16_t w, uint16_t h, uint16_t color); display.fillRect(player_position_X, player_position_Y, player_thickness, player_width, SSD1306_WHITE); display.fillRect(enemy_position_X, enemy_position_Y, enemy_thickness, enemy_width, SSD1306_WHITE); display.display(); // Update screen with each newly-drawn rectangle //Display the ball: display.fillCircle(ball_position_X, ball_position_Y, ball_radius, SSD1306_WHITE); display.display(); delay(500); // Pause for 0.5 second } में, हमारे पास तीन मुख्य कार्य हैं जिन्हें नीचे विस्तार से समझाया जाएगा। लूप void loop() { buttons_check(); move_the_ball_and_check_for_collisions(); move_enemy(); } फ़ंक्शन में, हम जांच करेंगे कि यूपी या डाउन बटन दबाया गया है या नहीं और तदनुसार खिलाड़ी के रैकेट की स्थिति को अपडेट करें। रैकेट स्थिति परिवर्तन तीन मुख्य चरणों में किया जाता है: पुरानी स्थिति में एक काला आयत बनाना, स्थिति चर बदलना, और नई स्थिति में एक सफेद आयत बनाना। बटन_चेक void buttons_check(){ if (!digitalRead(buttonUP) && !lastButtonStateUP) { lastButtonStateUP = true; // Serial.println("UP pressed"); if(player_position_Y > 0){ display.fillRect(player_position_X, player_position_Y, player_thickness, player_width, SSD1306_BLACK); player_position_Y = player_position_Y-3; display.fillRect(player_position_X, player_position_Y, player_thickness, player_width, SSD1306_WHITE); display.display(); // Update screen with each newly-drawn rectangle } } if (digitalRead(buttonUP) && lastButtonStateUP) { lastButtonStateUP = false; } if (!digitalRead(buttonDOWN) && !lastButtonStateDOWN) { lastButtonStateDOWN = true; // Serial.println("DOWN pressed"); if(player_position_Y < 64-player_width){ display.fillRect(player_position_X, player_position_Y, player_thickness, player_width, SSD1306_BLACK); player_position_Y = player_position_Y+3; display.fillRect(player_position_X, player_position_Y, player_thickness, player_width, SSD1306_WHITE); display.display(); // Update screen with each newly-drawn rectangle } } if (digitalRead(buttonDOWN) && lastButtonStateDOWN) { lastButtonStateDOWN = false; } } फ़ंक्शन में, हम गेंद को स्थानांतरित करेंगे और क्षैतिज दीवारों, रैकेट और ऊर्ध्वाधर दीवारों (खिलाड़ी की जीत या हार) के साथ टकराव की जांच करेंगे। दीवार को हिलाने से पहले, हम गेंद की आखिरी चाल से गुजरने वाले आवश्यक समय की जांच करेंगे। मैंने आवश्यक समय निर्धारित किया है क्योंकि गेंद की गति बीस से गुणा की जाती है। गेंद को प्रदर्शित करने के लिए हम एक भरा हुआ वृत्त खींचेंगे। सामान्य तौर पर, बॉल पोजीशन अपडेट उसी तरह किया जाएगा जैसे रैकेट पोजीशन अपडेट। move_the_ball_and_check_for_collisions क्षैतिज दीवारों में से एक के साथ गेंद की टक्कर की जांच करने के लिए हमें यह सुनिश्चित करने की आवश्यकता है कि ball_position_Y और ball_direction_Y का जोड़ 0 और 63 के बीच की सीमा में है (-1 से कम नहीं और 64 से अधिक नहीं)। यदि ऐसा है, तो ball_direction_Y उलट जाएगा। यह जांचने के लिए कि क्या खिलाड़ी का रैकेट गेंद से चूक गया है, हमें यह जांचना होगा कि क्या ball_position_X, खिलाड़ी_स्थिति_X से कम है और खेल का एक नया दौर शुरू करें। दुश्मन के रैकेट के लिए भी यही तर्क है, क्योंकि इसे मैदान के दूसरी तरफ रखा गया है, चेक अधिक के लिए होगा। यह जांचने के लिए कि खिलाड़ी का रैकेट गेंद से टकराया है या नहीं, हम जांच करेंगे कि गेंद रैकेट के अंदर है या नहीं। यदि ऐसा है, तो ball_direction_X उलट जाएगा और ball_direction_Y के लिए एक यादृच्छिक मान दिया जाएगा। हमेशा की तरह दुश्मन के रैकेट से गेंद को मारने का भी यही तर्क है। void move_the_ball_and_check_for_collisions(){ //move th ball: if(millis() > ball_speed*20+ball_last_move_time){ //erase ball on old position: display.fillCircle(ball_position_X, ball_position_Y, ball_radius, SSD1306_BLACK); display.display(); //set new posion of the ball: ball_position_X = ball_position_X + ball_direction_X; if(ball_position_Y + ball_direction_Y < -1) ball_direction_Y = ball_direction_Y * -1; if(ball_position_Y + ball_direction_Y > 64) ball_direction_Y = ball_direction_Y * -1; ball_position_Y = ball_position_Y + ball_direction_Y; //draw ball on new position: display.fillCircle(ball_position_X, ball_position_Y, ball_radius, SSD1306_WHITE); display.display(); // Serial.print("ball_position_Y: "); Serial.println(ball_position_Y); ball_last_move_time = millis(); //Check for player loose: if(ball_position_X < player_position_X){ Serial.println("Player lose!"); newRound("enemy");//player } //check for collision of the ball and the player: if(player_position_X <= ball_position_X && player_position_X+player_thickness >= ball_position_X && player_position_Y <= ball_position_Y && player_position_Y+player_width >= ball_position_Y){ Serial.println("Collision of the ball and the player"); //send the ball to enemy with random values: ball_direction_X = 3; ball_direction_Y = random(-5, 5); display.fillRect(player_position_X, player_position_Y, player_thickness, player_width, SSD1306_WHITE); display.display(); // Update screen with each newly-drawn rectangle } //check for enemy loose: if(ball_position_X > enemy_position_X+enemy_thickness){ Serial.println("Enemy lose!"); newRound("player");//enemy } //check for collision of the ball and the enemy: if(enemy_position_X <= ball_position_X && enemy_position_X+enemy_thickness >= ball_position_X && enemy_position_Y <= ball_position_Y && enemy_position_Y+enemy_width >= ball_position_Y){ Serial.println("Collision of the ball and the enemy"); //send the ball to player with random values: ball_direction_X = -3; ball_direction_Y = random(-5, 5); display.fillRect(enemy_position_X, enemy_position_Y, enemy_thickness, enemy_width, SSD1306_WHITE); display.display(); // Update screen with each newly-drawn rectangle } } } जैसा कि आपने ऊपर देखा, फ़ंक्शन इनपुट विजेता (खिलाड़ी/दुश्मन) के रूप में लेता है। उपयुक्त स्कोर बढ़ाने के लिए इनपुट की आवश्यकता होती है। फ़ंक्शन में, हम सभी आवश्यक गेम-संबंधित चर रीसेट करेंगे, अपडेट किए गए स्कोर प्रिंट करेंगे, सभी गेम ऑब्जेक्ट प्रदर्शित करेंगे, और यदि आवश्यक हो तो दुश्मन और गेंद की गति को अपडेट करें। जैसे-जैसे आप इसके माध्यम से आगे बढ़ेंगे खेल और कठिन होता जाएगा। newRound void newRound(String winner){ // Clear the buffer display.clearDisplay(); //draw lines: display.drawLine(16, 0, 16, 63, SSD1306_WHITE); display.drawLine(111, 0, 111, 63, SSD1306_WHITE); display.display(); //Update scores: if(winner == "enemy"){ enemy_score++; }else{ player_score++; } print_score(player_score, 0); print_score(enemy_score, 115); //reset gaming vars: //player: player_position_X = 19; // static player_position_Y = 0; player_width = 16; player_thickness = 4; //ball: ball_position_X = 63; ball_position_Y = 31; ball_radius = 1; //set random direction for th ball: ball_direction_X = -3; ball_direction_Y = random(-5, 5); //ball_direction_Y = -5;//test ball_last_move_time = 0; //Display players: //void fillRect(uint16_t x0, uint16_t y0, uint16_t w, uint16_t h, uint16_t color); display.fillRect(player_position_X, player_position_Y, player_thickness, player_width, SSD1306_WHITE); display.display(); // Update screen with each newly-drawn rectangle //enemy: enemy_position_X = 104; // static enemy_position_Y = 47; enemy_width = 16; enemy_thickness = 4; enemy_last_move_time = 0; //checking for if we need to update enemy_speed_of_moving and ball_speed if((player_score+enemy_score)%5 == 0){ //5,10,15 and so on if(ball_speed > 3) ball_speed = ball_speed - 1; //10,9,8... Serial.print("ball_speed: ");Serial.println(ball_speed); } if((player_score+enemy_score)%10 == 0){ //10,20,30 and so on if(enemy_speed_of_moving > 1) enemy_speed_of_moving = enemy_speed_of_moving * 0.9; //2000,1800,1620,1458... Serial.print("enemy_speed_of_moving: ");Serial.println(enemy_speed_of_moving); } delay(500); // Pause for 0.5 seconds } अंकों को लंबवत रूप से प्रिंट करना थोड़ा मुश्किल है। इसलिए, मैंने इसे एक अलग समारोह में विभाजित करने का निर्णय लिया। स्कोर के प्रत्येक अंक को एक-एक करके प्रदर्शित किया जाएगा और कर्सर को तदनुसार अद्यतन करने की आवश्यकता है। void print_score(int temp_num, int X){ //0/115 for(int i=48; i>=0; i-=16){ int num = temp_num % 10; char cstr[16]; itoa(num, cstr, 10); display.setCursor(X, i); display.write(cstr); display.display(); // Serial.println(cstr); temp_num = temp_num/10; if(temp_num==0){ break; } } } और आखिरी । यह गेंद को हिट करने की कोशिश करेगा। और इसके लिए वह गेंद के केंद्र के साथ अपने केंद्र को बराबर करने की कोशिश करेगा। स्क्रीन के अंदर रैकेट को बनाए रखने के लिए हमारे पास कुछ पूरक जांच हैं। ऐसे दुश्मन को जीतने के लिए, शुरुआत में इसकी गति धीमी होगी और जैसे-जैसे खेल आगे बढ़ेगा, गति तेज होती जाएगी। वाला दुश्मन के रैकेट को आगे बढ़ा रहा है void move_enemy(){ //enemy: if(millis() > enemy_speed_of_moving+enemy_last_move_time){ display.fillRect(enemy_position_X, enemy_position_Y, enemy_thickness, enemy_width, SSD1306_BLACK); if(ball_position_Y < enemy_position_Y+enemy_width/2){ enemy_position_Y = enemy_position_Y - 3; }else{ enemy_position_Y = enemy_position_Y + 3; } //checking if enemy is within the wall: if(enemy_position_Y > 64-player_width) enemy_position_Y = 64-player_width; if(enemy_position_Y < 0) enemy_position_Y = 0; // Serial.print("enemy_position_Y: "); Serial.println(enemy_position_Y); display.fillRect(enemy_position_X, enemy_position_Y, enemy_thickness, enemy_width, SSD1306_WHITE); display.display(); // Update screen with each newly-drawn rectangle enemy_last_move_time = millis(); } } निष्कर्ष मुझे आशा है कि आपने खेल के विकास और खेल को खेलने दोनों का आनंद लिया। खेल बचपन से कई लोगों से परिचित है और खेलते समय उदासीनता महसूस होती है। डेवलपर्स के पास न केवल बाहर से खेल को जानने का एक अनूठा अवसर है, बल्कि यह देखने का भी है कि अंदर से सब कुछ कैसे काम करता है। परियोजना में वृद्धि के लिए यहां कुछ विचार दिए गए हैं: वर्तमान में, खेल अंतहीन है। विजेता का निर्धारण करने के लिए टेबल टेनिस के आधिकारिक नियमों को लागू करना बहुत अच्छा होगा। जैसे ही गेंद की गति बढ़ती है, एक दृश्य प्रभाव बनाएं ताकि गेंद की एक पूंछ हो। रिबाउंड के दौरान गेंद की उड़ान के कोण को उस स्थान पर निर्भर होना चाहिए जहां गेंद रैकेट को छूती है।