paint-brush
How to Deploy Apps to a Local K3d Clusterby@asadfaizi
6,277 reads
6,277 reads

How to Deploy Apps to a Local K3d Cluster

by Asad FaiziDecember 23rd, 2021
Read on Terminal Reader
Read this story w/o Javascript
tldt arrow

Too Long; Didn't Read

Containerized applications offer a lightweight, portable, and executable package that includes all the necessary code, runtimes, and dependencies. This has led to creating applications that can be virtually deployed in any supported environment. Let’s create a simple web server that will serve static web pages using Go and utilize it for creating a containerized image. We will be using the net/http module to power our server and serve the HTML files in the “content” folder. All the examples in this post are based on a Windows environment with VSCode as the IDE and the terminal.

People Mentioned

Mention Thumbnail

Company Mentioned

Mention Thumbnail
featured image - How to Deploy Apps to a Local K3d Cluster
Asad Faizi HackerNoon profile picture


Containerization has changed the way applications are developed, packaged, and deployed. Containerized applications offer a lightweight, portable, and executable package that includes all the necessary code, runtimes, and dependencies. This has led to creating applications that can be virtually deployed in any supported environment.


As the popularity of containerization grows, the need for new tools and technologies has also arisen to manage these containers effectively. Platforms like Kubernetes have gained industry-wide popularity to meet these requirements for container management.


In this post, let’s look at how to deploy and test a containerized application in a local Kubernetes Cluster. All the examples in this post are based on a Windows environment with VSCode as the IDE and PowerShell as the terminal.

Creating the Application

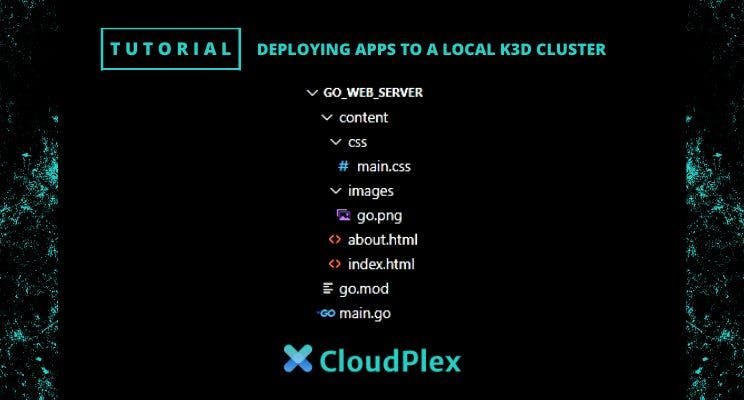
First, we need to deploy a container. Let’s create a simple web server that will serve static web pages using Go and utilize it for creating a containerized image. We will be using the net/http module to power our server and serve the HTML files in the “content” folder.

The project structure will appear as the following.

main.go

package main

// Import Packages
import (
    "log"
    "net/http"
)

func main() {

    // Server the Desired HTML File
    http.Handle("/", http.FileServer(http.Dir("./content")))

    log.Fatal(http.ListenAndServe(":9091", nil))
}

index.html

<!DOCTYPE html>
<html lang="en">
  <head>
    <title>Simple Go Web Server</title>
    <link rel="stylesheet" href="css/main.css">
  </head>
  <body>
    <h1>Hello from Go...!!</h2>
    <div>
      <img src="images/go.png" alt="Go Lang" class="center">
    </div>
  </body>
</html>

about.html

<!DOCTYPE html>
<html lang="en">
  <head>
    <title>Simple Go Web Server</title>
  </head>
  <body>
    <h1>Kubernetes Deployment Test</h2>
  </body>
</html>

main.css

h1 {
    text-align: center;
    width: 100%;
    font-family:'Segoe UI', Tahoma, Geneva, Verdana, sans-serif;
}

.center {
    display: block;
    margin-left: auto;
    margin-right: auto;
    width: 50%;
}


If we run this application using the “go run .” command and visit http://localhost:9091/, we will be able to see our index.html file as the following.


Containerizing an Application


Now let’s move into containerizing this application. We will be using Docker to create the containerized image. Docker is the leading open-source containerization platform that lets you build, run and share containers. Even though containers can be created without Docker, it simplifies the process by providing all the necessary tools to build and maintain containers.


We can use a Dockerfile to create a docker image. The Dockerfile is a document that contains all the necessary commands to create a docker image. We can create the desired container image using the docker build command.


First, let’s create a file named Dockerfile at the project root and add the following commands there.

Dockerfile

# Base Image
FROM golang:1.17-alpine

# Make app directory
RUN mkdir /app

# Copy all content to the app directory
ADD . /app

# Make app directory the working directory
WORKDIR /app

# Download any required modules
RUN go mod download

# Build the program to create an executable binary
RUN go build -o webserver .

# Set the startup command
CMD ["/app/webserver"]


Using the “golang alpine” image for its compact size, we will create the image by copying our project to a folder named “app” and building an executable binary for the webserver, which will be used in the container.


Now let’s build the container using the build command while tagging it with the name “go-web-server.”


docker build -t go-web-server .

RESULT


We can simply look at the images within docker using the image command and thereby verify the image creation.


docker images

RESULT

Deploying the Application to a Local K3d Cluster

Now we have created a container image. The next step is to deploy it in a container orchestration environment. However, testing in a local cluster environment is always advisable before deploying to the production environment.


Kubernetes is the most popular container cluster environment for container orchestration.


However, configuring Kubernetes from scratch is quite a complex process. Yet, there are some tools available to simplify this process and run Kubernetes clusters locally. K3d is one such tool created by Rancher Lab that provides a lightweight Kubernetes distribution that can be used to create a simple K8s cluster in any operating system. You can install K3d by following the official installation guide for your preferred platform.

Pushing Images to a Container Registry

We have the container image locally, yet the K3d cluster still does not have access to it. This can be solved by pushing the image to a container registry which can be a private registry or a public registry such as the Docker container registry.


K3d has the ability to create private container registries. Therefore, it will be the ideal solution for an enterprise environment as it will mitigate any risk associated with pushing containers to a public registry.


Creating a Private Container Registry


The registry can be created using the registry create command. We will create a local private registry called “test-app-registry” using port 5050.

k3d registry create test-app-registry --port 5050

RESULT

K3d provides users with the necessary steps to create a K8s cluster and push the images. Let’s create a local Kubernetes cluster called “mycluster” that utilizes the newly created private container registry.


Before creating the cluster, let’s create a file named registries.yaml that will define the registry config for the cluster. It will help to route the traffic to this private registry properly.

registries.yaml

mirrors:
"localhost:5050":
    endpoint:
      - http://k3d-test-app-registry:5050


Then we can create the cluster using the following command. It will use a cluster load balancer on port 9900 while utilizing the previously created container registry.


k3d cluster create mycluster -p "9900:80@loadbalancer" 
--registry-use k3d-test-app-registry:5050 --registry-config registries.yaml

RESULT


Pushing the Docker image to the Private Container Registry

We are in the final few steps to successfully deploying our Go web server in the Kubernetes cluster. We will tag the image with the registry name and push the image to the “k3d-test-app-registry”.


Tag and Push the Local Docker image

As we have defined, “localhost:5050” will point to “http://k3d-registry.localhost:5050” in the registries. yaml file. So, we can directly refer to the private registry using localhost:5050. We will tag and push the image using the following commands.


docker tag go-web-server:latest localhost:5050/go-web-server:v1.0
docker push localhost:5050/go-web-server:v1.0

Create a Deployment

Finally, we can deploy using our image and then create a service to expose the deployment. After that, we have to create an ingress object to allow access to it.

Create the Deployment and Service

kubectl create deployment go-web-server --image=k3d-test-app-registry:5050/go-web-server:v1.0

RESULT

kubectl create service clusterip go-web-server --tcp=9091:9091

RESULT

Create Ingress Object

Create the following file and apply it using the kubectl apply command.

ingress.yaml

apiVersion: networking.k8s.io/v1
kind: Ingress
metadata:
  name: go-web-server
  annotations:
    ingress.kubernetes.io/ssl-redirect: "false"
spec:
  rules:
  - http:
      paths:
      - path: /
        pathType: Prefix
        backend:
          service:
            name: go-web-server
            port:
              number: 9091
kubectl apply -f .\ingress.yaml

RESULT

That’s it, and now you have successfully deployed your containerized application to a Kubernetes cluster. The deployed web server will be visible if you visit the cluster URL http://localhost:9900/.


Conclusion

With a containerized application image, users can simply deploy the same image in a production environment without any modification. By deploying and testing an application on a local Kubernetes cluster, users can tinker with the application to iron out any bugs or issues before moving to another environment.


However, one downside of this approach is that each component will be broken down into a separate container when dealing with a large number of containers, such as a microservices-based application. Therefore, manual deployments are not scalable solutions in these instances.


Tools like CloudPlex offer the ideal solution to deploy containers at a large scale. With services like TelePlex and KubePlex, CloudPlex provides users with a streamlined visual interface to manage deployments, Kubernetes clusters, and test the containerized applications directly from their preferred IDE.


Try out CloudPlex for free for your next project and save you time for real coding.

Asad Faizi

Founder CEO

CloudPlex.io, Inc

[email protected]


Also Published Here