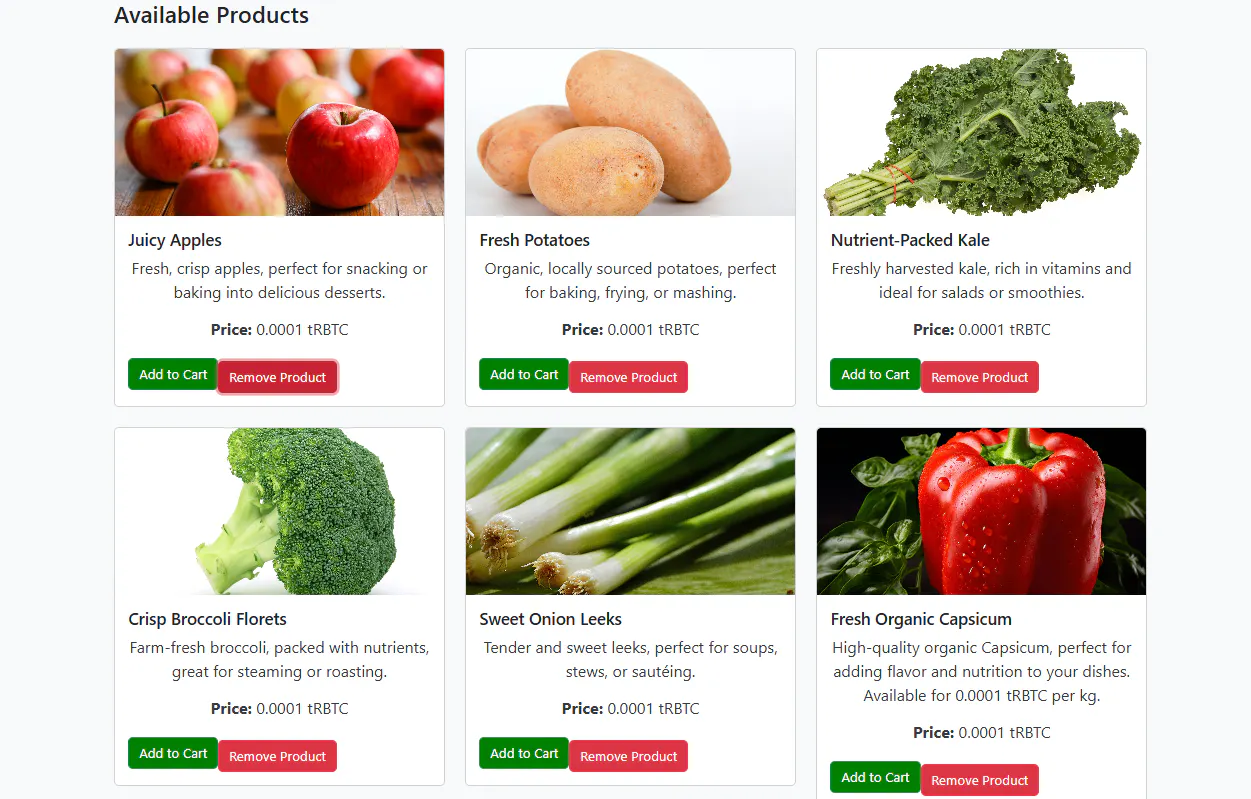
Technology has to be in the service of mankind. Blockchain technology, which has already revolutionized many sectors, can also transform the agriculture field. To bring this decentralized technology to mainstream adoption trend, we should simplify it to reach the general public so that we can get into the broader users, ultimately increasing the use cases. In this tutorial, we'll build a decentralized application (dApp) that allows users to buy and sell agricultural products on the Rootstock (RSK) blockchain network. The main aim is to build a dApp that runs on the blockchain network. Any sort of users can add products easily to earn by selling their agricultural products without excessive human intervention. Initially, the app was tested on Rootstock’s testnet, and it is almost in the production-ready state (Just needed minor adjustments to switch to the mainnet of Rootstock). The project is already uploaded in GitHub so you can just clone the repository to test it by yourself. For this, I prefer Readme.md on GitHub. But, in this tutorial, we attempt to guide in depth so that any sort of user can build their dApp with the ease of understanding the tutorial stepwise. We might propose you download the Frontend code from the GitHub repository, and add it to the appropriate directory. We'll cover everything from setting up the project to deploying smart contracts and creating an interactive Frontend with real-time features. Before getting started, we are aiming to build a dApp named AgriMarket which is expected to have the following features: Allows users to access Web3 features through supported wallets (MetaMask in our case). Allows users to add their agricultural products with their prices by connecting their wallets with the dApp. The app confirms the smartcontract calls by interacting with MetaMask. Users can add products in the cart and dApp is able to initiate transactions even in case there are multiple products in the cart. Users can get real-time notifications, transaction receipts, and product removal features from both carts as well as from the product list page. 📥Prerequisites - Before we begin, ensure you have the following installed on your machine: Node.js (v14 or higher) npm or yarn Truffle or Hardhat for smart contract development MetaMask extension configured for the RSK testnet Git for version control An IDE like VSCode 📥Project Setup 👉Create the Project Directory Please make sure you prefer this main project’s directory throughout our entire development and testing process. 👉Initialize the Project Directory Create a new directory for your project by running the following commands in the terminal: mkdir rsk-agri-marketplace cd rsk-agri-marketplace 👉Initialize a new npm project: npm init -y 👉Initialize Truffle Project We are using Truffle to compile and develop the smart contract so initialize it through the root directory: truffle init This creates the basic structure: • contracts/ - Contains Solidity contracts • migrations/ - Deployment scripts • test/ - Tests for your contracts • truffle-config.js - Truffle configuration file 📥Configure Environment Variables Sensitive information like private keys, Pimata API Key, etc should be stored in a .env file. 👉Install dotenv npm install dotenv 👉Create a .env File In the root directory, create a .env file with the following structure: REACT_APP_PINATA_API_KEY=Your API Key REACT_APP_PINATA_SECRET_API_KEY=Secret API Key MNEMONIC=12 words mnemonic key RSK_TESTNET_URL=https://public-node.testnet.rsk.co REACT_APP_CONTRACT_ADDRESS=Contract Address Please create the .env file without extra spaces or character mismatches else you will face difficulties later. Please, remember this Step because you are updating the smart contract later. Get Pinata API from here. 📥Connecting to the RSK Testnet 👉Update truffle-config.js You can see the already created truffle-config.js in your project’s directory. Just update the code so we can interact with the RSK testnet through it. require('dotenv').config(); const HDWalletProvider = require('@truffle/hdwallet-provider'); module.exports = { networks: { development: { host: "127.0.0.1", port: 8545, network_id: "*", }, rskTestnet: { provider: () => new HDWalletProvider({ mnemonic: { phrase: process.env.MNEMONIC, }, providerOrUrl: `https://public-node.testnet.rsk.co`, chainId: 31, // RSK Testnet ID pollingInterval: 15000, }), network_id: 31, gas: 2500000, gasPrice: 60000000, confirmations: 2, timeoutBlocks: 60000, skipDryRun: true, }, }, compilers: { solc: { version: "0.8.20", }, }, db: { enabled: false, }, }; 👉Install HDWalletProvider npm install @truffle/hdwallet-provider 📥Smart Contract Development We'll create a marketplace contract. 👉Install OpenZeppelin Contracts We are using OpenZeppelin contracts to enhance the security and the smooth operation of our smart contract, so install it by running the following command in the terminal: npm install @openzeppelin/contracts 👉Create Marketplace.sol in contracts/ directory: // SPDX-License-Identifier: MIT pragma solidity ^0.8.0; import "@openzeppelin/contracts/utils/ReentrancyGuard.sol"; import "@openzeppelin/contracts/utils/Pausable.sol"; contract Marketplace is ReentrancyGuard, Pausable { uint public productCount = 0; struct Product { uint id; address payable seller; string name; string description; string imageHash; // IPFS hash uint price; // Price in tRBTC bool active; } mapping(uint => Product) public products; event ProductCreated( uint id, address seller, string name, string description, string imageHash, uint price, bool active ); event ProductPurchased( uint id, address seller, address buyer, uint price ); event ProductRemoved(uint id, address seller); function createProduct( string memory _name, string memory _description, string memory _imageHash, uint _price ) public whenNotPaused { require(bytes(_name).length > 0, "Name is required"); require(_price > 0, "Price must be positive"); // Price is expected in tRBTC productCount++; products[productCount] = Product( productCount, payable(msg.sender), _name, _description, _imageHash, _price, true ); emit ProductCreated( productCount, msg.sender, _name, _description, _imageHash, _price, true ); } function purchaseProducts(uint[] memory _ids) public payable nonReentrant whenNotPaused { uint totalCost = 0; for (uint i = 0; i < _ids.length; i++) { Product storage _product = products[_ids[i]]; require(_product.id > 0 && _product.id <= productCount, "Invalid product ID"); require(_product.active, "Product is not active"); require(_product.seller != msg.sender, "Seller cannot buy their own product"); totalCost += _product.price; } require(msg.value >= totalCost, "Insufficient funds"); for (uint i = 0; i < _ids.length; i++) { Product storage _product = products[_ids[i]]; (bool success, ) = _product.seller.call{value: _product.price}(""); require(success, "Transfer failed to the seller"); // Emit purchase event (product can be bought again) emit ProductPurchased( _product.id, _product.seller, msg.sender, _product.price ); } } function removeProduct(uint _id) public { Product storage _product = products[_id]; require(_product.id > 0 && _product.id <= productCount, "Invalid product ID"); require(_product.seller == msg.sender, "Only the seller can remove the product"); _product.active = false; // Mark the product as inactive emit ProductRemoved(_id, msg.sender); } function getProduct(uint _id) public view returns (Product memory) { require(_id > 0 && _id <= productCount, "Invalid product ID"); Product memory product = products[_id]; require(product.active, "Product is not available"); return product; } function pause() public { _pause(); } function unpause() public { _unpause(); } } 👉Write Migration Script in migrations/2_deploy_contracts.js const Marketplace = artifacts.require("Marketplace"); module.exports = function (deployer) { deployer.deploy(Marketplace); }; 👉Compile and Deploy Contracts Run the following code to compile the contract through the terminal: truffle compile If everything goes correctly, you can see something like this in the terminal: Run the following command in the terminal to deploy Marketplace.sol to the Rootstock’s testnet. truffle migrate --network rskTestnet You need some amounts of tRBTC in the wallet before deploying your contract. Get it from the RSK faucet here. After the successful process, you will see the message in the following terminal: You will find Marketplace.json file in \build\contracts\Marketplace.json remember it, you will copy this file to another directory. Frontend Development for the Marketplace dApp Now that we’ve deployed the smart contracts, we are going to build an attractive frontend for the marketplace that allows users to interact with it. The frontend will have the features like product listings, adding products, purchasing, adding/removing products in the cart, tracking transactions, and providing real-time feedback like notifications and a progress bar. 📥Frontend Development 👉Initialize React Application We will use React for the frontend. Initialize a new React app in the project directory. npx create-react-app client Navigate to the client directory. cd client Install Web3 and Bootstrap for UI npm install web3 bootstrap 👉Project Structure You will need the structure for the frontend as shown in Figure 1. 👉Web3 Setup insrc/utils/Marketplace.json To interact with the smart contract, we'll import the ABI (Application Binary Interface). Copy the Marketplace.json ABI from your Truffle build/contracts directory into the client/src/utils/ folder as mentioned in Step. Web3 setup is in the App.js file. Download it from GitHub and place it in the appropriate directory as shown in Figure 1. 👉 Real-time notifications and Progress Bars For real-time notifications, we will integrate a library-like react-toastify. You can also use react-bootstrap for progress bars. Install React Toastify in the client directory npm install react-toastify 👉Install Axios for HTTP requests (to Pinata’s API): npm install axios Alright, now please download all the Frontend components from the client folder (including folder+files) of the GitHub repository. And place them in the appropriate directory. 📥Final Touches and Interacting With Your App 👉Now, you can interact with your dApp. You can run your react app by using the following command in the terminal: npm start It will automatically open the default browser. Please make sure you have the MetMask browser extension installed and properly configured the RSK testnet (You can follow the project’s guide to select the correct network here). Now, react app invokes the MetaMask wallet extension, please confirm the call. It will then exhibit the connected wallet in the main interface as shown in the following figure. The frontend offers you plenty of features. You can add/remove products. Each time, you will be asked to confirm the call in the MetaMask wallet extension. Check the following gif: Well, now you can test whether dApp properly processes the transactions added to the cart or not. You can see a detailed transaction history under the “Transaction History” section with all the technical details. Once the purchase is completed, the fund is sent to the owner who has added the products to the dApp. Let’s test the App together: Congrats! We have successfully developed and tested the dApp in the RSK testnet. You can switch it to the RSK mainnet by adding your desired features. Just adjust the codes wherever testnet is mentioned and also check the project’s documentation here if you are rushing away to build the production-ready app. 📥Potential Challenges and Future: It will be the new approach to initiate the agricultural marketplace which includes several processes like product delivery, pickup, etc. Without knowing buyers and sellers in detail, it might create trust issues. Another challenge is that it is still in the experimental phase, and we don’t know how the consumers behave to this evolving tech. So, education and training are essential for both farmers and consumers to adopt new technologies. Also, sufficient collaborations are the key factors to developing a sustainable decentralized marketplace for the agricultural products. Conclusion: We successfully built a decentralized agricultural marketplace on the Rootstock (RSK) testnet. Security has been taken as the priority that’s why several measures are taken to protect smartcontract code by using OpenZeppelin contracts. Tested dApp consists of almost all the necessary features that a simple decentralized marketplace should have, but you can enhance it with more features if you plan to launch app in the Rootstock’s mainnet. Also, keep security in mind to make sure everything works as intended and smoothly. We have attempted to utilize Rootstock’s fast transaction processing features with low transaction fees to proceed with all the transaction which will solve Bitcoin’s notorious congestion issue. Of course, these sorts of decentralized marketplaces have to face so many issues, but as we naturally seek freedom, we can hope we will find a more decentralized marketplace in the future. Technology has to be in the service of mankind. Blockchain technology, which has already revolutionized many sectors, can also transform the agriculture field. To bring this decentralized technology to mainstream adoption trend, we should simplify it to reach the general public so that we can get into the broader users, ultimately increasing the use cases. In this tutorial, we'll build a decentralized application (dApp) that allows users to buy and sell agricultural products on the Rootstock (RSK) blockchain network. The main aim is to build a dApp that runs on the blockchain network. Any sort of users can add products easily to earn by selling their agricultural products without excessive human intervention. Initially, the app was tested on Rootstock’s testnet, and it is almost in the production-ready state (Just needed minor adjustments to switch to the mainnet of Rootstock). The project is already uploaded in GitHub so you can just clone the repository to test it by yourself. For this, I prefer Readme.md on GitHub . But, in this tutorial, we attempt to guide in depth so that any sort of user can build their dApp with the ease of understanding the tutorial stepwise. We might propose you download the Frontend code from the GitHub repository, and add it to the appropriate directory. We'll cover everything from setting up the project to deploying smart contracts and creating an interactive Frontend with real-time features. Readme.md GitHub Before getting started, we are aiming to build a dApp named AgriMarket which is expected to have the following features: Allows users to access Web3 features through supported wallets (MetaMask in our case). Allows users to add their agricultural products with their prices by connecting their wallets with the dApp. The app confirms the smartcontract calls by interacting with MetaMask. Users can add products in the cart and dApp is able to initiate transactions even in case there are multiple products in the cart. Users can get real-time notifications, transaction receipts, and product removal features from both carts as well as from the product list page. Allows users to access Web3 features through supported wallets (MetaMask in our case). Allows users to add their agricultural products with their prices by connecting their wallets with the dApp. The app confirms the smartcontract calls by interacting with MetaMask. Users can add products in the cart and dApp is able to initiate transactions even in case there are multiple products in the cart. Users can get real-time notifications, transaction receipts, and product removal features from both carts as well as from the product list page. 📥Prerequisites - Before we begin, ensure you have the following installed on your machine: Node.js (v14 or higher) npm or yarn Truffle or Hardhat for smart contract development MetaMask extension configured for the RSK testnet Git for version control An IDE like VSCode Node.js (v14 or higher) npm or yarn Truffle or Hardhat for smart contract development MetaMask extension configured for the RSK testnet Git for version control An IDE like VSCode 📥Project Setup 👉Create the Project Directory Please make sure you prefer this main project’s directory throughout our entire development and testing process. 👉Initialize the Project Directory Create a new directory for your project by running the following commands in the terminal: mkdir rsk-agri-marketplace cd rsk-agri-marketplace mkdir rsk-agri-marketplace cd rsk-agri-marketplace 👉Initialize a new npm project: npm init -y npm init -y 👉Initialize Truffle Project We are using Truffle to compile and develop the smart contract so initialize it through the root directory: truffle init truffle init This creates the basic structure: • contracts/ - Contains Solidity contracts • migrations/ - Deployment scripts • test/ - Tests for your contracts • truffle-config.js - Truffle configuration file contracts/ Contains Solidity contracts migrations/ Deployment scripts test/ Tests for your contracts truffle-config.js Truffle configuration file 📥Configure Environment Variables Sensitive information like private keys, Pimata API Key, etc should be stored in a .env file. 👉Install dotenv npm install dotenv npm install dotenv 👉Create a .env File In the root directory, create a .env file with the following structure: REACT_APP_PINATA_API_KEY=Your API Key REACT_APP_PINATA_SECRET_API_KEY=Secret API Key MNEMONIC=12 words mnemonic key RSK_TESTNET_URL=https://public-node.testnet.rsk.co REACT_APP_CONTRACT_ADDRESS=Contract Address REACT_APP_PINATA_API_KEY=Your API Key REACT_APP_PINATA_SECRET_API_KEY=Secret API Key MNEMONIC=12 words mnemonic key RSK_TESTNET_URL=https://public-node.testnet.rsk.co REACT_APP_CONTRACT_ADDRESS=Contract Address Please create the .env file without extra spaces or character mismatches else you will face difficulties later. Please, remember this Step because you are updating the smart contract later. Get Pinata API from here. Please create the .env file without extra spaces or character mismatches else you will face difficulties later. Please, remember this Step because you are updating the smart contract later. Get Pinata API from here . .env Step here 📥Connecting to the RSK Testnet 👉Update truffle-config.js You can see the already created truffle-config.js in your project’s directory. Just update the code so we can interact with the RSK testnet through it. require('dotenv').config(); const HDWalletProvider = require('@truffle/hdwallet-provider'); module.exports = { networks: { development: { host: "127.0.0.1", port: 8545, network_id: "*", }, rskTestnet: { provider: () => new HDWalletProvider({ mnemonic: { phrase: process.env.MNEMONIC, }, providerOrUrl: `https://public-node.testnet.rsk.co`, chainId: 31, // RSK Testnet ID pollingInterval: 15000, }), network_id: 31, gas: 2500000, gasPrice: 60000000, confirmations: 2, timeoutBlocks: 60000, skipDryRun: true, }, }, compilers: { solc: { version: "0.8.20", }, }, db: { enabled: false, }, }; require('dotenv').config(); const HDWalletProvider = require('@truffle/hdwallet-provider'); module.exports = { networks: { development: { host: "127.0.0.1", port: 8545, network_id: "*", }, rskTestnet: { provider: () => new HDWalletProvider({ mnemonic: { phrase: process.env.MNEMONIC, }, providerOrUrl: `https://public-node.testnet.rsk.co`, chainId: 31, // RSK Testnet ID pollingInterval: 15000, }), network_id: 31, gas: 2500000, gasPrice: 60000000, confirmations: 2, timeoutBlocks: 60000, skipDryRun: true, }, }, compilers: { solc: { version: "0.8.20", }, }, db: { enabled: false, }, }; 👉Install HDWalletProvider npm install @truffle/hdwallet-provider npm install @truffle/hdwallet-provider 📥Smart Contract Development We'll create a marketplace contract. 👉Install OpenZeppelin Contracts We are using OpenZeppelin contracts to enhance the security and the smooth operation of our smart contract, so install it by running the following command in the terminal: npm install @openzeppelin/contracts npm install @openzeppelin/contracts 👉Create Marketplace.sol in contracts/ directory: Marketplace.sol contracts/ // SPDX-License-Identifier: MIT pragma solidity ^0.8.0; import "@openzeppelin/contracts/utils/ReentrancyGuard.sol"; import "@openzeppelin/contracts/utils/Pausable.sol"; contract Marketplace is ReentrancyGuard, Pausable { uint public productCount = 0; struct Product { uint id; address payable seller; string name; string description; string imageHash; // IPFS hash uint price; // Price in tRBTC bool active; } mapping(uint => Product) public products; event ProductCreated( uint id, address seller, string name, string description, string imageHash, uint price, bool active ); event ProductPurchased( uint id, address seller, address buyer, uint price ); event ProductRemoved(uint id, address seller); function createProduct( string memory _name, string memory _description, string memory _imageHash, uint _price ) public whenNotPaused { require(bytes(_name).length > 0, "Name is required"); require(_price > 0, "Price must be positive"); // Price is expected in tRBTC productCount++; products[productCount] = Product( productCount, payable(msg.sender), _name, _description, _imageHash, _price, true ); emit ProductCreated( productCount, msg.sender, _name, _description, _imageHash, _price, true ); } function purchaseProducts(uint[] memory _ids) public payable nonReentrant whenNotPaused { uint totalCost = 0; for (uint i = 0; i < _ids.length; i++) { Product storage _product = products[_ids[i]]; require(_product.id > 0 && _product.id <= productCount, "Invalid product ID"); require(_product.active, "Product is not active"); require(_product.seller != msg.sender, "Seller cannot buy their own product"); totalCost += _product.price; } require(msg.value >= totalCost, "Insufficient funds"); for (uint i = 0; i < _ids.length; i++) { Product storage _product = products[_ids[i]]; (bool success, ) = _product.seller.call{value: _product.price}(""); require(success, "Transfer failed to the seller"); // Emit purchase event (product can be bought again) emit ProductPurchased( _product.id, _product.seller, msg.sender, _product.price ); } } function removeProduct(uint _id) public { Product storage _product = products[_id]; require(_product.id > 0 && _product.id <= productCount, "Invalid product ID"); require(_product.seller == msg.sender, "Only the seller can remove the product"); _product.active = false; // Mark the product as inactive emit ProductRemoved(_id, msg.sender); } function getProduct(uint _id) public view returns (Product memory) { require(_id > 0 && _id <= productCount, "Invalid product ID"); Product memory product = products[_id]; require(product.active, "Product is not available"); return product; } function pause() public { _pause(); } function unpause() public { _unpause(); } } // SPDX-License-Identifier: MIT pragma solidity ^0.8.0; import "@openzeppelin/contracts/utils/ReentrancyGuard.sol"; import "@openzeppelin/contracts/utils/Pausable.sol"; contract Marketplace is ReentrancyGuard, Pausable { uint public productCount = 0; struct Product { uint id; address payable seller; string name; string description; string imageHash; // IPFS hash uint price; // Price in tRBTC bool active; } mapping(uint => Product) public products; event ProductCreated( uint id, address seller, string name, string description, string imageHash, uint price, bool active ); event ProductPurchased( uint id, address seller, address buyer, uint price ); event ProductRemoved(uint id, address seller); function createProduct( string memory _name, string memory _description, string memory _imageHash, uint _price ) public whenNotPaused { require(bytes(_name).length > 0, "Name is required"); require(_price > 0, "Price must be positive"); // Price is expected in tRBTC productCount++; products[productCount] = Product( productCount, payable(msg.sender), _name, _description, _imageHash, _price, true ); emit ProductCreated( productCount, msg.sender, _name, _description, _imageHash, _price, true ); } function purchaseProducts(uint[] memory _ids) public payable nonReentrant whenNotPaused { uint totalCost = 0; for (uint i = 0; i < _ids.length; i++) { Product storage _product = products[_ids[i]]; require(_product.id > 0 && _product.id <= productCount, "Invalid product ID"); require(_product.active, "Product is not active"); require(_product.seller != msg.sender, "Seller cannot buy their own product"); totalCost += _product.price; } require(msg.value >= totalCost, "Insufficient funds"); for (uint i = 0; i < _ids.length; i++) { Product storage _product = products[_ids[i]]; (bool success, ) = _product.seller.call{value: _product.price}(""); require(success, "Transfer failed to the seller"); // Emit purchase event (product can be bought again) emit ProductPurchased( _product.id, _product.seller, msg.sender, _product.price ); } } function removeProduct(uint _id) public { Product storage _product = products[_id]; require(_product.id > 0 && _product.id <= productCount, "Invalid product ID"); require(_product.seller == msg.sender, "Only the seller can remove the product"); _product.active = false; // Mark the product as inactive emit ProductRemoved(_id, msg.sender); } function getProduct(uint _id) public view returns (Product memory) { require(_id > 0 && _id <= productCount, "Invalid product ID"); Product memory product = products[_id]; require(product.active, "Product is not available"); return product; } function pause() public { _pause(); } function unpause() public { _unpause(); } } 👉Write Migration Script in migrations/2_deploy_contracts.js migrations/2_deploy_contracts.js const Marketplace = artifacts.require("Marketplace"); module.exports = function (deployer) { deployer.deploy(Marketplace); }; const Marketplace = artifacts.require("Marketplace"); module.exports = function (deployer) { deployer.deploy(Marketplace); }; 👉Compile and Deploy Contracts Run the following code to compile the contract through the terminal: truffle compile truffle compile If everything goes correctly, you can see something like this in the terminal: Run the following command in the terminal to deploy Marketplace.sol to the Rootstock’s testnet. Marketplace.sol truffle migrate --network rskTestnet truffle migrate --network rskTestnet You need some amounts of tRBTC in the wallet before deploying your contract. Get it from the RSK faucet here. You need some amounts of tRBTC in the wallet before deploying your contract. Get it from the RSK faucet here . here After the successful process, you will see the message in the following terminal: You will find Marketplace.json file in \build\contracts\Marketplace.json remember it, you will copy this file to another directory. You will find Marketplace.json file in \build\contracts\Marketplace.json remember it, you will copy this file to another directory. Marketplace.json \build\contracts\Marketplace.json Frontend Development for the Marketplace dApp Now that we’ve deployed the smart contracts, we are going to build an attractive frontend for the marketplace that allows users to interact with it. The frontend will have the features like product listings, adding products, purchasing, adding/removing products in the cart, tracking transactions, and providing real-time feedback like notifications and a progress bar. 📥Frontend Development 👉Initialize React Application We will use React for the frontend. Initialize a new React app in the project directory. npx create-react-app client npx create-react-app client Navigate to the client directory. cd client cd client Install Web3 and Bootstrap for UI npm install web3 bootstrap npm install web3 bootstrap 👉Project Structure You will need the structure for the frontend as shown in Figure 1. 👉Web3 Setup in src/utils/Marketplace.json src/utils/Marketplace.json To interact with the smart contract, we'll import the ABI (Application Binary Interface). Copy the Marketplace.json ABI from your Truffle build/contracts directory into the client/src/utils/ folder as mentioned in Step. Copy the Marketplace.json ABI from your Truffle build/contracts directory into the client/src/utils/ folder as mentioned in Step . Marketplace.json build/contracts client/src/utils/ Step Web3 setup is in the App.js file. Download it from GitHub and place it in the appropriate directory as shown in Figure 1. Web3 setup is in the App.js file. Download it from GitHub and place it in the appropriate directory as shown in Figure 1. App.js GitHub 👉 Real-time notifications and Progress Bars For real-time notifications, we will integrate a library-like react-toastify . You can also use react-bootstrap for progress bars. react-toastify react-bootstrap Install React Toastify in the client directory client npm install react-toastify npm install react-toastify 👉Install Axios for HTTP requests (to Pinata’s API): npm install axios npm install axios Alright, now please download all the Frontend components from the client folder (including folder+files) of the GitHub repository . And place them in the appropriate directory. GitHub repository 📥Final Touches and Interacting With Your App 👉Now, you can interact with your dApp. You can run your react app by using the following command in the terminal: npm start npm start It will automatically open the default browser. Please make sure you have the MetMask browser extension installed and properly configured the RSK testnet (You can follow the project’s guide to select the correct network here ). here Now, react app invokes the MetaMask wallet extension, please confirm the call. It will then exhibit the connected wallet in the main interface as shown in the following figure. The frontend offers you plenty of features. You can add/remove products. Each time, you will be asked to confirm the call in the MetaMask wallet extension. Check the following gif: Well, now you can test whether dApp properly processes the transactions added to the cart or not. You can see a detailed transaction history under the “Transaction History” section with all the technical details. Once the purchase is completed, the fund is sent to the owner who has added the products to the dApp. Let’s test the App together: Congrats! We have successfully developed and tested the dApp in the RSK testnet. You can switch it to the RSK mainnet by adding your desired features. Just adjust the codes wherever testnet is mentioned and also check the project’s documentation here if you are rushing away to build the production-ready app. project’s documentation 📥Potential Challenges and Future: It will be the new approach to initiate the agricultural marketplace which includes several processes like product delivery, pickup, etc. Without knowing buyers and sellers in detail, it might create trust issues. Another challenge is that it is still in the experimental phase, and we don’t know how the consumers behave to this evolving tech. So, education and training are essential for both farmers and consumers to adopt new technologies. Also, sufficient collaborations are the key factors to developing a sustainable decentralized marketplace for the agricultural products. Conclusion: We successfully built a decentralized agricultural marketplace on the Rootstock (RSK) testnet. Security has been taken as the priority that’s why several measures are taken to protect smartcontract code by using OpenZeppelin contracts. Tested dApp consists of almost all the necessary features that a simple decentralized marketplace should have, but you can enhance it with more features if you plan to launch app in the Rootstock’s mainnet. Also, keep security in mind to make sure everything works as intended and smoothly. We have attempted to utilize Rootstock’s fast transaction processing features with low transaction fees to proceed with all the transaction which will solve Bitcoin’s notorious congestion issue. Of course, these sorts of decentralized marketplaces have to face so many issues, but as we naturally seek freedom, we can hope we will find a more decentralized marketplace in the future.