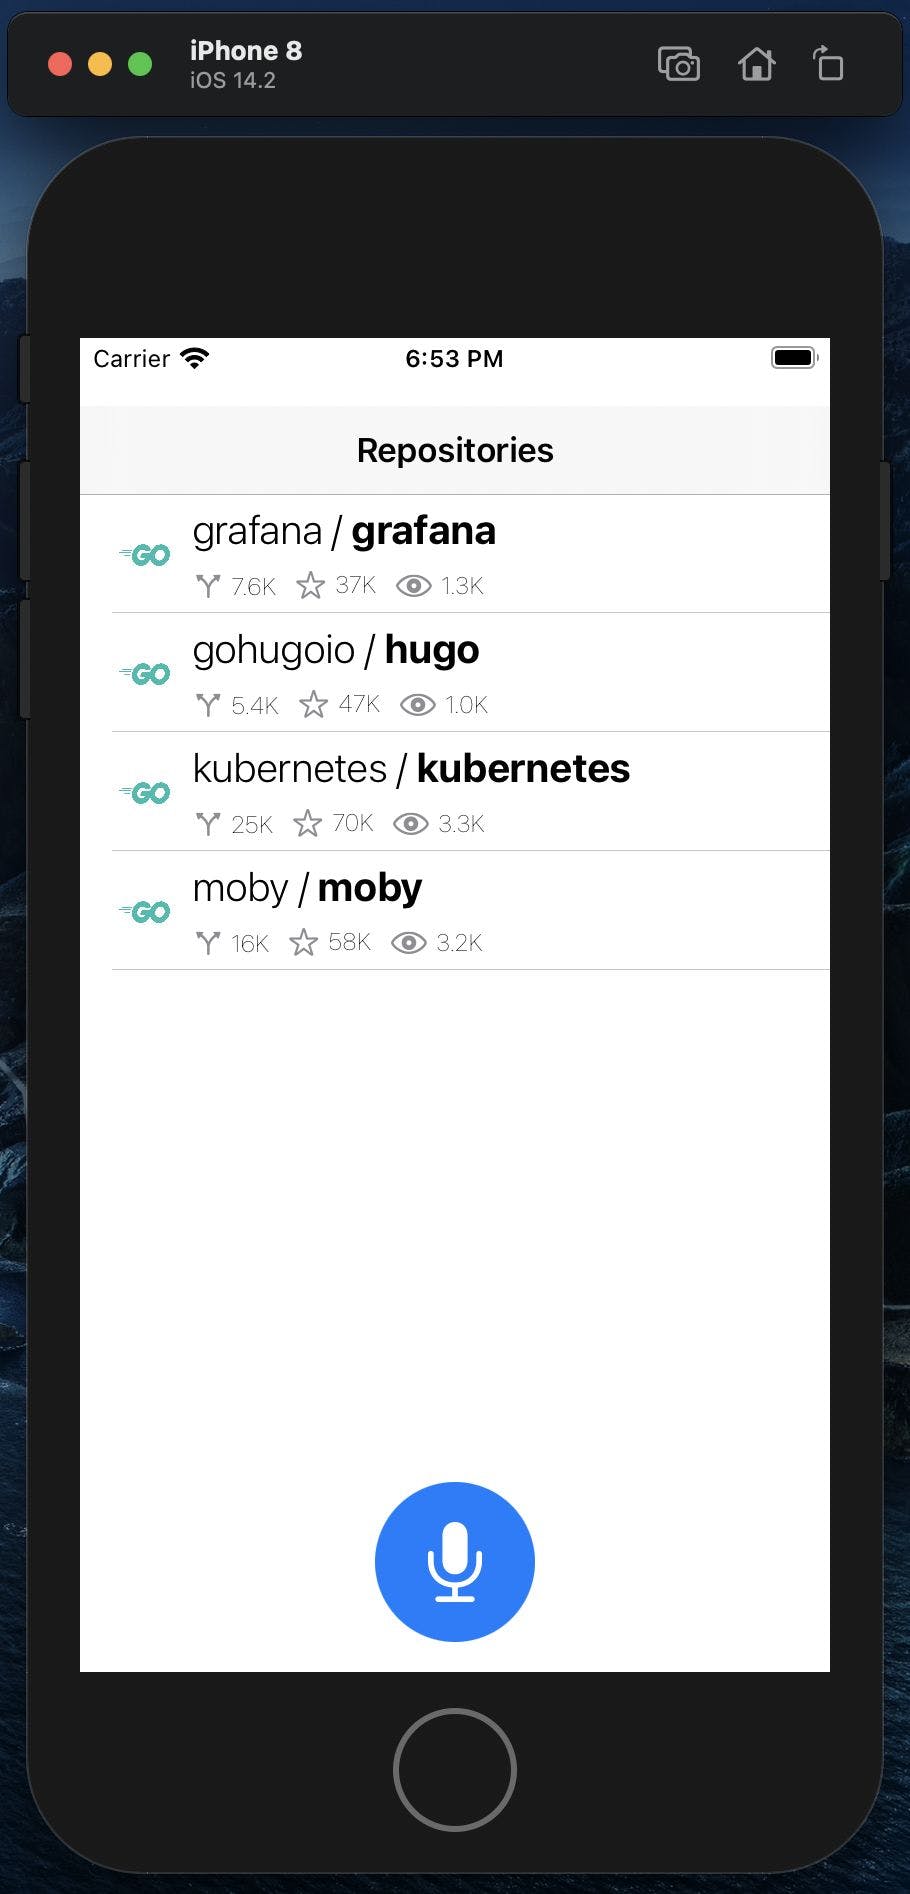
Introduction This tutorial will help you to get up and running with Speechly by guiding you through the process of building a simple voice filtering web app with Speechly and React. You can find the source code for this and you can also try out the . tutorial on GitHub final result Prerequisites Since we'll be using for this tutorial, we'll need the following tools: create-react-app - Node.js 8.10+ - npm 5.2+ Note that this tutorial also uses TypeScript, so feel free to check out if you're not familiar with it. TypeScript documentation 1. Creating an app Let's get started by creating an app and installing its dependencies: npx create-react-app speechly-voice-filter --typescript cd speechly-voice-filter npm i Now that you've created the app, you can check it out by running `npm start` - it should open a browser tab with your app running in it. 2. Adding data and layout Since we are building a filtering app, let's add some data to filter and layout to display it. To make it simple, our data source will be just a static array with some popular repositories on GitHub. Let's add the following code and save it as `src/data.ts`: ts type Repository = { : string; description: string; language: string; followers: number; stars: number; forks: number; }; repositories: Repository[] = [ { : , : , : , : , : , : , }, { : , : , : , : , : , : , }, { : , : , : , : , : , : , }, { : , : , : , : , : , : , }, { : , : , : , : , : , : , }, { : , : , : , : , : , : , }, { : , : , : , : , : , : , }, { : , : , : , : , : , : , }, { : , : , : , : , : , : , }, { : , : , : , : , : , : , }, { : , : , : , : , : , : , }, { : , : , : , : , : , : , }, ]; src/RepoList.tsx tsx React ; { Repository } ; type Props = { : Repository[]; }; RepoList = ({ repos }: Props): JSX.Element => { ( <table> <thead> <tr> <th>Name</th> <th>Language</th> <th>Description</th> <th>Followers</th> <th>Stars</th> <th>Forks</th> </tr> </thead> <tbody> {repos.map((repo) => ( <RepoRow repo={repo} key={repo.name} /> ))} </tbody> </table> </div> <tr> <td>{repo.name}</td> <td>{repo.language}</td> <td>{repo.description}</td> <td>{repo.followers}</td> <td>{repo.stars}</td> <td>{repo.forks}</td> </tr> export name export const name "microsoft/typescript" description "TypeScript is a superset of JavaScript that compiles to clean JavaScript output" language "TypeScript" followers 2200 stars 65000 forks 8700 name "nestjs/nest" description "A progressive Node.js framework for building efficient, scalable, and enterprise-grade server-side applications on top of TypeScript & JavaScript (ES6, ES7, ES8)" language "TypeScript" followers 648 stars 30900 forks 2800 name "microsoft/vscode" description "Visual Studio Code" language "TypeScript" followers 3000 stars 105000 forks 16700 name "denoland/deno" description "A secure JavaScript and TypeScript runtime" language "TypeScript" followers 1700 stars 68000 forks 3500 name "kubernetes/kubernetes" description "Production-Grade Container Scheduling and Management" language "Go" followers 3300 stars 70700 forks 25500 name "moby/moby" description "Moby Project - a collaborative project for the container ecosystem to assemble container-based systems" language "Go" followers 3200 stars 58600 forks 16900 name "gohugoio/hugo" description "The world’s fastest framework for building websites" language "Go" followers 1000 stars 47200 forks 5400 name "grafana/grafana" description "The tool for beautiful monitoring and metric analytics & dashboards for Graphite, InfluxDB & Prometheus & More" language "Go" followers 1300 stars 37500 forks 7600 name "pytorch/pytorch" description "Tensors and Dynamic neural networks in Python with strong GPU acceleration" language "Python" followers 1600 stars 43000 forks 11200 name "tensorflow/tensorflow" description "An Open Source Machine Learning Framework for Everyone" language "Python" followers 8300 stars 149000 forks 82900 name "django/django" description "The Web framework for perfectionists with deadlines" language "Python" followers 2300 stars 52800 forks 22800 name "apache/airflow" description "Apache Airflow - A platform to programmatically author, schedule, and monitor workflows" language "Python" followers 716 stars 18500 forks 7200 `` ` We can display this data in a simple table, so let's add a component for that under ` `: ` `` import from "react" import from "./data" repos export const return < = > div className "block" ); }; const RepoRow = React.memo( ({ repo }: { repo: Repository }): JSX.Element => { return ( ); } ); In order to show the table, we'll need to render it. We could render our table right in our top-level `App` component, but let's instead use a top-level component for our app under `src/SpeechApp.tsx`, it will come in handy later on: React ; { repositories } ; { RepoList } ; SpeechApp: React.FC = (): JSX.Element => { ( <RepoList repos={repositories} /> </div> <div className="App"> <SpeechApp /> </div> import from "react" import from "./data" import from "./RepoList" export const return < > div ); }; ``` Now let's add it to our top-level component: ```tsx import React from "react"; import { SpeechProvider } from "@speechly/react-client"; import "./App.css"; import { SpeechApp } from "./SpeechApp"; function App(): JSX.Element { return ( ); } export default App; 3. Adding Speechly client and a microphone button Before we proceed with the app, let's take a quick detour and train a very simple and not very useful Speechly app, so that we can use it to test our integration later on. Go to https://www.speechly.com/dashboard and login (or sign up if you haven't yet) and create a new app (you can check our Speechly Dashboard if you feel lost). Feel free to use any configuration you want, even an almost empty configuration with just a "Hello world" will suffice, but make sure your app is deployed! quickstart guide Once you have your Speechly app deployed, let's integrate it. Start by installing Speechly React client: ```sh npm i --save @speechly/react-client ``` The client exposes a context provider and a hook that allows you to consume that context. Let's add the context provider to `src/App.tsx` - make sure you provide the `App ID` of your Speechly app as a property for `SpeechProvider`! ```tsx import React from "react"; import { SpeechProvider } from "@speechly/react-client"; import "./App.css"; function App(): JSX.Element { return ( <div className="App"> <SpeechProvider appId="your-app-id-here" language="en-US"> <SpeechApp /> </SpeechProvider> </div> ); } export default App; ``` Next let's add some code to act as the microphone button. Also, it would be nice to see what we are saying, so let's also render the transcript next to the button for some feedback. Let's make that a separate component and save it as `src/Microphone.tsx`: React ; { Word SpeechWord, SpeechSegment, SpeechState, } ; Props = { segment?: SpeechSegment; state: SpeechState; onRecord: < >; }; Microphone = React.memo( ({ state, segment, onRecord }: Props): JSX.Element => { enabled = ; text = ; (state) { SpeechState.Idle: SpeechState.Ready: enabled = ; text = ; ; SpeechState.Recording: enabled = ; text = ; ; SpeechState.Connecting: SpeechState.Loading: enabled = ; text = ; ; } ( <div> <button onClick={onRecord} disabled={!enabled}> {text} < > < em> < > ))} < strong>; } <span>{ }< import from "react" import as from "@speechly/react-client" type => () Promise void export const let false let "Error" switch case case true "Start" break case true "Stop" break case case false "Loading..." break return /button> <Transcript segment={segment} / /div> ); } ); const Transcript = React.memo( ({ segment }: { segment?: SpeechSegment }): JSX.Element => { if (segment === undefined) { return ( <div> <em>Waiting for speech input...</ /div> ); } return ( <div> {segment.words.map((w) => ( <Word word={w} key={w.index} / /div> ); } ); const Word = React.memo( ({ word }: { word: SpeechWord }): JSX.Element => { if (word.isFinal) { return <strong>{`${word.value} `}</ return ` ` ${word.value} /span>; } ); As you can see this component renders a button that calls the `onRecord` callback passed in the properties and uses the state of Speechly client to determine when to enable the button and which text to use as its label. In addition to that the component also renders the transcript of the phrase by assembling individual transcripted words from a segment (check out [this article in our documentation](/speechly-api/#understanding-server-responses) for more information about how SLU API works). Since a word can be either tentative (i.e. its value can change as the API receives more audio data) or final, we use bold text to highlight final words. One more step - we'd need to render our component and hook it up to the API. Let's add it to our `SpeechApp` component: React ; { useSpeechContext } ; { repositories } ; { RepoList } ; { Microphone } ; SpeechApp: React.FC = (): JSX.Element => { { toggleRecording, speechState, segment } = useSpeechContext(); ( <Microphone segment={segment} state={speechState} onRecord={toggleRecording} /> <RepoList repos={repositories} /> </div> ); }; import from "react" import from "@speechly/react-client" import from "./data" import from "./RepoList" import from "./Microphone" export const const return < > div Here we use the other main part of Speechly React client - a custom hook that consumes the state preserved in `SpeechProvider`. Feel free to check the [API documentation of React client](https://github.com/speechly/react-client/blob/master/docs/modules/_index_d_.md) to see what other properties are returned by the hook. Now you can go ahead and try talking to the app and see what you get back in the transcript. Congratulations, you've just integrated Speechly into the app. However, we still need to implement the filtering functionality, so let's go ahead and update our Speechly app configuration to support that. 4. Configuring Speechly app Now that we've integrated the API into the app it's time to make our Speechly app useful. Let's add a couple of simple commands for manipulating the data we see in the table: - A command to filter by programming language, e.g. when a user says "Show me TypeScript repos" the app will only show repos with that specific language - A command to sort the results in a specific order, e.g. "Sort the results by forks" will sort the repos by the amount of forks it has. - A command to reset the filters, e.g. "Reset the filters to default" will remove the language filter and reset the sorting to some default. Let's go back to and update the configuration of our app with the following: Speechly dashboard # Which languages we can filter by languages = [ Go TypeScript Python ] # Which fields we can sort by sort_fields = [ name description language followers stars forks ] # Synonyms results = [ items results repos repositories ] # A couple of commands filtering. # # This will expand into e.g. following examples (not exhaustive): # # # # etc. # # Words curly brackets ( ) are optional. # Square brackets are lists (e.g. one option the list may be used) *filter show {me} {[all | only]} $languages(language) {$results} *filter filter {$results} by $languages(language) {language} # A command sorting, e.g.: # # # etc. *sort [sort | order] {the} {$results} by $sort_fields(sort_field) # A command resetting the filters, e.g.: # # # # etc. *reset [reset | remove] {[the | all]} {filters} {to } for "repo" for "Show all Go repos" "Show me only TypeScript repositories" "Show Python results" in "{me}" for from for "Sort the repos by name" "Order results by forks" for "Reset all filters to default" "Remove the filters" "Reset to default" default Don't forget to add `sort`, `filter` and `reset` as intents and `languages` and `sort_fields` as entities! As you can see from the comments, this configuration will make our Speechly app understand the commands we need and properly detect entities and intents. Keep in mind, that the cool part is that the model will also be able to understand the variations of commands that are not explicitly defined in our configuration. The same also applies to entities - the app won't be limited to only detecting "Go", "TypeScript" and "Python" as options for the language, but other words as well, which will be roughly in the same place in a pharse (e.g. you could try saying "Show me all Javascript repos"). However, with words that are very specific to domain like programming language names it's always a good idea to list them all in your configuration, otherwise they might be mistaken for some regular words, e.g. the API might not properly detect "Rust" as a programming language if you say "Show me all Rust repositories", because it would think that you meant "rust" as that thing that destroys metals. You can read more about how to configure Speechly applications. Once you've deployed your new version of the Speechly app, let's continue to parsing the results. 5. Parsing intents and entities Now that we've trained a version of Speechly app with proper entities and intents, let's parse the results. First let's add our parsing logic to `src/parser.ts`: ts { SpeechSegment } ; enum IntentType { Unknown = , Sort = , Filter = , Reset = , } enum EntityType { Language = , SortField = , } enum SortEntityType { Unknown = , Name = , Description = , Language = , Followers = , Stars = , Forks = , } SpeechIntentValues = .values(IntentType) string[]; SortTypeValues = .values(SortEntityType) string[]; { { intent } = segment; (SpeechIntentValues.includes(intent.intent)) { intent.intent IntentType; } IntentType.Unknown; } { langs: string[] = []; ( e segment.entities) { (e.type === EntityType.Language) { langs.push(e.value.toLowerCase()); } } langs; } { s = SortEntityType.Unknown; ( e segment.entities) { val = e.value.toLowerCase(); (e.type === EntityType.SortField && SortTypeValues.includes(val)) { s = val SortEntityType; } } s; } import from "@speechly/react-client" export "unknown" "sort" "filter" "reset" export "language" "sort_field" export "unknown" "name" "description" "language" "followers" "stars" "forks" const Object as const Object as export ( ): function parseIntent segment: SpeechSegment IntentType const if return as return export ( ): [] function parseLanguageEntity segment: SpeechSegment string const for const of if return export ( ): function parseSortEntity segment: SpeechSegment SortEntityType let for const of const if as return Here we define a couple of functions to parse intents and different entity types from a `SpeechSegment`, which is returned by `useSpeechContext`. As you can see, the code is pretty straightforward, most of it is actually just listing which intents and entities we expect and defining them as enumerations, since it's always a good idea to check the results returned from API against a pre-defined list of allowed values to avoid bugs. Another good idea is to make sure we use consistent case (in this case by casting the results to lower case) to avoid false negatives when e.g. comparing `STARS` to `stars`. Now that we have our code for parsing the results from a segment, time to use it. Let's update our `SpeechApp` and add some code that calls our parser: React, { useEffect } ; { SpeechSegment, useSpeechContext } ; { repositories } ; { IntentType, SortEntityType, parseIntent, parseLanguageEntity, parseSortEntity, } ; { RepoList } ; { Microphone } ; SpeechApp: React.FC = (): JSX.Element => { { toggleRecording, speechState, segment } = useSpeechContext(); useEffect( { (segment === ) { ; } parseSegment(segment); }, [segment]); ( <div> <Microphone segment={segment} state={speechState} onRecord={toggleRecording} /> <RepoList repos={repositories} /> < import from "react" import from "@speechly/react-client" import from "./data" import from "./parser" import from "./RepoList" import from "./Microphone" export const const => () if undefined return return /div> ); }; function parseSegment(segment: SpeechSegment) { const intent = parseIntent(segment); switch (intent) { case IntentType.Filter: const languages = parseLanguageEntity(segment); console.log("Filtering by languages", languages); break; case IntentType.Sort: const sortBy = parseSortEntity(segment); if (sortBy !== SortEntityType.Unknown) { console.log("Sorting by field", sortBy); } break; case IntentType.Reset: console.log("Resetting the filters"); break; } } Here we define a `parseSegment` function that is called every time a segment changes by using React's `useEffect` hook. Since segment might come as `undefined` (this happens after the the user stops speaking and the API sends it's final response), we want to check for that before trying to parse it. The function checks for the intent and then calls the appropriate entity parser (or no entity parser at all if the intent was to reset the filters). For now we are just going to log the results of the parser, but to use them we'll have to add some filters. Let's continue with that! 6. Adding and applying filters In order to apply filters, we'd need to implement some filtering logic, so let's do just that and add it as `src/filter.ts`: Here we define a `Filter` type that contains a list of languages to display and the field to sort by. We also define a function `filterRepos` that takes a list of repositories and a filter and returns a new list of repositories filtered and sorted according to that filter. Now we need to call the filtering function when we get new results from the API, so let's also update our `SpeechApp` to do that: tsx React, { useEffect, useState } ; { SpeechSegment, useSpeechContext } ; { repositories, Repository } ; { Filter, filterRepos } ; { IntentType, SortEntityType, parseIntent, parseLanguageEntity, parseSortEntity, } ; { RepoList } ; { Microphone } ; SpeechApp: React.FC = (): JSX.Element => { [filter, setFilter] = useState<Filter>(defaultFilter); [repos, setRepos] = useState<Repository[]>(repositories); { toggleRecording, speechState, segment } = useSpeechContext(); useEffect( { (segment === ) { ; } nextFilter = { ...filter, ...parseSegment(segment), }; setFilter(nextFilter); setRepos(filterRepos(repositories, nextFilter)); }, [segment]); ( <div> <Microphone segment={segment} state={speechState} onRecord={toggleRecording} /> <RepoList repos={repos} /> < import from "react" import from "@speechly/react-client" import from "./data" import from "./filter" import from "./parser" import from "./RepoList" import from "./Microphone" export const const const const => () if undefined return const // eslint-disable-next-line react-hooks/exhaustive-deps return /div> ); }; const emptyFilter: Filter = {}; const defaultFilter: Filter = { languages: [], sortBy: SortEntityType.Name, }; function parseSegment(segment: SpeechSegment): Filter { const intent = parseIntent(segment); switch (intent) { case IntentType.Filter: const languages = parseLanguageEntity(segment); if (languages.length === 0) { return emptyFilter; } return { languages, }; case IntentType.Sort: const sortBy = parseSortEntity(segment); if (sortBy !== SortEntityType.Unknown) { return { sortBy, }; } return emptyFilter; case IntentType.Reset: return defaultFilter; default: return emptyFilter; } } Here we use React's `useState` hook to create a couple of stateful variables for storing filtered results and last filters (since you can append them by saying "Show me all Go repos" first and then following up with "Sort by start"). Every time we get new state of `segment` from the API, we call our `parseSegment` to parse the filters from it and then append those filters to the ones we've saved in the state. Then we also apply new filters to the list of repositories before passing them on to rendering. Conclusion And that's it! Now you can go ahead and try out your app - you can filter the repos by language, apply some sorting order and reset the filters. If you want to delve into the details, go ahead and check out and our public our documentation https://github.com/speechly You can also check the source code for this tutorial at https://github.com/speechly/react-example-repo-filtering. Feel free to navigate through individual commits - they refer to each section of this tutorial. Also published on Speechly.