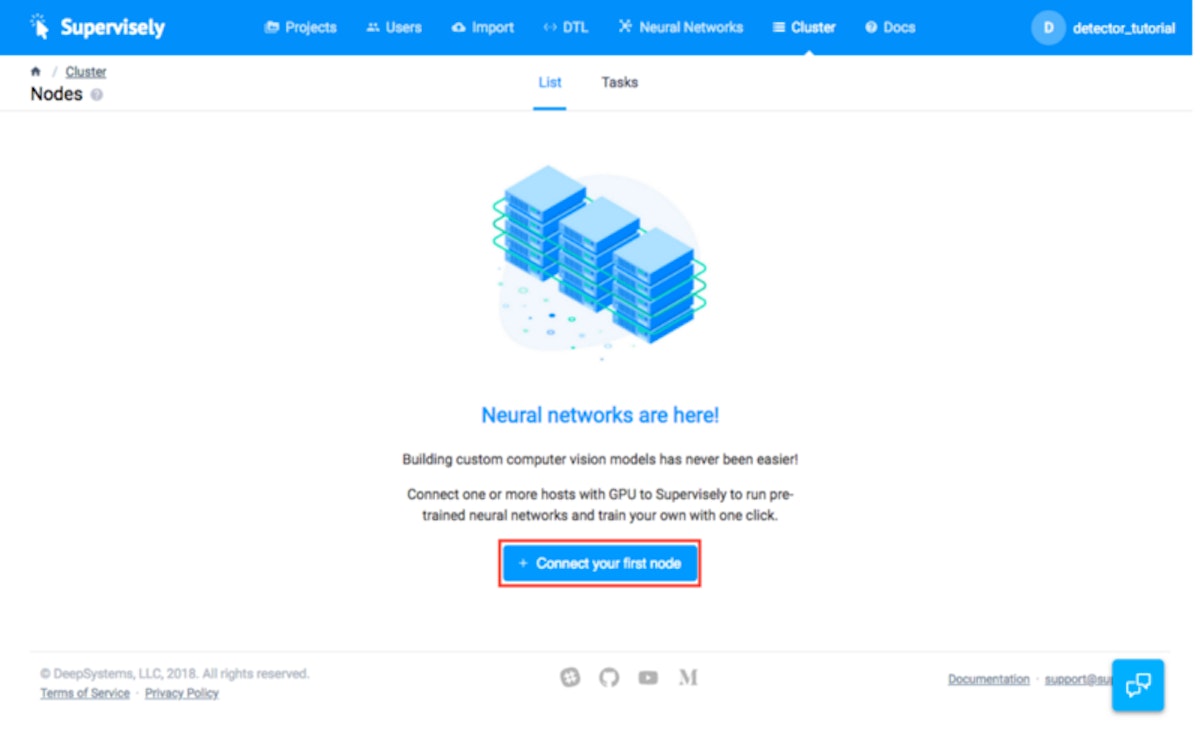
Spoiler: sure, you can! 💪 Motivation Person detection task is really everywhere. If you are working in computer vision field, chances are that you have faced this task before. You can take almost any industry and person detection will arise. The examples are: Identifying pedestrians on a road scene Self-driving. Analysing visitors behaviour within a supermarket Retail. Identify specific brands and persons who wear them Fashion. Restrict access for certain people to certain places Security. Find a person and apply cool filter Mobile apps. But how hard is the task today? Well, 5 years ago, the dominant solutions were built using opencv, based on cascade classifiers on top of Haar-like features. These detectors required time & efforts to build and the detection quality was not very good by today’s standards. In the Deep Learning Era, the combination of feature engineering and simple classifier is left behind (at least, when it comes to computer vision) and neural networks dominate the field. Actually, there are a number of implementations of person detection out there on . For example, take a look at and repos. github this this Nevertheless, even today, companies keep contacting us ( ) and ask us to help them with this particular task. Hopefully, after reading this blog post, you will find it feasible to run person detector that will work for your task. DeepSystems.ai Let’s choose the tools We will use to address Person Detection task. The reasons, besides promo, are: Supervise.ly platform It will take us 5 minutes to get initial solution No need to write code and jump back and forth between various developer tools We get out-of-the-box: a bunch of pre-trained models, visualization and deployment How to approach the task Actually, we have two ways to address the task: (1) use a pre-trained model or (2) train our own Person Detector. With Supervise.ly you can go both ways, but, for simplicity, we will focus on the first — we will use . NASNet based Faster R-CNN model that is pre-trained on COCO dataset So, our high level plan is the following: I. Setup a person detector model II. Detect persons on your images to check the quality III. Deploy the model for production applications Let’s start … Step by step guide First of all, we need to go to website and sing in. Then, just follow step-by-step guideline below. Supervise.ly I. Setup a person detector model Setting up a detector model is easy. To do that, we need to connect your GPU machine to Supervise.ly and then pick one of the pre-trained models. 1. Connect your GPU machine to Supervise.ly platform (1) click “connect your first node” button (2) run selected command in your terminal (3) check that your computer is connected to the platform Go to Cluster page, click “Connect your first node” button (1). Then, you will see a following window (2). Just copy the command and execute it in your terminal. Python agent will be installed on your machine, and it will be shown in a list of available nodes (3). 2.Pick a pre-trained model (1) go to Model Zoo page (2) pick your detector (3) check “My Models” list Go to “Neural networks” -> “Model Zoo” page (1). You will see there a bunch of pre-trained models for semantic segmentation and object detection tasks. If you hover cursor over “FasterRCNN NasNet”, you will see “Add model” button (2). After clicking it, the model will be available in “My models” list (3). Now, Faster R-CNN detector is ready. The next step is to check how it works for your images. II. Detect persons on your images to check the quality Before you deploy model as API, it is a good idea to visualize neural network predictions to understand whether it fits your requirements or not. It is super easy with Supervisely: drag&drop your images and run inference process with a few clicks. 1. Import your images (1) go to “Import”->”Upload” page and drag&drop your images (2) define project name and start import (3) check “Projects” page Go to import page, and drag&drop the folder with your test images (1). Name the project where your images will be kept. In our case, the project name is “test_images”. Then click start import button (2). After the import process is finished, go to “Projects”page to check the project with your images is created (3). 2. Run inference process (1) click “Test” button (2) choose a project (3) define inference parameters Now let’s test our persons detector on your images. Go to “My models” page and click “Test” button (1). Then you pick a project with the images to detect persons on. In our case, it’s “test_images” project, then click “Next” button (2). Then, we should specify the name of the project where detection results will be stored. In our case, it’s “inf_test_images” project (3). The only thing left is to select an inference mode. Select in a list “inference_full_image”. The last step is to replace that line: “save_classes”: “__all__”, with this line: “save_classes”: [“person”], Then, click “Start inference” button. 3. Check the results (1) click to the resulting project (2) look at predictions After inference process is finished, you will see “inf_test_images” on the project page (1). To visually check the results (2), click on “inf_test_images” project, and, then, on a dataset within this project. Now that we understand that our model meet the requirements, let’s go to the final step — model deployment. III. Deploy the model for production applications In most cases, once we are satisfied with detection quality, we need to use the model from custom environment via APIs. The instructions below describe how to deploy the model for production applications. 1. Deploy person detection model (1) click “Deploy” button (2) specify and submit deployment parameters (3) make sure the task is completed Go to “My models” page and click “Deploy” button (1). Then, after specifying the target GPU machine and device, click “Submit” button (2). As a result, a new task will be created, and, as soon as, it is completed (3) you can send API requests to your person detection model. 2. Send API requests (1) click “Deploy API Info” item (2) get deployment information Before calling API, we need to get token and url information. To do that, on a “Cluster->Tasks” page click on “Deploy API info” from context menu (1). On the next page, you will see all the information needed to use our detection model via API (2). More specifically, here (2) we can see: API token. RsiYTrSBsyE5BIXRYYCFBLJf13JqVQ4NeEUUxX2oE1SdkwgdpmErjZ0tHEKljadILv8cQrosxMVmirJVOOf025mR8XB88feSRDbbeAYpKL2MwJ1MAZtJ2PfideN4UmNP URL. https://app.supervise.ly/public/api/v1/models/435/deploy/upload 3. Usage example. It’s evident, but let me say it anyway, that your API tokens and URLs will differ from the ones above. For example, suppose that you have “dl_heroes.jpg” image Yann LeCun, Geoffrey Hinton, Yoshua Bengio, Andrew Ng So, if you run in terminal the following command: curl -XPOST -H ‘X-API-KEY: ’ -F ‘image= ;type=image/jpeg’ YourToken @ dl_heroes.jpg YourUrl then, Supervise.ly will give you back detection results in json format: [{"tags":[],"description":"","objects":[{"bitmap":{"origin":[],"np":[]},"type":"rectangle","classTitle":"person","description":"","tags":[],"points":{"exterior":[[343,87],[493,375]],"interior":[]},"score":0.999502420425415},{"bitmap":{"origin":[],"np":[]},"type":"rectangle","classTitle":"person","description":"","tags":[],"points":{"exterior":[[0,94],[149,375]],"interior":[]},"score":0.9994213581085205},{"bitmap":{"origin":[],"np":[]},"type":"rectangle","classTitle":"person","description":"","tags":[],"points":{"exterior":[[247,96],[367,377]],"interior":[]},"score":0.9987866282463074},{"bitmap":{"origin":[],"np":[]},"type":"rectangle","classTitle":"person","description":"","tags":[],"points":{"exterior":[[138,96],[256,378]],"interior":[]},"score":0.99868243932724},{"bitmap":{"origin":[],"np":[]},"type":"rectangle","classTitle":"person","description":"","tags":[],"points":{"exterior":[[100,133],[129,177]],"interior":[]},"score":0.9136056900024414}],"size":{"width":506,"height":380}}] Json above corresponds to all the object detected, including coordinates and confidence levels. After visualization, we get Visualization of predictions returned by API To make the life even easier, we provide a that implements API calls and visualise detection results. We encourage you to play with it! python notebook Jupyter notebook (not much code here) Back to the main question Recall the question in the title “Can you solve a person detection task in 10 minutes?” The quick answer is Yes, just follow the instructions above. More thoughtful answer is “It depends”, the devil is, as always, in details. Again, the number of possible apps where person detection is needed is huge. Below are three most popular factors that cause a headache: . For some apps it’s ok to use Desktop Computer with high-end GPU onboard. Other apps should work on a mobile phone or inside a robot. In this case, we need to use small & fast neural network at the expense of the model accuracy. Hardware constraints . For example, in self-driving industry the software should work in real-time. In this case, the latest GPU is still not powerful enough to run State-of-The-Art implementations of Faster R-CNN. So, again, we have to sacrifice the accuracy and pick simpler model. Real-time requirements . if we build a security app, then, very likely, we have to spot unwanted persons during the night. There are no guarantees that out-of-the-box detectors will solve this task. A lot of other variations are possible — different weather, camera angles or the fact that only small part of a person is visible. The good news is that we can train the models to work well in a specified conditions, but it might take us some extra work. Specific conditions In the future, we are going to publish a series of blog posts that address the more complicated scenarios, including training of custom object detectors If you found this article interesting, give it some 👏, so that more people could see it!