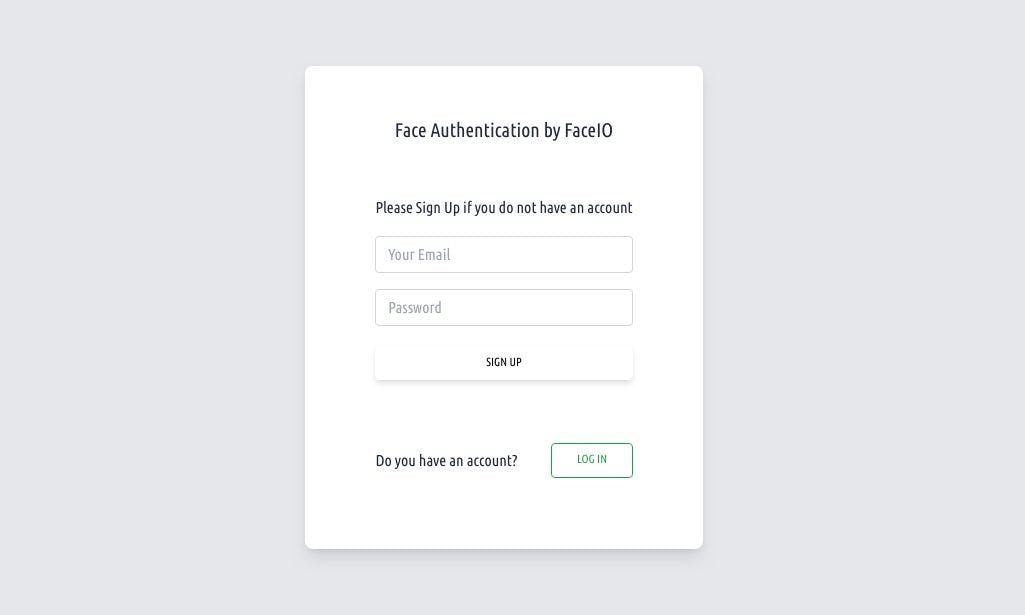
Hi there, I am going to show you an exciting new way to authenticate your users using facial recognition by . faceIO What is FaceIO This is a facial authentication framework that can easily be integrated into any website or web app using a simple JavaScript snippet. Why use facial integration and faceIO? Since the number of websites asking for passwords is constantly growing and the complexity of passwords needs to increase beyond that which the human brain can remember, facial recognition authentication is able to step in and provide a method of authentication that is simple and secure. In cases where the website moderators want to substantially reduce the ability of a user to open multiple accounts or where the user identity needs to be verified, for example when using financial service provider’s websites, facial recognition is able to provide authentication that is incomparable to other traditional forms of authentication. The cost of authentication is reduced compared to OTP authentication (sending shortcodes to clients’ phone numbers). Now let us get to the heart of the matter and integrate faceIO into a Next.js login/signup form and you will experience the simplicity of faceIO. First, we begin by initializing Next.js in a new folder. I will use yarn: yarn create next-app faceionextjsform Let us cd into the folder then add Tailwind CSS to the project cd faceionextjsform yarn add -D tailwindcss postcss autoprefixer Create tailwind CSS configuration files that are and by this yarn command. tailwind.config.js postcss.config.js yarn tailwindcss init -p Open tailwind.config.js and replace the contents with this module.exports = { content: [ // add this lines "./pages/**/*.{js,ts,jsx,tsx}", "./components/**/*.{js,ts,jsx,tsx}", ], theme: { extend: {}, }, plugins: [], } Update , you may delete any other files. ./styles/globals.css /* ./styles/globals.css */ @tailwind base; @tailwind components; @tailwind utilities; Go to and delete all the HTML and replace it with the following: pages/index.js <div className='bg-green-300 text-center text-white h-screen'> <Head> <title>face.IO login/signup form</title> <meta name='description' content='a face.IO login form' /> <link rel='icon' href='/favicon.ico' /> </Head> <main> <h1 className='text-xl font-bold'>home</h1> </main> </div> Before we run our application, add a new file to the pages folder ( ). This is used to override the default because we want to add a custom script tag to our site. This script tag will enable us to integrate the faceIO into our project by adding their CDN to the HTML. _document.js pages/_document.js Document If you want to know more you can visit the . faceIO integration guide The contents of will be as follows: _document.js import Document, { Html, Head, Main, NextScript } from 'next/document'; class MyDocument extends Document { static async getInitialProps(ctx) { const initialProps = await Document.getInitialProps(ctx); return { ...initialProps }; } render() { return ( <Html> <Head></Head> <body> //note this script tag <script src='https://cdn.faceio.net/fio.js'></script> <Main /> <NextScript /> </body> </Html> ); } } export default MyDocument; After you run yarn dev your application should look like this picture above. Inspect your site and confirm whether the faceIO CDN script is located inside the body tag. Create a new root folder components and add a file ( ). SignUpForm.js components/SignUpForm.js Since I want to summarize this as much as possible I have taken the liberty of creating a form feel free to copy the code. import React from 'react'; const SignUpForm = () => { return ( <section className='h-full gradient-form bg-gray-200 md:h-screen'> <div className='container py-12 px-6 h-full'> <div className=' flex justify-center items-center flex-wrap h-full g-6 text-gray-800'> <div className=''> <div className='block bg-white shadow-lg rounded-lg'> <div className='lg:flex lg:flex-wrap g-0'> <div className='px-4 md:px-0'> <div className='md:p-12 md:mx-6'> <div className='text-center'> <h4 className='text-xl font-semibold mt-1 mb-12 pb-1'> Face Authentication by FaceIO </h4> </div> <form> <p className='mb-4'> Please Sign Up if you do not have an account </p> <div className='mb-4'> <input type='email' className='form-control block w-full px-3 py-1.5 text-base font-normal text-gray-700 bg-white bg-clip-padding border border-solid border-gray-300 rounded transition ease-in-out m-0 focus:text-gray-700 focus:bg-white focus:border-blue-600 focus:outline-none' placeholder='Your Email' name='userEmail' /> </div> <div className='mb-4'> <input type='password' className='form-control block w-full px-3 py-1.5 text-base font-normal text-gray-700 bg-white bg-clip-padding border border-solid border-gray-300 rounded transition ease-in-out m-0 focus:text-gray-700 focus:bg-white focus:border-blue-600 focus:outline-none' placeholder='Password' name='pin' /> </div> <div className='text-center pt-1 mb-12 pb-1'> <button className='bg-green inline-block px-6 py-2.5 text-black font-medium text-xs leading-tight uppercase rounded shadow-md hover:bg-blue-700 hover:shadow-lg focus:shadow-lg focus:outline-none focus:ring-0 active:shadow-lg transition duration-150 ease-in-out w-full mb-3' type='button' onClick={handleSubmit} > Sign Up </button> </div> <div className='flex items-center justify-between pb-6'> <p className='mb-0 mr-2'>Do you have an account?</p> <button type='button' className='inline-block px-6 py-2 border-2 border-green-600 text-green-600 font-medium text-xs leading-tight uppercase rounded hover:bg-black hover:bg-opacity-5 focus:outline-none focus:ring-0 transition duration-150 ease-in-out' onClick={handleLogIn} > Log In </button> </div> </form> </div> </div> </div> </div> </div> </div> </div> </section> ); }; export default SignUpForm; Go to and replace the h1 tag in the main tag with . pages/index.js <SignUpForm /> Do not forget to import it. Your form now should look like this: Now go to the sign up then create a new project by following the steps once you are done you will get a public ID. Note it because we will use it here. faceIO console We are going to register a user. In order to do this, we must first initialize the faceIO object. We will do this inside a so that even if the state changes it will not reinitialize faceIO object, remember to import the . useEffect useEffect Go to signUpForm.js and add the . useEffect //first import useEffect and useState import React, { useEffect, useState } from 'react'; // initialize faceIO object let faceio; useEffect(() => { faceio = new faceIO('xxxxxxxxx'); }, []); //replace xxxx.. with your project id In order to register a user, we must have user registration logic (just the usual username and password) that will be stored together with the user's facial authentication data for future reference ( faceIO does not store an actual picture of the user but rather a vector which is hashed and cannot be reverse engineered ). You can read more about this . here Let us collect the user data, we are going to use a hook (hooks are react.js superpower). useState We are going to map the values of the username and password into a payload variable object. const [payload, setPayload] = useState({userEmail: '',pin: '',}); Go to the input field of name and update it so that its value is mapped to the , do the same also to the input field with the name pin: userEmail userEmail <input type='email' className='form-control...' placeholder='Your Email'name='userEmail' defaultValue={payload.userEmail} /> //and also <input type='password' className='form-control...' placeholder='Your Email'name='pin' defaultValue={payload.userEmail} /> We need to create an function so that when the user types the info it can be stored in the payload object. onChange const onChange = (e) => {setPayload({...payload,[e.target.name]: e.target.value,});}; //Again do not forget to update the input fields by adding onChange = {onChange} We will create a signup function that takes in the payload and enrolls the user to faceIO. Note that is a method of the faceIO object. enroll const handleSignUp = async (payload) => { try { let response = await faceio.enroll({ "locale": "auto", "payload": { "email": `${payload.userEmail}`, "pin": `${payload.pin}` } }); console.log(` Unique Facial ID: ${response.facialId} Enrollment Date: ${response.timestamp} Gender: ${response.details.gender} Age Approximation: ${response.details.age}`); } catch (error) { console.log(error); } }; Let us now create a function that will submit all this info: handleSubmit const handleSubmit = (e) => { // prevents the submit button from refreshing the page e.preventDefault(); //just to confirm that payload has the info you may delete it after console.log(payload); handleSignUp(payload); }; And as simple as that we have enrolled the user try it and you will see. When that user comes in next time and wants to log in he/she will only need to be authenticated. Let us make the function and update the log-in button: handleLogIn const handleLogIn = async () => { try { let response = await faceio.authenticate({ locale: 'auto', }); console.log(` Unique Facial ID: ${response.facialId} PayLoad: ${response.payload} `); } catch (error) { console.log(error); } }; And with that we are done, see how simple it is. If you want to see the whole code you may access it on . GitHub That is the conclusion for now but always check in this space for more. Also published . here