paint-brush
6 Ways A Node Developer Can Drastically Boost Their Productivityby@robbiecahill
3,936 reads
3,936 reads

6 Ways A Node Developer Can Drastically Boost Their Productivity

by Robbie CahillDecember 26th, 2021
Read on Terminal Reader
Read this story w/o Javascript
tldt arrow

Too Long; Didn't Read

These six productivity tips will supercharge your productivity as a Node developer. You'll save hours of time which you can then invest in other activities. Very experienced engineers would probably already be doing at least some of these techniques. Use the fuzzy finder in vscode to help you find files hidden in your project's folders. Use a real debugger instead of using the console console to run your app. Set a breakpoint in your app then run your code and see all variables in the debug tab. Use an IntelliJ or WebStorm, press `shift` twice quickly instead of pressing `Alt+P`.

Company Mentioned

Mention Thumbnail
featured image - 6 Ways A Node Developer Can Drastically Boost Their Productivity
Robbie Cahill HackerNoon profile picture

Introduction

These six productivity tips will supercharge your productivity as a Node developer. You'll save hours of time which you can then invest in other activities.


This is not a complete list of everything you should be doing, but these techniques alone will drastically improve your productivity if you are not already using them.


Discovering all of these techniques took me years, but you can learn them all in less than a day. Very experienced engineers would probably already be doing at least some of these techniques.


Use the fuzzy finder

Many of us are still working with large monolithic codebases that sometimes have thousands of files.


How are you supposed to find employee.js, hidden in /src/authentication/userTypes/employee.js amongst the thousands of .js files and hundreds of folders in your project? Manually go looking for the file through the directory tree? Ask another developer who is more familiar with the codebase?


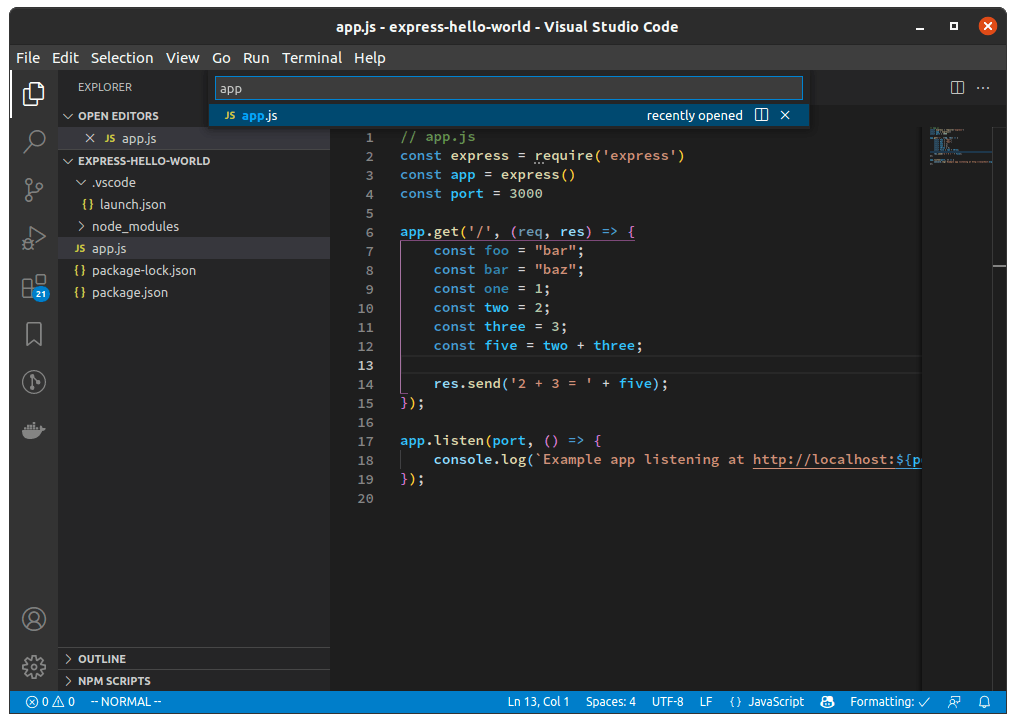
Nope, just use the fuzzy finder and type in employee.js and you'll have found your file in seconds.

Here’s how it works. In vscode, press Alt+P and then type in the name of the file you are looking for. The result will appear instantly. The fuzzy finder in vscode

If you are using IntelliJ or WebStorm, press shift twice quickly (aka double shift) instead of pressing Alt+P.

Use a real debugger instead of console.log()

Back when I was a mid level engineer, learning how to use a debugger was one thing by itself that supercharged my productivity. I could do in a couple of hours work that might have taken me a day to do. Fixing bugs and building out features was much easier.


I've found debugging especially useful when exploring unfamiliar codebases that I didn't write. You can easily see the results of even the most complex logic written in weird ways. Its much easier to reason out complex, convoluted logic when you can run it line by line and see how things change.


If you've ever used console.log() to print a value to the console, you might know how tedious it can get if you are trying to debug something complex. It prints one value at a time and you need to write a new console.log() statement for each value you want to see. If the value you are looking at changes, you need to console.log() it again. Its a bit like poking around with a blindfold or in the dark.


Human working memory is limited so once you've manually printed enough variables, the values will start to disappear from your mind and then you'll have to print them again or write them down somewhere. Trying to keep it all in working memory takes valuable brain resources that you could redirect towards making your code work the way you want it to.


Enter the debugger - set a breakpoint in your code then run your app. When your app reaches the line you set a breakpoint on, you'll be able to see all variables in scope in the debug tab.

There is no more need to juggle lots of values in your working memory. With just one action, you can now see everything instead of just one value at a time.


I started with just debugging my own application code but as time went by and I became more senior, I found I could get great insights by debugging framework code (such as the code for express). I was able to find answers to questions that weren't even listed in the documentation of the frameworks I was using.


If you want to learn how to set up your debugger, see my other article Supercharge Your Node Productivity With Debugging.

Use async/await and avoid "callback hell"

Consider the following examples with and without async/await.

Without async/await:

function addFavoriteProduct(favoriteProduct) {
	const user = userRepository.get(userId).then((user) => {
		const userProfile = profileRepository.get(user.profileId).then((userProfile)) => {
			const favoriteProducts = productsRepository.getFavoriteProducts(userProfile.favoriteProductsId).then((favoriteProducts) => {
				favoriteProducts.add(favoriteProduct);
			}).catch((error) => {
				// Handle error
			})
		}).catch((error) => {
			//Handle error
		});
	}).catch((error) => {
		// Handle error
	});
}

This is an example of "callback hell". It contains many nested operations and is hard to maintain. If you had any more nested operations you'd be heading towards the Pyramid Of Doom anti-pattern.


I wouldn't be surprised if there is a bug in there I didn't notice because the code is way more complicated than it needs to be!. I'm not even going to try to get it working, because there is a better way.


This used to be the standard way to do this type of operation in NodeJS up until very recently.


Because of this, many older examples and tutorials online still teach this style, so be careful about what you read online in places like Stackoverflow. If you see this style of code you should be aware that its no longer best practice. Find a different example elsewhere or try to refactor it to be better, like the example below.


With async/await:

async function addFavoriteProduct(favoriteProduct) {
	try {
		const user = await userProfile.get(userId);
		const userProfile = await profileRepository.get(user.profileId);
		const favoriteProducts = await  productsRepository.getFavoriteProducts(userProfile.favoriteProductsId);
		await favoriteProducts.add(favoriteProduct);
	} catch (error) {
		// Handle error
	}
}


As you can see, this example is much cleaner and easier to understand. It’s way less likely to have bugs hidden in it because it is simpler.


To use async/await you need to be on Node 8 or higher, so recent versions of Node will support it. You'll need to use it inside an async function. Declare one by adding async, e.g. async function get().

Share your work early with a public URL

Did you know you can get a public URL for a Node application being served from localhost or 127.0.0.1 on your local machine, even if it is behind a firewall or corporate network? It doesn't require any networking config and you can do it in a single command with expose, for example expose 80 as myapi.expose.sh.


This lets you share your work early with your collaborators - such as other engineers, customers, or product managers and get fast feedback without needing to set up a full deployment pipeline.


You could be writing a back-end API, share a public URL for that, and then do live debugging as the React front-end developer you are collaborating with sends a request from their application to your API.


Why not do live debugging while webhook providers send you webhook requests, instead of spending hours reading their (often not so great) documentation?


If you are on Linux, run this to install expose

curl -s https://expose.sh/sh/install-linux.sh | sudo bash

If you are on a Mac, run

curl -s https://expose.sh/sh/install-mac.sh --output install-mac.sh && sudo bash install-mac.sh

For Windows head over to the Installation Page and download the exe file.


Then you can run expose <port> where <port> is the port number your app is running on. More instructions are available in the Documentation.

Use npm scripts to automate repetitive tasks

Need to compile your JavaScript, run a linter, or do your unit tests?


Instead of remembering the commands to run each of these, you can add NPM scripts to your package.json file to run them.

{
  "name": "myapp",
  "main": "app.js",
  "scripts": {
    "build": "tsc -p ./",
    "watch": "tsc -p ./ -w",
	"test": "jest",
	"lint": "eslint",
	"start": "nodemon app.js"
  },
  "dependencies": {
	.....
  }
}

This example uses TypeScript, the superset of JavaScript that adds type safety. I run my app I first need to compile my code into plain JavaScript that node can run.


To run the script, run npm run <script_name>. Here I can run npm run build to compile my code and npm run watch to compile in watch mode, automatically recompiling for each change.

test and start are special scripts and you can just run these as npm test and npm start.

Start your app with nodemon to get fast feedback

If you make a change to your code after starting your app with node (e.g. node app.js) you need to press ctrl+c to stop your app and then start it again to get the new change. While it might not sound like much and only takes a few seconds to do, doing this repeatedly over time will add up.


Let us say it takes you five seconds and you do this on average 1000 times in a week. That's 5000 seconds or about an extra 1.3 hours of work that you didn't need to do per week.


The difference with nodemon is that when you update your code, your application automatically restarts.


Before you use nodemon you need to install it, so run npm install -g nodemon.


To start your app with nodemon is almost the same as using node. Just replace node with nodemon, for example, you might run nodemon app.js instead of node app.js.


In my example, app.js is my application’s main entry point. Because of this any change I make to any .js file in my project will automatically trigger nodemon to restart my app.


Here's what it looks like:

$ nodemon app.js
[nodemon] 1.18.9
[nodemon] to restart at any time, enter `rs`
[nodemon] watching: *.*
[nodemon] starting `node app.js`
Example app listening at http://localhost:3000 # My app has started up

#####
# Here, I make a change to app.js while nodemon is running.
#####

[nodemon] restarting due to changes...
[nodemon] starting `node app.js`
Example app listening at http://localhost:3000 # Now, my app automatically restarts and picks up the change

Now when I make changes, the application automatically restarts saving me lots of time which I can then invest in other things.


Pro tip: Combine this with a start npm script, like in the example in the previous section.

Conclusion

This isn't a complete list of things you can do to increase your productivity as a Node developer, but it’s a good starting point.


These simple things can save you lots of hours of unnecessary work. If you found this article useful, please consider sharing it to help others.


Happy Coding!