4,325 reads
User Authentication in Android using Firebase (Java)
by Grace Tamara EkunolaJune 26th, 2023


Too Long; Didn't Read
Firebase is a mobile(Android or iOS) and web application development platform. It provides a suite of cloud-based tools and services offered by Google. In this tutorial, we'll build a simple Java Android app with Firebase for authentication. We'll also cover how to use your Android phone as an emulator.People Mentioned


What is Firebase?
Firebase is a mobile(Android or iOS) and web application development platform that provides a suite of cloud-based tools and services offered by
In this tutorial, we'll build a simple Java Android app with Firebase for authentication that allows users to create accounts. sign in and sign out of the accounts. We'll also cover how to use your Android phone as an emulator.
Prerequisites
Before starting this tutorial, you should know the basics of Android app development.
Additionally, you must have the following software installed on your computer:
- Android Studio:
Android Studio is the official IDE for developing Android apps. It has a large set of features including code editing, layout design, debugging, and an emulator for testing. - Java Development Kit (JDK): In this tutorial, we'll use
Java to build our app. Android Studio requires JDK 8 or higher. - Android SDK (Software Development Kit): The Android SDK is a collection of tools and libraries provided by Google for developing Android apps.
- Android Virtual Device (AVD) Manager: AVD Manager is a tool provided by Android Studio that allows you to create and manage virtual devices for testing your apps.
Step 1: Create a New Android App
- Open Android Studio, and click "Start a new Android Studio project" on the welcome screen. If you don't see this option, you can go to File>New>New Project to create a new project.
- Next, you will choose a template for your project. Android Studio provides several templates for different types of apps, such as "Empty Activity", "Basic Activity", "Fullscreen Activity", and more. Choose "Empty Activity" and click on "Next".

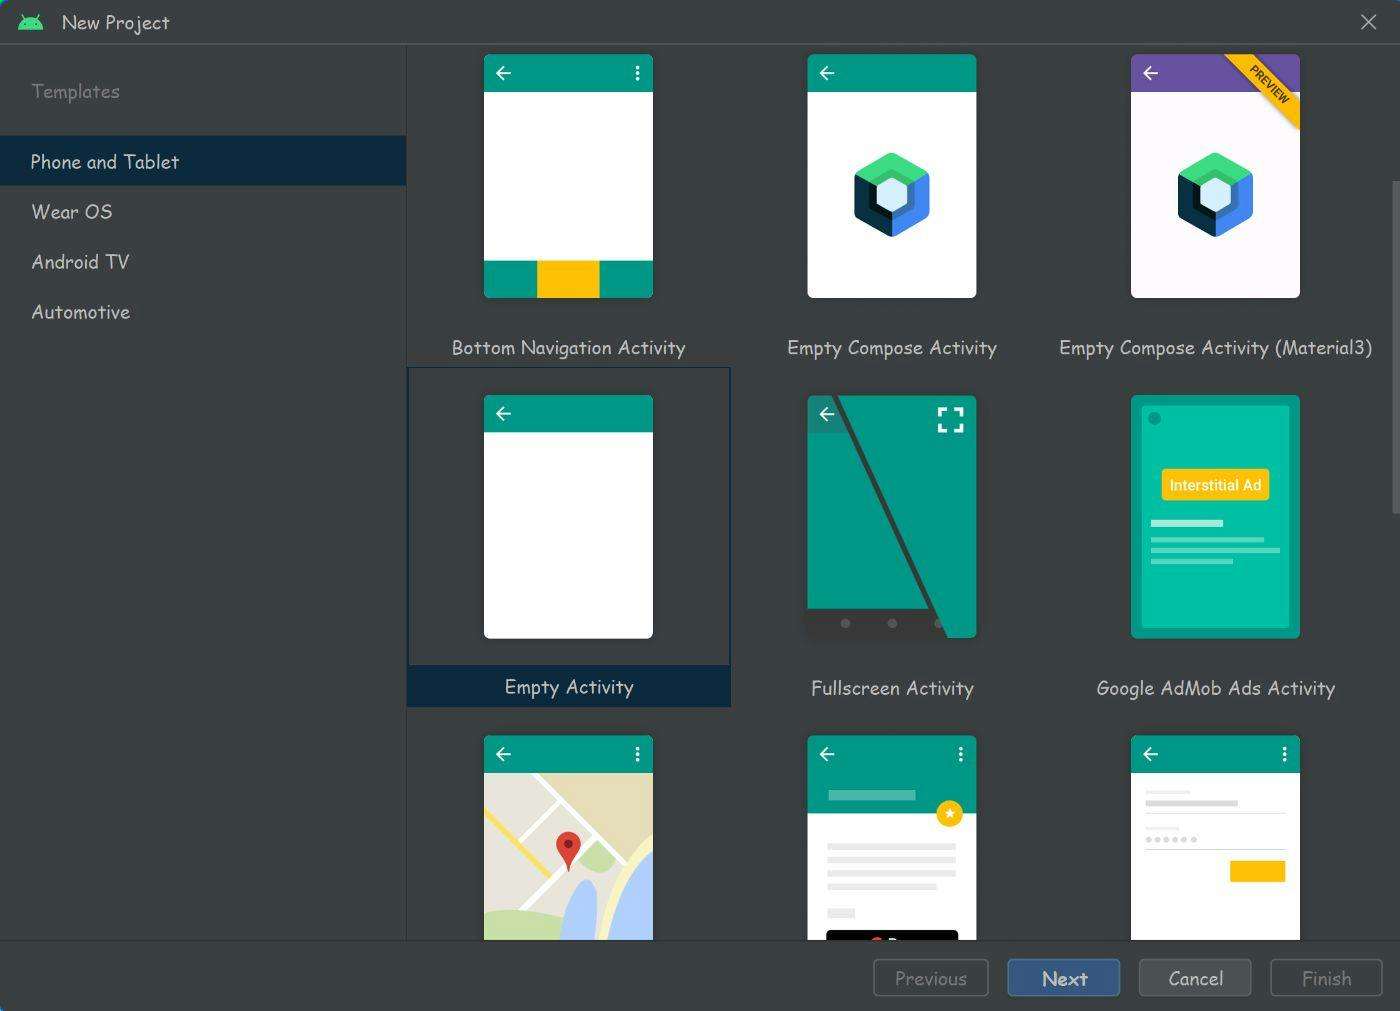
- In the "Empty Activity" dialogue, you can set additional settings for the app. You will see a prompt to configure various settings for your project, such as the project name, package name, location, minimum SDK, and language. Fill in the required information; in this case, the project name is `FirebaseAuthApp," and click "Finish".


- Android Studio will create a new project with the chosen template and generate the necessary files and folders. It may take a couple of minutes depending on your system’s performance and capacity. Once the project is built, you will see the project structure in the Project tab, the activity_main.xml layout file in the layout editor, and the mainactivity.java file in the editor.
- Click on `Build` on the toolbar and select `Build Project` to generate the APK file that contains your app's code and resources. N.B.: You may see "Rebuild Project" instead of "Build Project" if you have previously triggered a build or if you have made changes to your project that require a full build.
Step 2: Run and test the app.
To do this, you can connect a physical Android device or start an emulator.
To use an emulator, follow these steps:
- Click on Device Manager in the toolbar on Android Studio to open the Android Virtual Device (AVD) Manager.


- Create or select an existing virtual device: If you already have a virtual device, click on the play button to start the emulator in the AVD. If you don't have one, then click on `Create Device` to create a new emulator or virtual device. Select your preferred hardware configuration (size, resolution, density, etc.), then select next. After that, select a system image and Android version. Let it download, and then set up the emulator settings.


- When the virtual device is created, click on the play button to start the emulator.
- Once the emulator is running, navigate to the toolbar and click on the `run` button to run your project on the emulator. It will automatically build and install the app on the emulator. You should see `Hello World` on the emulator.


To connect to a physical Android device, follow the following steps:
On your Android device( phone or tablet), open the settings and navigate to `About phone`. Click on 'Software Information'.
- Once you open it, scroll down and look for 'Build Number." Tap on it seven times( the number may vary depending on the phone; I'm using a Samsung phone), and it will turn on development mode.
- At this stage, it may ask for your password; input it, and you are done. Go back to the settings home page, and you should see the developer options.
- Click on Developer Options, and then turn on USB Debugging.
- Connect your device to your computer by plugging it in with a USB cord. You'll see a pop-up message asking you to allow USB debugging from the computer.
- Go back to your Android Studio and navigate to the AVD manager. On the toolbar, your device should show up; select it and run the app. The app should open on your Android device after a few minutes, and you'll see the `Hello World` home page.
N.B.: There are other ways to connect your physical device to your Android studio as an emulator, such as wireless debugging, but in this tutorial, we'll use USB debugging.
Step 3: Create the User Interface
In this step, we'll create the user interface and design. Navigate to the `app/res` folder; this is where most of the user interface changes will take place.
- Add colours: Open the `app/res/values/colors.xml` file and add the colour codes for our app.
<?xml version="1.0" encoding="utf-8"?>
<resources>
    <color name="slateblue"> #6F58C9</color>
    <color name="black">#FF000000</color>
    <color name="white"> #FFFFFFFF</color>
</resources>
- Add font: Right-click on the `res` folder and click 'New', scroll down to 'Folder," and select `Font folder' from the drop-down. Or create a new folder and name it `font`. Download and copy this
font into the font folder. - Create Drawable Resources: We'll create and add the login, dialogue boxes, form input boxes, buttons, background images, and vector assets on the login and signup pages. To do this, follow the steps below:
- Add custom drawable resource files: In the `res` folder, navigate to the 'drawable' folder, right-click on it, click 'New," and select 'Drawable Resource File'. Save the name as 'custom_edittext' and change the root element from selector to shape, then click 'OK'.
- Open the file and add these lines of code:
<?xml version="1.0" encoding="utf-8"?>
<shape xmlns:android="http://schemas.android.com/apk/res/android" android:shape="rectangle">
    <stroke
        android:width="2dp"
        android:color="@color/slateblue"/>
    <corners
        android:radius="30dp"/>
</shape>
-
- Add vector images:
- In the `res` folder, navigate to the 'drawable' folder, right-click on it, click 'New," and select 'Vector Asset'. Here we'll download vector images for the forms.
- Click on clip art and type 'person' in the search bar. Select the 'person' art, click 'next," and select 'finish'.
- Repeat the steps but download the vector image for 'lock'.
- Open the XML code for each of them and change the tint to burgundy. 'android:tint="@color/slateblue"'.
- Add vector images:
Step 4: Create new activities.
- Navigate to the 'app/java/com.example.firebaseauthapp' folder, right-click on it, and select 'New'. Scroll down and click 'Activity," then select 'Empty Activity'.
- Rename the activity to 'SignUpActivity', check the box that says 'Launcher Activity," and then click 'Finish'.


-
Repeat the steps excluding making it a launcher activity, this time for 'LoginActivity'.
-
Open the 'app/manifests/AndroidManifest.xml' file and remove the intent filter from the Main Activity block, also change the 'android:exported="true"' to 'android:exported="false"'. It should look like this:
<activity
            android:name=".LoginActivity"
            android:exported="false" />
        <activity
            android:name=".SignUpActivity"
            android:exported="true">
            <intent-filter>
                <action android:name="android.intent.action.MAIN" />

                <category android:name="android.intent.category.LAUNCHER" />
            </intent-filter>
        </activity>
        <activity
            android:name=".MainActivity"
            android:exported="false">
        </activity>
Step 5: Edit the activity layout.
- Open the 'app/res/layout/activity_main.xml' file.
- Add the following code:
<?xml version="1.0" encoding="utf-8"?>
<androidx.constraintlayout.widget.ConstraintLayout xmlns:android="http://schemas.android.com/apk/res/android"
    xmlns:app="http://schemas.android.com/apk/res-auto"
    xmlns:tools="http://schemas.android.com/tools"
    android:layout_width="match_parent"
    android:layout_height="match_parent"
    tools:context=".MainActivity">

    <TextView
        android:layout_width="wrap_content"
        android:layout_height="wrap_content"
        android:text="Hello World!"
        android:textColor="@color/slateblue"
        android:textSize="26sp"
        android:textStyle="bold"
        app:layout_constraintBottom_toBottomOf="parent"
        app:layout_constraintEnd_toEndOf="parent"
        app:layout_constraintStart_toStartOf="parent"
        app:layout_constraintTop_toTopOf="parent"/>

</androidx.constraintlayout.widget.ConstraintLayout>
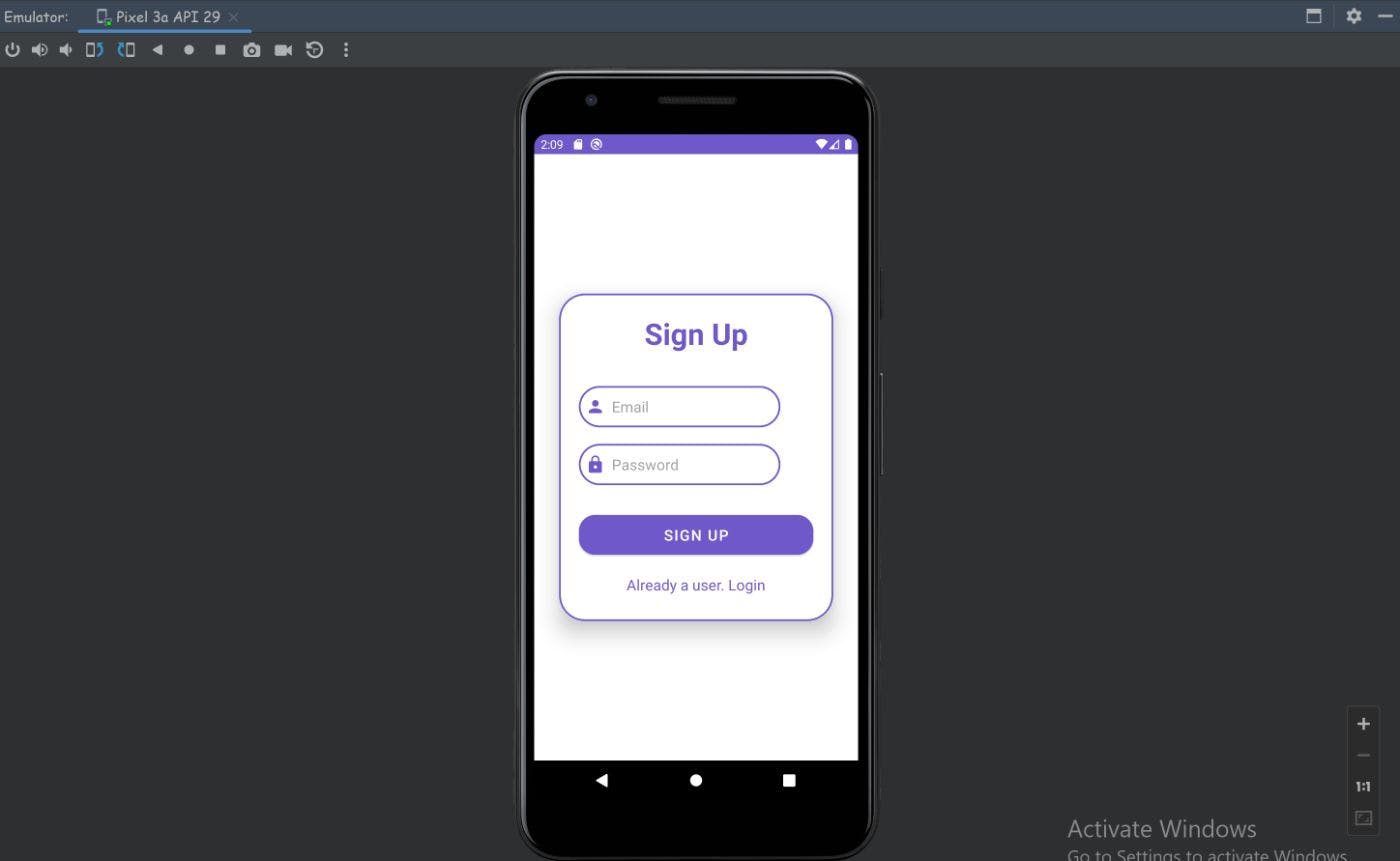
- Open the 'app/res/layout/activity_sign_up.xml' file.
- Add the following code:
<?xml version="1.0" encoding="utf-8"?>
<LinearLayout
    xmlns:android="http://schemas.android.com/apk/res/android"
    xmlns:app="http://schemas.android.com/apk/res-auto"
    xmlns:tools="http://schemas.android.com/tools"
    android:layout_width="match_parent"
    android:layout_height="match_parent"
    android:orientation="vertical"
    android:gravity="center"
    tools:context=".SignUpActivity">

    <androidx.cardview.widget.CardView
        android:layout_width="match_parent"
        android:layout_height="wrap_content"
        android:layout_margin="30dp"
        app:cardCornerRadius="30dp"
        app:cardElevation="20dp">

        <LinearLayout
            android:layout_width="match_parent"
            android:layout_height="wrap_content"
            android:orientation="vertical"
            android:layout_gravity="center_horizontal"
            android:padding="24dp"
            android:background="@drawable/custom_edittext">

            <TextView
                android:layout_width="match_parent"
                android:layout_height="wrap_content"
                android:text="Sign Up"
                android:textSize="36sp"
                android:textAlignment="center"
                android:textStyle="bold"
                android:textColor="@color/slateblue"
                />


            <EditText
                android:layout_width="match_parent"
                android:layout_height="50dp"
                android:id="@+id/signup_email"
                android:background="@drawable/custom_edittext"
                android:layout_marginRight="40dp"
                android:layout_marginTop="40dp"
                android:padding="8dp"
                android:hint="Email"
                android:drawableLeft="@drawable/baseline_person_24"
                android:drawablePadding="8dp"
                android:textColor="@color/black" />

            <EditText
                android:layout_width="match_parent"
                android:layout_height="50dp"
                android:id="@+id/signup_password"
                android:background="@drawable/custom_edittext"
                android:layout_marginRight="40dp"
                android:layout_marginTop="20dp"
                android:padding="8dp"
                android:hint="Password"
                android:drawableLeft="@drawable/baseline_lock_24"
                android:drawablePadding="8dp"
                android:textColor="@color/black"
                />

            <Button
                android:layout_width="match_parent"
                android:layout_height="60dp"
                android:text="Sign Up"
                android:id="@+id/signup_button"
                android:textSize="18sp"
                android:layout_marginTop="30dp"
                android:backgroundTint="@color/slateblue"
                app:cornerRadius = "20dp" />

            <TextView
                android:layout_width="wrap_content"
                android:layout_height="wrap_content"
                android:id="@+id/loginRedirectText"
                android:text="Already a user. Login"
                android:layout_gravity="center"
                android:padding="8dp"
                android:layout_marginTop="10dp"
                android:textColor="@color/slateblue"
                android:textSize="18sp" />


        </LinearLayout>


    </androidx.cardview.widget.CardView>

</LinearLayout>
- Navigate to app/res/layout/activity_login.xml.
- Add the following code:
<?xml version="1.0" encoding="utf-8"?>
<LinearLayout
    xmlns:android="http://schemas.android.com/apk/res/android"
    xmlns:app="http://schemas.android.com/apk/res-auto"
    xmlns:tools="http://schemas.android.com/tools"
    android:layout_width="match_parent"
    android:layout_height="match_parent"
    android:orientation="vertical"
    android:gravity="center"
    tools:context=".LoginActivity">

    <androidx.cardview.widget.CardView
        android:layout_width="match_parent"
        android:layout_height="wrap_content"
        android:layout_margin="30dp"
        app:cardCornerRadius="30dp"
        app:cardElevation="20dp">

        <LinearLayout
            android:layout_width="match_parent"
            android:layout_height="wrap_content"
            android:orientation="vertical"
            android:layout_gravity="center_horizontal"
            android:padding="24dp"
            android:background="@drawable/custom_edittext">

            <TextView
                android:layout_width="match_parent"
                android:layout_height="wrap_content"
                android:text="Login"
                android:textSize="36sp"
                android:textAlignment="center"
                android:textStyle="bold"
                android:textColor="@color/slateblue"
                />


            <EditText
                android:layout_width="match_parent"
                android:layout_height="50dp"
                android:id="@+id/login_email"
                android:background="@drawable/custom_edittext"
                android:layout_marginRight="40dp"
                android:layout_marginTop="40dp"
                android:padding="8dp"
                android:hint="Email"
                android:drawableLeft="@drawable/baseline_person_24"
                android:drawablePadding="8dp"
                android:textColor="@color/black" />

            <EditText
                android:layout_width="match_parent"
                android:layout_height="50dp"
                android:id="@+id/login_password"
                android:background="@drawable/custom_edittext"
                android:layout_marginRight="40dp"
                android:layout_marginTop="20dp"
                android:padding="8dp"
                android:hint="Password"
                android:drawableLeft="@drawable/baseline_lock_24"
                android:drawablePadding="8dp"
                android:textColor="@color/black" />

            <Button
                android:layout_width="match_parent"
                android:layout_height="60dp"
                android:text="Login"
                android:id="@+id/login_button"
                android:textSize="18sp"
                android:layout_marginTop="30dp"
                android:backgroundTint="@color/slateblue"
                app:cornerRadius = "20dp" />

            <TextView
                android:layout_width="wrap_content"
                android:layout_height="wrap_content"
                android:id="@+id/signUpRedirectText"
                android:text="Not yet registered? Sign Up"
                android:layout_gravity="center"
                android:padding="8dp"
                android:layout_marginTop="10dp"
                android:textColor="@color/slateblue"
                android:textSize="18sp" />


        </LinearLayout>


    </androidx.cardview.widget.CardView>

</LinearLayout>
Step 6: Setup Firebase Authentication
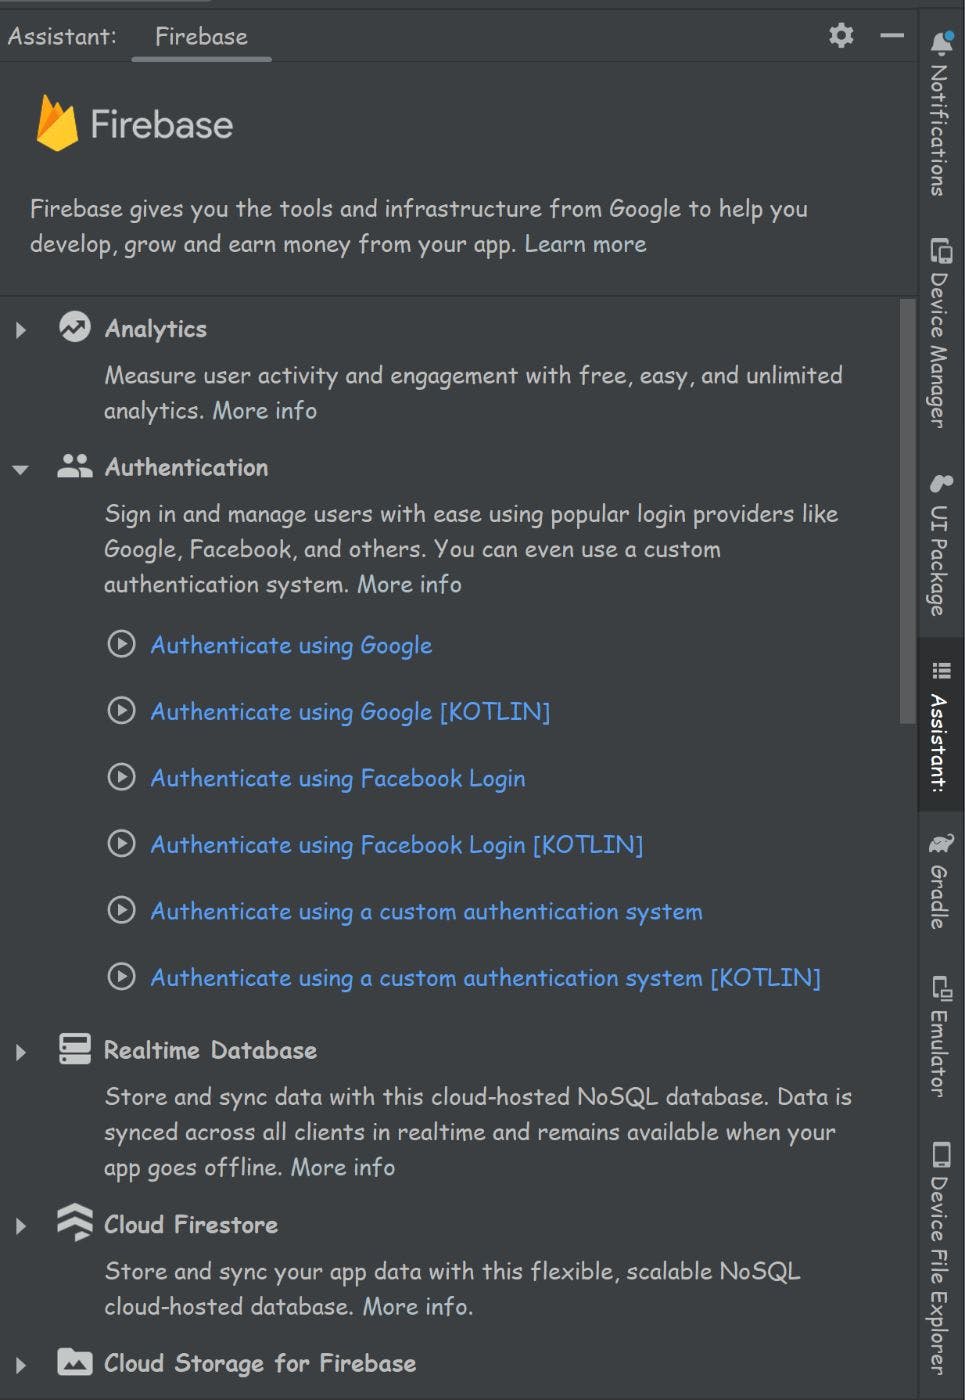
- Navigate to the menu bar and click on 'Tools', then select Firebase.
- Once you do that, you'll see a side pop-up bar. Scroll through and click on Authentication, and then select 'Authentication using a custom authentication system'. Remember, this is a Java Android tutorial, so make sure the option you're selecting does not use KOTLIN.

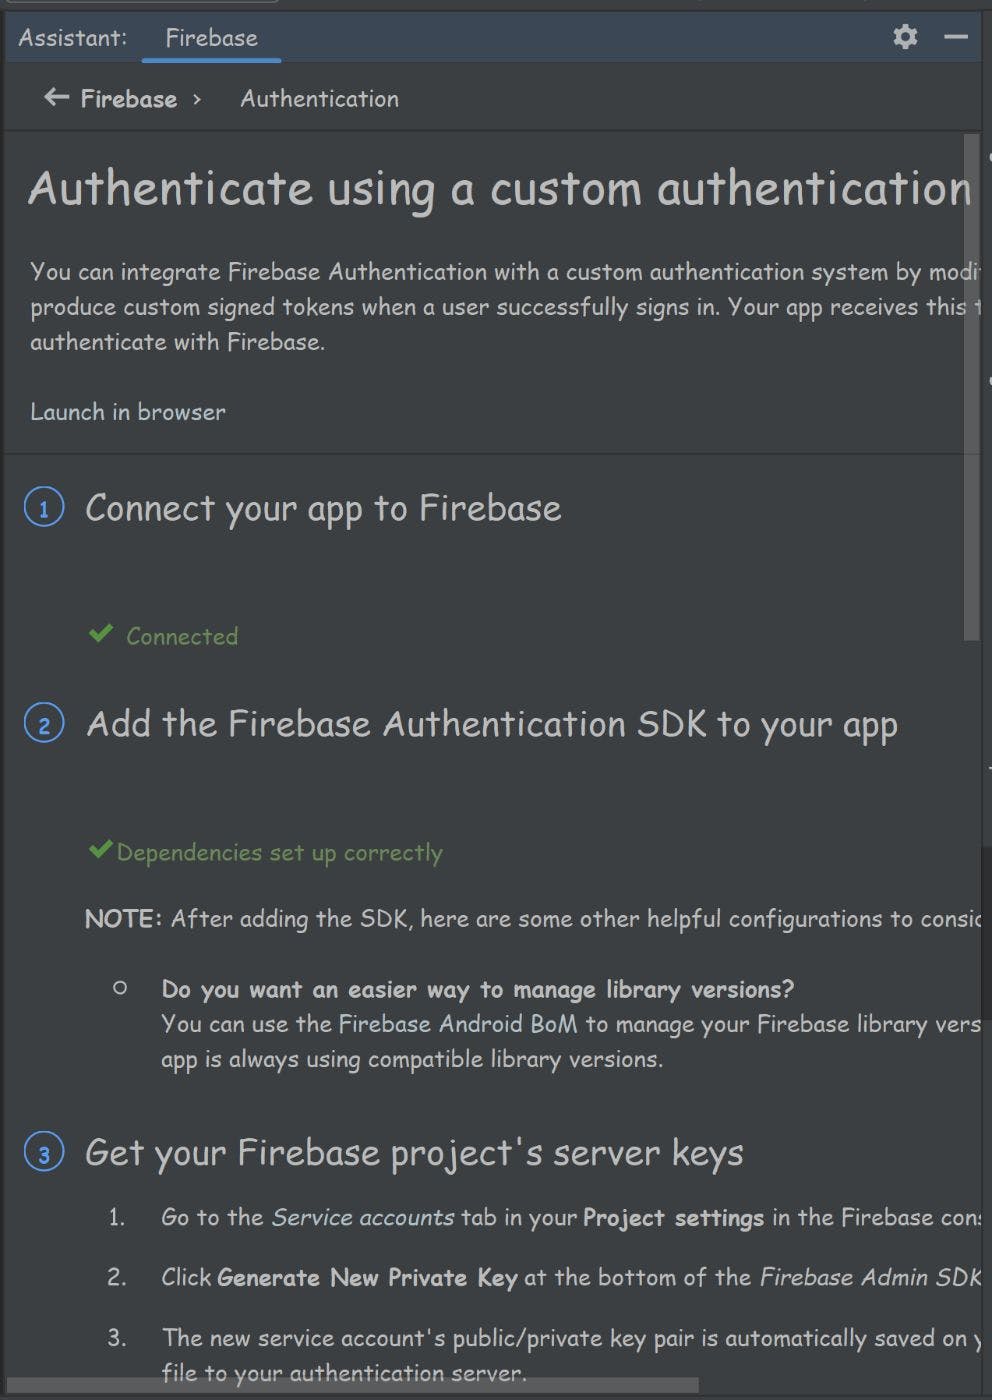
- Connect to Firebase by clicking on the button. It will redirect you to your Firebase console. If you have not created an account, make sure you create one. You'll likely be signed in; if not, then sign in.
- When you create a new project, it will suggest a name based on the project name in Android Studio. You can choose to keep it or rename it. Mine is 'FirebaseAuthApp'.
- On the next prompt, disable Google Analytics for the project and then create the project.
- Once the project has been created, you'll see a prompt asking you to connect Android Studio to Firebase. Select 'Okay', and you're done.
- Go back to the Firebase console and open your newly created project.
- Click on 'Build' and then select 'Authentication'. Click on the 'Get Started' button.
- Add a sign-in method by selecting 'Email/Password' and enabling it. This will build your custom authentication system using your preferred method, in this case, email or password.


- Navigate back to Android Studio. You should see a pop-up message saying your app, com.example.firebaseauthapp, is now connected to your Firebase project.
- Add the Firebase Authentication SDK to your App by clicking on the button on the assistant toolbar and selecting 'accept changes'.
- Once it is done, you'll see a prompt on the assistant toolbar saying the dependencies were set up correctly.

- Close the toolbar and open Gradle.
- Click on the Gradle icon in the top left corner of the Gradle toolbar.
- Type 'signingRedport' on the search bar and press enter.
- Once the Build Analyzer results are available, copy the SHA1 hash.
- Go back to the Firebase console and click on the project overview, then select Project Settings.
Note: If you have more than one app on the project, go to the project overview, then click on 'app' and select which app you want to authenticate.
- Navigate to the base of the project and add a fingerprint. Paste the SHA1 hash and then select Save." You'll get a prompt saying 'New certificate fingerprints added'.
Step 7: Add authentication to the project.
- Open the 'com/example/firebaseauthapp/SignUpActivity.java' file.
- Add the necessary imports, declare the FirebaseAuth instance, and initialize it in the 'onCreate' method of the signup activity. It should look like this:
package com.example.firebaseauthapp;

import androidx.annotation.NonNull;
import androidx.appcompat.app.AppCompatActivity;

import android.content.Intent;
import android.os.Bundle;
import android.view.View;
import android.widget.Button;
import android.widget.EditText;
import android.widget.TextView;
import android.widget.Toast;

import com.google.android.gms.tasks.OnCompleteListener;
import com.google.android.gms.tasks.Task;
import com.google.firebase.auth.AuthResult;
import com.google.firebase.auth.FirebaseAuth;

public class SignUpActivity extends AppCompatActivity {

    // Declare any other necessary variables.
    private FirebaseAuth auth;
    private EditText signupEmail, signupPassword;
    private Button signupButton;
    private TextView loginRedirectText;


    @Override
    protected void onCreate(Bundle savedInstanceState) {
        super.onCreate(savedInstanceState);
        setContentView(R.layout.activity_sign_up);

        //Initialize the FirebaseAuth instance in the onCreate()
        auth = FirebaseAuth.getInstance();
        signupEmail = findViewById(R.id.signup_email);
        signupPassword = findViewById(R.id.signup_password);
        signupButton = findViewById(R.id.signup_button);
        loginRedirectText = findViewById(R.id.loginRedirectText);

        signupButton.setOnClickListener(new View.OnClickListener() {
            @Override
            public void onClick(View view) {
                String user = signupEmail.getText().toString().trim();
                String pass = signupPassword.getText().toString().trim();

                if (user.isEmpty()){
                    signupEmail.setError("Email cannot be empty");
                }
                if(pass.isEmpty()){
                    signupPassword.setError("Password cannot be empty");
                } else{
                    auth.createUserWithEmailAndPassword(user, pass).addOnCompleteListener(new OnCompleteListener<AuthResult>() {
                        @Override
                        public void onComplete(@NonNull Task<AuthResult> task) {
                            if(task.isSuccessful()){
                                Toast.makeText(SignUpActivity.this, "Signup Successful", Toast.LENGTH_SHORT).show();
                                startActivity(new Intent(SignUpActivity.this, LoginActivity.class));
                            } else{
                                Toast.makeText(SignUpActivity.this, "Signup Failed" + task.getException().getMessage(), Toast.LENGTH_SHORT).show();
                            }
                        }
                    });
                }
            }
        });

        loginRedirectText.setOnClickListener(new View.OnClickListener() {
            @Override
            public void onClick(View view) {
                startActivity(new Intent(SignUpActivity.this, LoginActivity.class));
            }
        });

    }
}
- Open the 'com/example/firebaseauthapp/LoginActivity.java' file.
- Add the following code:
package com.example.firebaseauthapp;

import androidx.annotation.NonNull;
import androidx.appcompat.app.AppCompatActivity;

import android.content.Intent;
import android.os.Bundle;
import android.util.Patterns;
import android.view.View;
import android.widget.Button;
import android.widget.EditText;
import android.widget.TextView;
import android.widget.Toast;

import com.google.android.gms.tasks.OnFailureListener;
import com.google.android.gms.tasks.OnSuccessListener;
import com.google.firebase.auth.AuthResult;
import com.google.firebase.auth.FirebaseAuth;

public class LoginActivity extends AppCompatActivity {

    private FirebaseAuth auth;
    private EditText loginEmail, loginPassword;
    private TextView signupRedirectText;
    private Button loginButton;

    @Override
    protected void onCreate(Bundle savedInstanceState) {
        super.onCreate(savedInstanceState);
        setContentView(R.layout.activity_login);

        auth = FirebaseAuth.getInstance();
        loginEmail = findViewById(R.id.login_email);
        loginPassword = findViewById(R.id.login_password);
        loginButton = findViewById(R.id.login_button);
        signupRedirectText = findViewById(R.id.signupRedirectText);

        loginButton.setOnClickListener(new View.OnClickListener() {
            @Override
            public void onClick(View view) {
                String email = loginEmail.getText().toString();
                String pass = loginPassword.getText().toString();

                if(!email.isEmpty() && Patterns.EMAIL_ADDRESS.matcher(email).matches()) {
                    if (!pass.isEmpty()) {
                        auth.signInWithEmailAndPassword(email, pass)
                                .addOnSuccessListener(new OnSuccessListener<AuthResult>() {
                                    @Override
                                    public void onSuccess(AuthResult authResult) {
                                        Toast.makeText(LoginActivity.this, "Login Successful", Toast.LENGTH_SHORT).show();
                                        startActivity(new Intent(LoginActivity.this, MainActivity.class ));
                                        finish();

                                    }
                                }).addOnFailureListener(new OnFailureListener() {
                                    @Override
                                    public void onFailure(@NonNull Exception e) {
                                        Toast.makeText(LoginActivity.this, "Login Failed", Toast.LENGTH_SHORT).show();
                                    }
                                });
                    } else {
                        loginPassword.setError("Password cannot be empty");
                    }

                } else if (email.isEmpty()) {
                    loginEmail.setError("Email cannot be empty");
                } else {
                    loginEmail.setError("Please enter a valid email");
                }
            }
        });
                signupRedirectText.setOnClickListener(new View.OnClickListener() {
                    @Override
                    public void onClick(View view) {
                        startActivity(new Intent(LoginActivity.this, SignUpActivity.class));
                    }
                });
    }
}
- Run the app and start the emulator.
- You should see a fully functioning application.
- Go to the Firebase console and click on 'Authentication. Under the 'users' tab, you will see the list of the newly registered user.
By following these steps, you have successfully integrated Firebase and set up user authentication for your application.

Conclusion
In this tutorial, we used Firebase to add user authentication to our Android Java application. We developed an application where users can create accounts, sign up, and sign out. We also covered how to use an Android phone as an emulator.
To expand your knowledge of Firebase in Android app development, refer to the Android and Firebase documentation.

L O A D I N G
. . . comments & more!
. . . comments & more!
About Author

TOPICS
Languages


THIS ARTICLE WAS FEATURED IN...


RELATED STORIES


A Deeper Dive Into Log Enrichment #.net
Jan 20, 1970