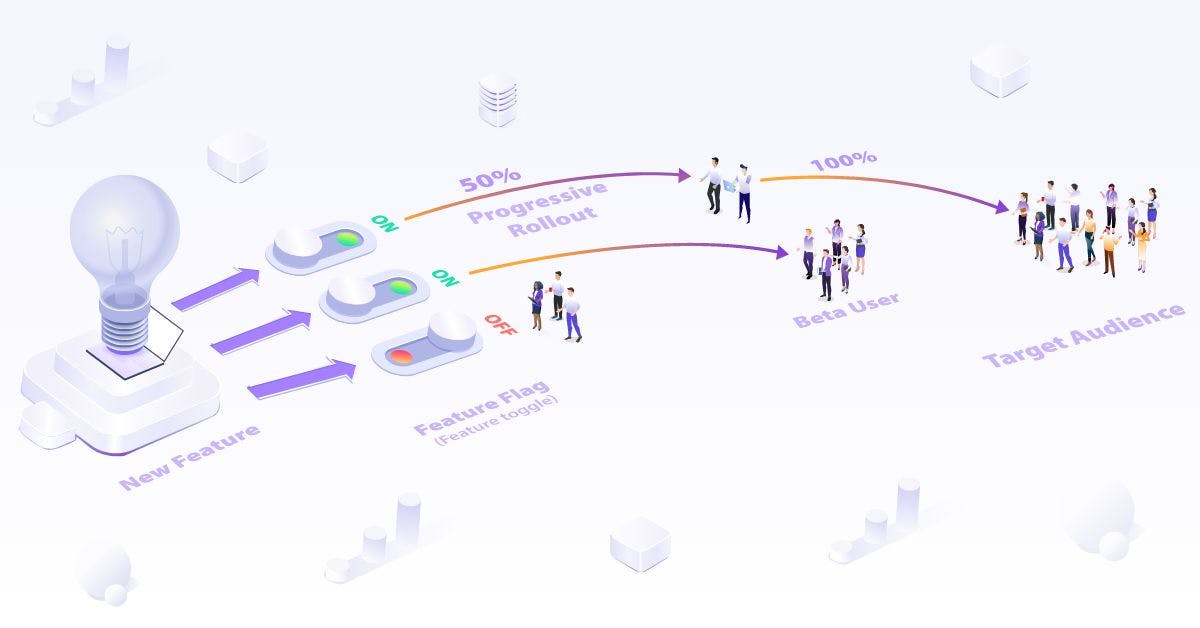
Feature flags (often called ) have existed for a long time in the software development process. We have been using feature flags in some way or another without even knowing it. So, let’s first understand what exactly feature flags are before we deep dive. feature toggles In simple words, feature flags help to control the code path and user flows. You might have used sometimes commenting a line in code to switch to a different logic (or If conditional flows). For example: def greeter(): greeterLanguageFrench = true # Comment to print greeting in English # greeterLanguageFrench = false # Un comment to print greeting in English if ( greeterLanguageFrench ) return "Bonjour monde!" else return "Hello World!" I hope you get the picture of how we’re changing the code path using if/else statement and commenting/uncommenting. However, the feature flag technique doesn’t require you to implement it in this way. Instead, you can control the flags remotely and turn them on/off without even changing the code in production. And this helps us . Decoupling deployment from release helps where the team is supposed to build a feature that requires weeks of work, leading to a long-lived feature branch. This long-lived branch comes with its own complexity of merging and releasing. decouple deployment from release To avoid these problems, you could do (TBD in short) trunk-based development TBD is a source-control branching model, where developers collaborate on code in a single branch called ‘trunk’ *, resist any pressure to create other long-lived development branches by employing documented techniques. They, therefore, avoid merge hell, do not break the build, and live happily ever after. And once the whole work is done, you can enable that feature via feature flags. This makes it considerably easier to control when to reveal new features to users while your code is already deployed from each iteration of releases. Also, feature flags help in releasing any feature to only certain users. It could be your internal team of testers/users that makes the feedback process faster and safer for you. You can just turn it off in case this feature causes latency or ambiguous behavior. Let’s look at the diagram below to understand feature flag-driven development. Feature flag allows us to ship our code to production in smaller commits and deploy in a dormant state. Now, you can decide when to turn it on/off, get feedback and iterate over it. Let’s go through some scenarios which can help us understand why we need feature flags. Why do we need feature flags? Scenario #1 Christmas Theme Have you ever noticed that most online shopping sites turn their website appearance into a holiday theme around the Christmas season? Does that mean they rolled out the theme at the same time? Most certainly, it’s not. A new theme was deployed earlier but not released to users. They enable the theme during Christmas by turning on the feature flag. Further, no team wants to release a feature on Christmas. They test & deploy it to production much in advance and control it using feature flags. Scenario #2 Beta Tester Once your feature is deployed in production, you can make it available to only those who opt-in for the beta tester program using feature flags. This helps you get real-time feedback since your feature is running on production and make decisions on the basis of metrics on whether to roll out to all. In case a feature has a problem, you will be able to control its blast radius. Scenario #3 Early Access As the name suggests, you can choose specific users/groups, i.e, segments, to make the new feature available. Before you roll it out for everyone. This approach helps in A/B testing/experiments. Scenario #4 Progressive Delivery You can roll out a feature progressively based on metrics like latency, CPU and usage, etc. If any of the metrics don’t match your requirement, you can just turn it off without affecting the user’s experience. These are the few rollout strategies you can use for feature rollout – A/B testing. Read our articles on , and to learn more about progressive delivery strategies. Blue-Green deployment Canary deployment Scenario #5 Cascading Failure A huge team is working on multiple features, and few folks completed inter-dependent features, which got shipped in one release. If any of those features start having issues, it will lead to cascading failure. You could’ve avoided this from happening by feature flag, by turning the problematic feature off until the fix is released, and it will control the blast radius. These were some of the use cases I listed, but there could be many use cases, so It’s not limited to only mentioned ones. These are some of the benefits of having feature flags however there are pitfalls to using feature flags as well. Let’s take a look at those disadvantages. Pitfalls of feature flags Introducing feature flags in code also complicates managing and keeping track of them. They need to be short-lived or have proper ownership of feature flags within the team. Technical debt: Feature flags introduce latency in critical systems if not implemented with an appropriate method. It’s better to have feature flags where latency is manageable. Application performance: When you introduce a feature flag in code, you introduce a new code path, and it’s become quite tricky to test all those code paths. There could be “n level” of nesting in the code path if you’re heavily using feature flags in the codebase. Multiple code paths: Now that we know the benefits and pitfalls of feature flags, let’s talk about implementation. Challenges around feature flag implementation Pursuant to our discussion, the implementation looks relatively easy. Still, it involves nuances; some of the challenges are listed below: - Keep track of long-lived feature flags in your existing codebase so new flags don’t conflict with old ones. Maintenance - One must own the lifecycle of a flag from addition to removal; otherwise, over time, flags add up. Ownership - Names should describe what they do in minimal words and should follow common naming convention throughout the codebase. Flag names - If someone is turning a flag “on” or “off”, make sure that you know who it is. Audit history It is crucial to track a feature flag’s life cycle and remove them when they are no longer needed. In the below example, you see how we can use a conditional statement with some configuration parameters passed into the function. The below approach might help you with a short-lived feature flag where you don’t have many feature flags to deploy. def func(config): if(config.is_feature_on): # do something else: # do something else Feature flags can be a day savior, but they can turn into a disaster like what happened on 1 Aug 2012, and it cost that day. $400M to Knight Capital These are some important factors to consider while implementing feature flags: Short-lived vs Long-lived feature flags. Naming convention of feature flags. Ownership of feature flags. Appropriate logging. Better feature flag management, aka single pane of glass. If you like to go in-depth on best practices while implementing, you can follow article by Edith Harbaugh. this So, more importantly, we need a better feature flag management tool in place. Instead of , we can adopt any existing feature flag management platform like , which provides a SaaS platform to manage feature flags and help us simplify implementation through . Apart from LaunchDarkly, we do have alternative open-source tools. I’ve listed some of them below. building feature flag management LaunchDarkly available SDK Flagsmith Unleash Fun with Flags Flipper Togglz FeatureHub Now, let us discuss LaunchDarkly for the scope of this post. What is LaunchDarkly? It is a SaaS-based offering for the feature flag platform. On a day-to-day basis, they handle . LaunchDarkly covers all your needs. Some of its features include: 20 Trillion feature requests Progressive delivery A/B testing and insights Multiple ways to release a feature flag Scheduled release of feature flags Approval gate for feature flags Code references - helps you manage technical debt by finding the declaration of feature flag in the codebase. How to implement feature flags using LaunchDarkly We have looked into the benefits of using feature flags and management platforms. Now, we will see those features in action via a simple e-commerce application developed using Flask web framework and JavaScript. This application offers REST APIs to other businesses to list down the available product. And allow users to log in/register and save items in favorites. To run this demo application on the local system, clone on your local and go through the for your local setup. the launchdarkly-demo repository readme So, without further ado, let’s begin. How to implement LaunchDarkly? To begin with, you need a LaunchDarkly account for this demo, and you can create a trial account . Once you log in, you will see the list on the left side of the panel. here Feature Flag LaunchDarkly will create a project for you with the name of your account. Which is visible on top of the Production label. It will create two environments for you. Production Test . Each environment has its own SDK key, which allows the client-side applications to get all flag-associated data specific to that environment. Environments help you segregate rollout rules based on the environment For this demo, you need an and a Both of these are available under > . You need to click on the project’s name to see the available environment and associated keys. Copy keys of the environment for this demo. SDK key . Client ID Account Settings Projects Test We will use those keys to run our demo application locally. You can find the instructions on “How to run locally” in the DEMO application . readme We will need these keys to interact with for Python and . SDK should be implemented in a singleton pattern rather than creating multiple instances. So we need one instance of SDK throughout our Flask application. Let’s look at the basic implementation I followed. launchdarkly-server-sdk LaunchDarkly SDK for Browser JavaScript I created an instance of the Flask application and assigned the client object instance in this . Because of this, I can access the LaunchDarkly client through my application. line def setup_ld_client(app) -> ldclient.LDClient: featureStore = InMemoryFeatureStore() LD_SDK_KEY = app.config["LD_SDK_KEY"] LD_FRONTEND_KEY = app.config["LD_FRONTEND_KEY"] ld_config = LdConfig( sdk_key=LD_SDK_KEY, http=HTTPConfig(connect_timeout=30, read_timeout=30), feature_store=featureStore, inline_users_in_events=True ) client = ldclient.LDClient(config=ld_config) return client Use Case #1 Progressive Release of Dark Theme Context: Frontend team is building a dark theme as requested by a lot of users in feedback. So the team decided to roll out a feature first in a location where it has been most requested. Fortunately, you can do progressive releases in LaunchDarkly using workflows. However, this feature comes in the enterprise plan. But you can get a sense of how it works. Read about . feature workflows A workflow that progressively rolls out a flag over time. For now, we will go through how LaunchDarkly helps in the JavaScript client side to get feature flag variation and change the appearance of the website. To add that feature flag to the LaunchDarkly account, go to on the left side panel. Click and fill these values in. Feature Flags Create Flag Name - Dark Theme Button Key - dark-theme-button Flag Variation Type - Boolean Variation 1 - True Variation 2 - False Note: are flag values to serve based on . Variations targeting rules To use LaunchDarkly on the client side, you need to add a JavaScript SDK. We will initialize it with the client-id we copied in the first step of the Flask application setup. Client ID is used to handle feature flags on the client side. In order to make any feature flag data available to the client side, we need to enable Client-side SDK availability for that feature flag. To enable it, go to the feature dark-theme-button -> Setting tab -> Client-side SDK availability -> Checkbox and Save changes. SDKs using Client-side ID <script crossorigin="anonymous" src="https://unpkg.com/launchdarkly-js-client-sdk@2"></script> <script> var ldclient = LDClient.initialize("{{ config['LD_FRONTEND_KEY'] }}", {{ user_context | safe }}, options = { bootstrap: {{ all_flags | safe }} }); var renderButton = function() { var showFeature = ldclient.variation("dark-theme-button", false); var displayWidget = document.getElementById('dark-theme-button'); if (displayWidget) { if (showFeature) { displayWidget.style.display = "block"; } else { displayWidget.style.display = "none"; } } ldclient.waitForInitialization().then(function() { renderButton(); }) ldclient.on('change', function() { renderButton(); }); } </script> Now, test the feature flag you just created. Once you toggle it on. There will be a button on the left corner. If you toggle that button, it should appear like this. Use Case #2 Logging Level Feature Flag Context: Your development team is facing an issue in debugging an application. However, you have implemented debug logs throughout the application, but you can’t switch the logger level while the application is running. If you do it via the environment variable, it will still require you to restart the application. Is there any other way you can do it? Yes, you can add a flag that can define the logger level before any requests come in, and you can operate it remotely. Flask API provides us with to register any function, and it will run before each request. See the below example. before_request @app.before_request def setLoggingLevel(): from flask import request logLevel = app.ldclient.variation( "set-logging-level", get_ld_non_human_user(request), logging.INFO) app.logger.info(f"Log level: {logLevel}") app.logger.setLevel(logLevel) logging.getLogger("werkzeug").setLevel(logLevel) logging.getLogger().setLevel(logLevel) : 1. Flag key 2. User context 3. Default value. Note: In the above, I’m providing three things to ldclient.variation() To add that feature flag to the LaunchDarkly account, go to on the left side panel. Feature Flags Click and Fill these values in. Create Flag Name - Logging Level Key - set-logging-level Flag Variation Type - Number Variation 1 - 10 Variation 2 - 20 Note: Make sure every feature flag should be in the same environment as the keys you used to set up LaunchDarkly Client in the application. Now, go to and see the logs in the terminal of your running application. http://localhost:5000/ 127.0.0.1 - - [29/Sep/2022 14:49:47] "GET / HTTP/1.1" 200 - INFO:werkzeug:127.0.0.1 - - [29/Sep/2022 14:49:47] "GET / HTTP/1.1" 200 - [2022-09-29 14:49:47,972] INFO in run: Log level: 20 INFO:arun:Log level: 20 127.0.0.1 - - [29/Sep/2022 14:49:47] "GET /static/css/custom.css HTTP/1.1" 200 - INFO:werkzeug:127.0.0.1 - - [29/Sep/2022 14:49:47] "GET /static/css/custom.css HTTP/1.1" 200 - [2022-09-29 14:49:47,983] INFO in run: Log level: 20 INFO:app.run:Log level: 20 127.0.0.1 - - [29/Sep/2022 14:49:47] "GET /static/js/dark-mode.js HTTP/1.1" 304 - INFO:werkzeug:127.0.0.1 - - [29/Sep/2022 14:49:47] "GET /static/js/dark-mode.js HTTP/1.1" 304 - [2022-09-29 14:49:48,848] INFO in run: Log level: 20 INFO:app.run:Log level: 20 127.0.0.1 - - [29/Sep/2022 14:49:48] "GET /favicon.ico HTTP/1.1" 404 - INFO:werkzeug:127.0.0.1 - - [29/Sep/2022 14:49:48] "GET /favicon.ico HTTP/1.1" 404 - If you see your level is 20 as of now because the feature flag is not turned on. Now, go back to LaunchDarkly and turn on the flag via a toggle on the right side of it. Now, recheck the logs by going to the homepage of the local application. INFO:werkzeug:127.0.0.1 - - [29/Sep/2022 14:55:11] "GET / HTTP/1.1" 200 - DEBUG:root:{'key': 'sudhanshu', 'ip': '127.0.0.1', 'email': 'local@machine.com', 'custom': {'type': 'machine'}} [2022-09-29 14:55:12,018] INFO in run: Log level: 10 INFO:app.run:Log level: 10 127.0.0.1 - - [29/Sep/2022 14:55:12] "GET /static/js/dark-mode.js HTTP/1.1" 304 - INFO:werkzeug:127.0.0.1 - - [29/Sep/2022 14:55:12] "GET /static/js/dark-mode.js HTTP/1.1" 304 - DEBUG:root:{'key': 'sudhanshu', 'ip': '127.0.0.1', 'email': 'local@machine.com', 'custom': {'type': 'machine'}} [2022-09-29 14:55:12,027] INFO in run: Log level: 10 INFO:app.run:Log level: 10 You should able to see the log level 10 debug logs just by turning on the toggle from LaunchDarkly platform. If in the future, you’d want to turn on the debug log, it will be just a toggle away with no need for an application restart. Use Case #3 Adding a new field in API response Context: API team developer wants to add a new field in API response, i.e., . This field will help end users get a count of the number of products returned in an API response. Now, the API team lead decided first to validate latency in API response, whether it is in a reasonable range, and roll it out to a few beta users so that they can get their feedback before rolling it out to everyone. count You can see how I’m evaluating a feature flag using to get a current variation of a flag with a default value. Just for the sake of simplicity, this is how I’m implementing this in the Flask application. ldclient @api.route('/fashion', methods=['GET']) @token_required def list_fashion(current_user): # add a additional field in api response with feature flag try: query_result = Products.query.filter_by( product_type='fashion').all() product_schema = ProductSchema(many=True) data = { "message": "successfully retrieved all products", "data": product_schema.dump(query_result) } # Feature flag to add a field in api response if current_app.ldclient.variation( 'add-field-total', current_user.get_ld_user(), False): data.update({'count': len(data)}) return jsonify(data) except Exception as e: current_app.logger.debug( f'Something went wrong: {e}', exc_info=True) return jsonify({ "message": "failed to retrieve all products", "error": str(e), "data": None }), 500 Before hitting the request, you need to generate an API token of our application. To generate one, use this curl command: curl --location --request POST 'localhost:5000/api/login' \ --header 'Content-Type: application/json' \ --data-raw '{ "email" : "example@something.com", "password" : "12345" }' Once you run that command copy the token value, we will need it in further steps. Now, see the response using the below curl command. You’ll see there is no in the API response. count curl --location --request GET 'localhost:5000/api/fashion' \ --header 'Authorization: token PUT_TOKEN_HERE’ Response: { "data": [...], "message": "successfully retrieved all products" } Now, we will create a feature flag in LaunchDarkly using the same flow as we did earlier. Using these Values. Name - Add field ‘count’ in API response. Key - add-field-total Flag Variation Type - Boolean Variation 1 - True Variation 2 - False After you create that flag, you should navigate to the user’s tab on the left side of the panel. This user tab helps you find users who have evaluated those flags in that environment. Before we turn on that created feature flag, let’s talk about the dialog box we see whenever we turn in any feature flag toggle. You would’ve noticed changes options: - This helps you set up an approval flow & schedule to change the state of any flags. This feature is part of their Enterprise plan. Read more about it . Schedule here - Using different , we can specify which user should receive what variation. Targeting targeting rules Now, we will look into targeting and how we can leverage it to release a feature to specific users. Using User Targeting in LaunchDarkly To use targeting, you need to go into -> < > -> . Feature Flag Feature Flag Name Targeting tab Create any user from this page and add this user in Feature flag-> Feature Name -> Individual targeting section. One user in Variation and another user in Variation. http://localhost:5000/register True False Now, before calling this , you need to create a token for this user as well. And use the same curl command to get a list of products we used in the earlier step. http://localhost:5000/api/fashion Make an API call using those commands for two different users. You will see API is returning two different schemas of response. One contains , and the other doesn’t because you only released that feature to one user; for the other user it is still the same. count Use Case #4 Disable Registration Page Context: During a sale, we get huge traffic for new users; sometimes, it can be overwhelming to control such a situation. Even though it is good for business, we’re getting new customers, but the sheer amount of load can be a bad experience for your loyal registered users. For those who are paying money to get better & faster service. Below is an example of the HM.com website in maintenance mode. Ideally, it should not happen during your peak sales hours, but sometimes you need to calibrate the inventory before the sales begin. Or sometime you just want to allow only pre-registered customers to have access to the sale. Similar story with Product Hunt. In this case, you’re just disabling registration for a few minutes, allowing registered users first. You might be wondering is this kind of control behavior possible where no new user register for some time? Yes, It is. See the below code. I’ve created a flag called ; the default value is false. And once you turn it on, it will redirect all users back home with a message. disable-registration @core.route('/register', methods=["GET", "POST"]) def register(): if current_user.is_authenticated: return redirect(url_for("core.index")) if current_app.ldclient.variation('disable-registration', current_user.get_ld_user(), False): flash("Not accepting new registration, try after sometime") return redirect(url_for("core.index")) if request.method == "POST": user = User(email=request.form["userEmail"]) if User.query.filter_by( email=request.form["userEmail"]).first() is not None: flash("Email is already taken. Please choose another email") return redirect(url_for("core.register")) if request.form["inputPassword"] != request.form["confirmPassword"]: flash("Passwords must match") return redirect(url_for("core.register")) user.set_password(request.form["inputPassword"]) db.session.add(user) db.session.commit() flash("Congratulations, you are now a registered user!") login_user(user) return redirect(url_for("core.dashboard")) return render_template('register.html') Follow the same steps as we did earlier to create a feature flag. Use provided values. Name - Disable New Registration Key - disable-registration Flag Variation Type - Boolean Variation 1 - True Variation 2 - False Once you turn it on, the register page will stop accepting any registration. Try going to this URL . It should redirect you back to the home page. http://localhost:5000/register This Flask demo application has many such feature flags to explore if you want to. I’ve provided a list of those flags and the configuration of those flags in the readme of the application repository; you should see them in action. Though there are several features that come under the enterprise plan, which I couldn’t demo in this blog post, however, you can get a clear picture of more features from . LaunchDarkly has very detailed and easy-to-understand documentation. LaunchDarkly documentation Conclusion In this blog post, we looked at the benefits and drawbacks of using feature flags. On a day-to-day basis, how it can be useful for any team to have control of the feature they release. How decoupling between deployment and release is increasing the productivity of the developer. Feature flags have helped many companies (including Facebook, and Instagram, to name a few). Most companies generally release their features geographically and through user segmentation. Hence, having a feature flag management like LaunchDarkly becomes a need. That’s about it in this blog post. Feel free to reach out to for any suggestions or queries regarding this blog post. Sudhanshu References Feature Toggles (aka Feature Flags) Feature flags, what are they? - LaunchDarkly LaunchDarkly docs Feature Flags - Atlassian FeatureFlags Decoupling Deployment from Release with Feature Flags - Flagsmith Trunk Based Development Also Published Here