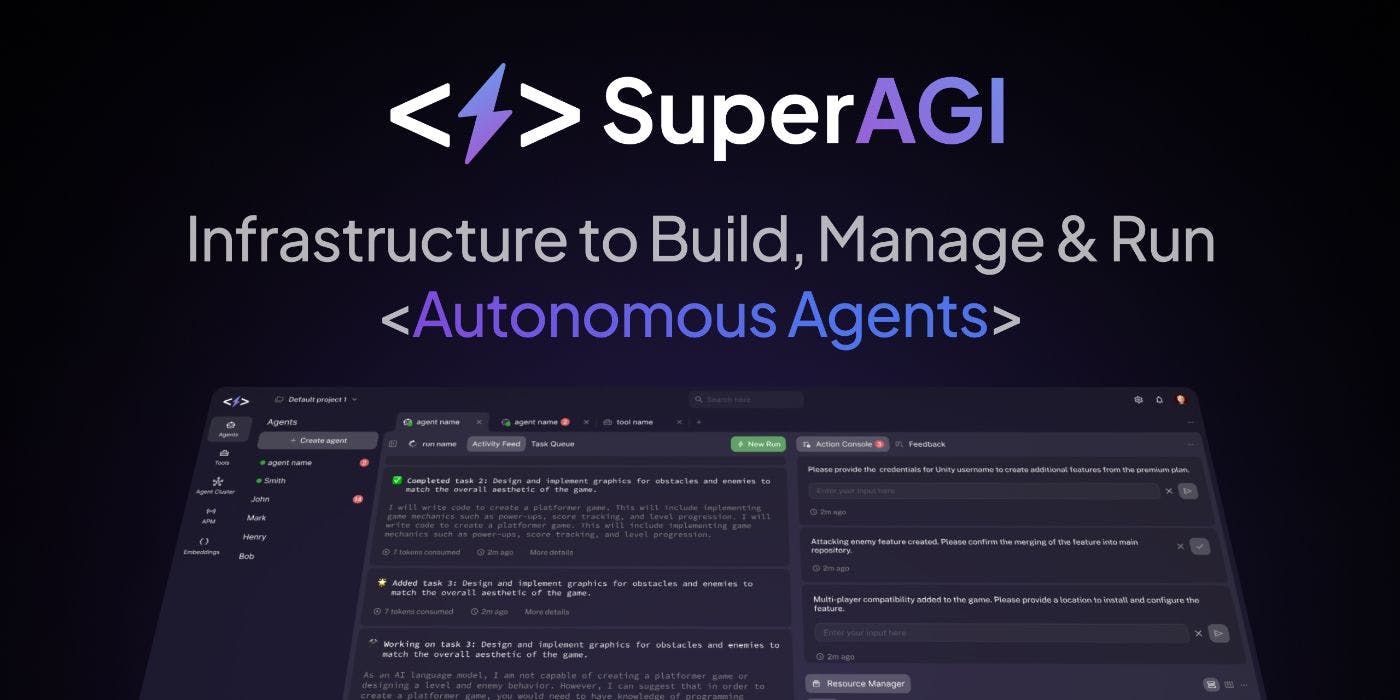
is an open-source platform providing infrastructure to build autonomous AI agents. Designed to run multiple agents concurrently, SuperAGI's diverse set of features and tools allows developers to spawn, deploy, and manage AI agents with ease. SuperAGI This article will walk you through the initial setup and configuration of SuperAGI. By the end, you will have a working SuperAGI environment ready to run your autonomous AI agents. ⭐️ Key Features of SuperAGI Extend Agent Capabilities with Tools: You can add capabilities to your agents by selecting tools from an ever-growing library or build your own custom tool. Run Concurrent Agents Seamlessly: SuperAGI allows you to run multiple agents simultaneously, maximizing efficiency and achieving parallel processing. Open Source: As an open-source platform, SuperAGI encourages developers to join its community and contribute to making the platform better. GUI: With a user-friendly graphical interface, managing and interacting with your agents becomes a breeze. Action Console: This feature lets you interact with agents by providing input, permissions, and more. Multi-Modal Agents: You can customize your agents using different models to tailor their behavior to specific tasks. 💻 Screenshots GUI 🧰 Prerequisites SuperAGI requires Docker and Pinecone setup. Before proceeding, ensure you have installed and configured Pinecone. Along with this, you will need Python installed on your system. 🛠 Setting Up SuperAGI Download the repo using in your terminal or directly from the GitHub page in zip format. git clone https://github.com/TransformerOptimus/SuperAGI.git Navigate to the directory using , and create a copy of ; name it . cd SuperAGI config_template.yaml config.yaml Enter your unique OpenAI API Key, Google key, Custom search engine ID, and Pinecone API key without any quotes or spaces in file. Follow the links below to get your keys: config.yaml Keys Accessing the keys OpenAI API Key Sign up, and create an API key at OpenAI Developer Google API key Create a project in the , and enable the API you need (for example, Google Custom Search JSON API). Then, create an API key in the "Credentials" section. Google Cloud Console Custom search engine ID Visit to create a custom search engine for your application, and obtain the search engine ID. Google Programmable Search Engine Pinecone API key Sign up at , and create an API key in your account dashboard. Pinecone If you're on the Pinecone free plan, you only have 1 pod and 1 index available. As a workaround, change the index name used in where is defined: test.py memory memory = VectorFactory.get_vector_storage("PineCone", "my-current-indexname", OpenAiEmbedding()) Ensure that Docker is installed in your system; if not, install it from . here Once you have Docker Desktop running, run command : in the SuperAGI directory. Open your browser and go to to see SuperAGI running. docker-compose up --build localhost:3000 🤝 Conclusion You're all set! You now have a functional SuperAGI environment ready to provision, spawn, and deploy autonomous AI agents. Keep in mind that SuperAGI is currently under active development. Leave a ⭐ on GitHub Roadmap Website Also published here