Introduction
There are quite a few myths related to Single Page Application (SPA) and SEO, for example:
-
SPA is bad for SEO.
-
Use SPA if SEO is not important.
-
Indexing requires prerendering which leaves SPA out in the cold.
-
Indexing requires server-side rendering (SSR) which excludes client-side rendering (CSR) and therefore SPA that does CSR.
-
Google generally understands SPA but crawling/rendering/indexing is a complex process. It makes indexing of any SPA difficult.
Today’s reality is that both SPA and SEO can easily coexist and grow next to each other. The best way to dispel the surrounding myths is to present the evidence to the contrary:
|
SPA Website |
Note |
Declared Sitemap |
Proof of Indexing |
|---|---|---|---|
|
Demo website. | |||
|
Demo website. | |||
|
Production website. |
The Links in the table point to Google searches based on the site: keyword. Only indexed pages can appear in the search results, so if a page does show up then you know it has been indexed. However, not all indexed pages are guaranteed to be included. If a page doesn’t appear, you can perform a more specific site: search for the given page only, like this.
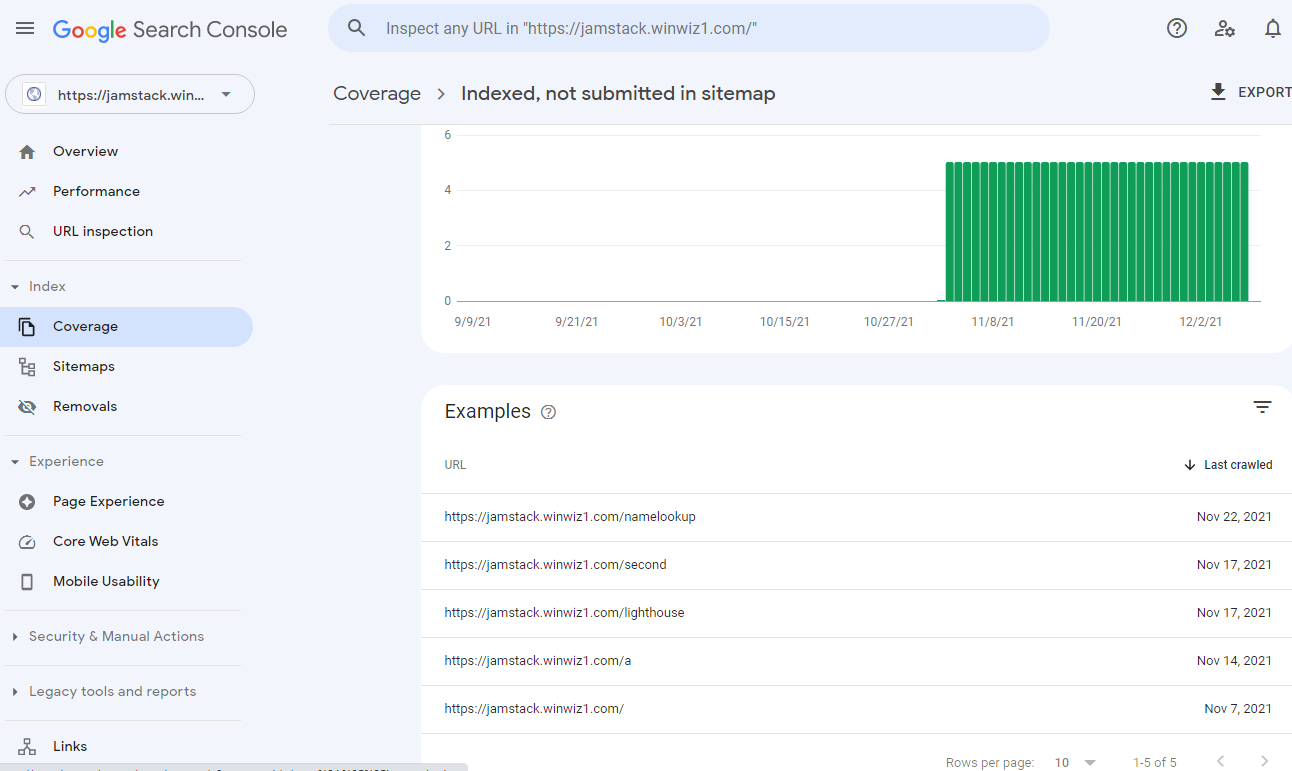
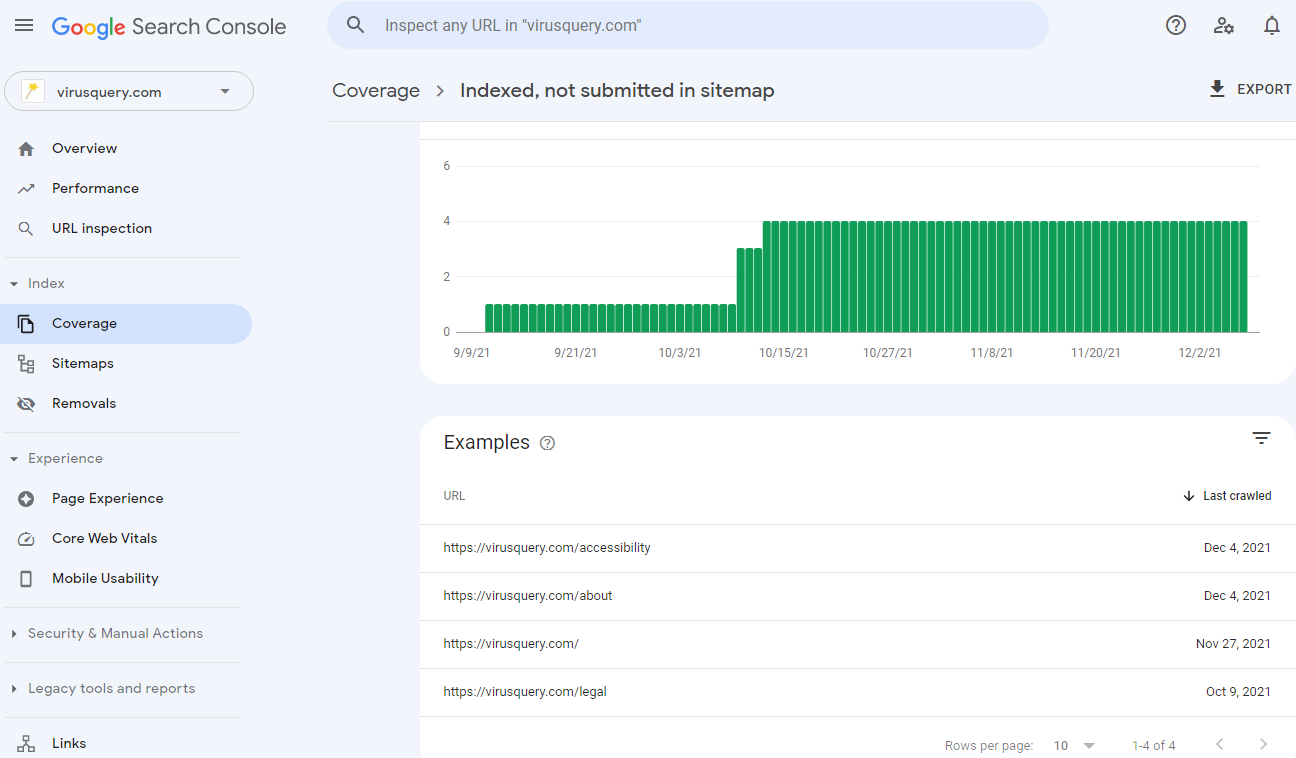
The Screenshots shown in the table come from Google Search Console (GSC). It’s the primary tool to request and verify indexing.
Some screenshots show the indexed pages as “Indexed, not submitted in sitemap”. It’s confusing since the pages are actually included in
sitemap.xml. This wording means Googlebot has initially discovered the pages without the sitemap and keeps crawling these without regards to the availablesitemap.xml.
The rest of this article explains the steps aimed at getting a similar GSC screen for your SPA website.
Groundwork
Prerequisites
- Custom domain ownership.
- GitHub account.
- Cloudflare account. It's free and can be created by following this link.
- Installed software: Git.
Deploy a SPA
In this section we are going to deploy a React SPA to Cloudflare Pages using the following steps:
-
Open a command prompt and clone Crisp React repository:
git clone https://github.com/winwiz1/crisp-react.gitcd crisp-react
-
Create a new GitHub repository by visiting repo.new.
-
Point the cloned repository to the newly created one and push it there:
git remote set-url origin https://github.com/your-github-username/your-newly-created-repogit push -
Deploy to Cloudflare Pages by logging into the Cloudflare dashboard and creating a Cloudflare Pages project.
This step will take several minutes spent mostly on waiting. It should take around a minute to copy the data provided below and paste it into the single configuration screen presented by Pages.
Use Menu > Pages > Create a project. You will be asked to authorize read-only access to your GitHub repositories with an option to narrow the access to specific repositories. Select the repository which you pushed to GitHub at the previous step and on the "Set up builds and deployments" screen, provide the following information:
|
Configuration option |
Value |
|---|---|
|
Production branch |
|
|
Build command |
|
|
Build output directory |
|
Add the following environment variable:
|
Environment variable |
Value |
|---|---|
|
NODE_VERSION |
|
Optionally, you can customize the "Project name" field. It defaults to the GitHub repository name and is used to create a 'per-project subdomain' e.g. <project-name>.pages.dev.
After completing the configuration, click on the "Save and Deploy" button. When the deployment pipeline finishes, the website will be partially functional. Point a browser to https://<project-name>.pages.dev/first to check the site is online.
-
Let Cloudflare manage DNS for the domain you own and want to use for the deployment.
You don’t have to change your domain registrar to Cloudflare though you could if you want to. If you do or if you purchase a brand new domain through Cloudflare, skip this step.
Use the top-level Add a site menu available in the Cloudflare dashboard. In response, Cloudflare will provide you with the names of two DNS nameservers. Login to the domain registrar account and change the nameservers from the ones supplied by the registrar to the nameservers provided by Cloudflare.
-
In the Cloudflare dashboard, use the DNS menu to add a record:
|
Type |
Name |
IPv6 Address |
|---|---|---|
|
|
|
|
Replace subdomain with either a subdomain name e.g. jamstack to deploy to jamstack.<your-domain>.com or apex e.g. @ if you prefer to use the root domain. Check the "Proxy status" of the record is set to "Proxied".
The "Proxied" status ensures the DNS record won't become public. Cloudflare will create another public DNS record that ensures the requests for subdomain are routed to Cloudflare datacenters. Once handled there, the requests would have been dropped since the address 100:: is used to discard traffic. But in reality, the requests will be handled by the Worker we are about to create at the next step.
-
Create a Cloudflare Worker by visiting
workers.new and replace the auto-generated code with the content ofthis file. Modify the Worker Customisation block at the top of the code by following the suggestions in the comments. Modifying the code includes two steps:-
Edit the
siteMapvariable and replace all thejamstack.winwiz1.comoccurrences with<subdomain>.<your-domain>.com. -
Edit the
pagesDomainvariable and replace the single occurrence ofhttps://crisp-react.pages.devwith the per-project subdomain e.g.https://<project-name>.pages.dev.
Click on the “Save and Deploy” button.
This step along with the next one will be automated in the future.
The default Workers Plan is free but has a limitation: 100,000 invocations per day.
-
- Unmap the Worker from the
*.workers.devdomain it was automatically deployed to. Map it to your custom domain or subdomain instead to ensure the Worker is invoked to handle each request. For example, the Worker for<subdomain>.<your-domain>.comshould be mapped to the path<subdomain>.<your-domain>.com/*.
- Point a browser to
https://<subdomain>.<your-domain>.comand verify the website is online and functional.
Request Indexing
In this section, we’ll ask Google to:
- Confirm that each SPA page can be indexed,
- Accept a request to index each SPA page.
Both confirmation and acceptance will be obtained by using
Perform the following steps:
-
Add some original content to the deployed website in order to avoid duplicate content.
-
In the SPA Configuration block, set the
appTitlevariable to a different title. Review the SPA codebase to ensure each page correctly sets the<title>HTML element and the canonical<meta>tag to the values meaningful for the page. This can be done by searching all.tsxfiles for the<Helmet>pattern and reviewing the relevant code.If you have changed not only the content of a webpage but also its path or added new pages, then you will need to modify the Worker Customisation block to reflect the changes.
-
Commit the code changes made at the previous two steps and push the commit to your GitHub repository. The push will trigger an automated build and deployment of the website by Cloudflare Pages.
-
Add the domain you own to GSC using the “+ Add Property” menu.For example, the production
website was added as a domain propertyvirusquery.comwhereas for the demo websites the root domain was added first as a domain propertywinwiz1.com. Once Google has verified the domain ownership, both demo websites were added separately as a URL property each e.g.https://crisp-react.winwiz1.com/andhttps://jamstack.winwiz1.com/. -
Click on the “URL Inspection” menu to activate the
URL Inspection Tool and type the path to the page you would like to index:You can copy the path from
sitemap.xmland paste it. On contrary to the screenshot above the response will state that “URL is not on Google” telling you the page hasn’t been indexed yet. -
Click on the
"TEST LIVE URL"button to get a confirmation the page can be indexed. Optionally review the screenshot of the page rendered by GSC. -
Request indexing for the page by clicking on the
"REQUEST INDEXING"link. The response should say your request has been added to the priority crawl queue.
The last 3 steps will have to be repeated for all the pages of each SPA.
Follow-up
You can use the “URL Inspection” menu to monitor if the page was indexed. It can take from a few days to a couple of weeks for the page to be added to Google index. At which time the response will state: “URL is on Google”. When that happens, you can double-check that the page was indexed by performing Google search using the site: keyword.
Finally, it will take up to another week for the indexed pages to appear in the indexing report under the GSC “Coverage” menu.
Under the Hood
Let’s dissect what the Cloudflare Worker does and find out when & why is it needed.
Plain SPA
Google has no trouble with rendering a SPA presented by a typical HTML file that has a nearly empty <body> element with references to scripts only. This HTML markup makes sense for CSR since the HTML and the DOM are generated at run time in the browser’s memory. You can observe such a markup on the demo websites mentioned at the beginning of the article, just jump to the second SPA and right-click on the page to ‘View page source’.
The page that belongs to the second SPA is indexed. It suggests the concern about the alleged fundamental troubles that Google has with an ‘empty’ SPA page has no merit. The only difference is the extra ‘Rendering’ stage in the indexing pipeline.
Also when you click on the "TEST LIVE URL" link in GSC to inspect that particular page, the screenshot of the page appears on the right pane. It proves the scripts were duly run resulting in proper rendering of the ‘empty’ page.
Selectively Prerendered SPA
Now let’s switch from a plain SPA to the one with the landing page prerendered. Crisp React builds such SPA to combine landing page prerendering with CSR for other pages. This is done to achieve performance.
Once the landing page is prerendered, the SEO troubles start. The indexing pipeline sees the HTML markup generated by prerendering and decides that it can optimise the scripts out. It assumes there is no need to run any client-side scripts because the markup, and therefore the page content, is already there.
No client scripts execution amounts to having no CSR and no SPA page switching. As a result, GSC reports under the “Coverage” menu that all the non-landing pages are treated as duplicates of the landing page and not indexed. Despite of all the pages having different content.
The remedy was simple. After HTMLRewriter in Cloudflare Worker was used to strip out the prerendered HTML markup, all internal (e.g. non-landing) SPA pages were indexed.
An attentive reader can ask if this amounts to website cloaking. The answer is No. Google provides definitions for ‘hybrid rendering’ and ‘dynamic rendering’. Both result in Googlebot and users receiving different content which effectively is a cloaking, albeit permitted by Google.
In our case the rendering stage of Google indexing pipeline sees what is rendered by the script whereas users are presented with the output of React
renderToStringfunction which yields the same HTML markup and page content.
Cloudflare Worker Functionality
The Worker is used to implement the following features:
-
Feature: Conditionally remove prerendering for bots but not for end-users.
In Crisp React the prerendering is optional so if no SPA has it enabled then obviously no need to remove it.
Alternative: If you need prerendering but are not using edge functions like Workers, then switch from Jamstack to full-stack deployment and implement prerendering removal in the backend e.g. Express. The implementation is as simple as finding the
div.app-rootelement and removing its children.
-
Feature: Implement SPA redirects.
This is done as a workaround for Cloudflare Pages assumption that any SPA has the landing/index page called
index.html. This is not necessarily true for Crisp React, it allows a React application to be split into multiple SPAs and you can name each as you like.Alternative: Use one SPA only and rename it from ‘first’ to ‘index’ to let Pages perform redirects. Or switch to full-stack deployment and implement redirects in the backend.
-
Feature: Generate auxiliary files e.g.
sitemap.xml,robots.txt.The files are created on the fly and are not persisted to the disk.
Alternative: The files could be created on the disk during build time or generated on the fly by the backend in full-stack deployments.
Conclusion
Hopefully, this article sheds some light on the SPA & SEO topic. As you could see, the overall picture is quite bright and certainly not as bleak as frequently painted.
Getting your website indexed is only the first, though critical, stretch of the long SEO road. It’s highly recommended to ensure your SPA includes meaningful Structured Data. Crisp React assists with that by providing static and dynamic placeholders you can replace with data that contributes to the SEO of your website.
Thank you for reading!