As it turns out, the correct installation and usage of NVM on Windows OS often raises some questions due to the fact that there are some inaccuracies in the official repository of this tool. In this regard, in this article, I will tell you how to install NVM on your computer step by step in a more optimal way (MacOS users do not need to read this).
NVM: What's the point? 🤨
Node Version Manager (NVM) is a tool that allows you to have multiple versions of Node.js on your device, switch them quickly, and it is managed from the command line interface (CLI).
Why is this needed? The fact is that different applications you work with can be implemented on different versions of Node.js. In practice, this is usually indicated by the .nvmrc file which is committed with your project and contains a single line with the version of Node.js to use for this project. However, running the application in another environment may not give the expected result or lead to errors.
Can I do without it? The cases when NVM is just an indispensable thing occur very often in the workplace. Let me give you a small example from my past experience. Having come to work for a new company some time ago, I had to quickly get to the bottom of one of their past projects. At that time, we seemed to be using Node.js version 14.16.0, but the project repository required version 10.x. Of course, if I did not know about NVM, I would only have to reinstall from one version to another. And so for each new project! Definitely, it would be a big headache and a waste of working time.
Moreover, when you work on a large team, it's rare that everyone is using the same version of Node.js.
How to install NVM correctly? 🤔
Well, let's get started with NVM installation. Along the way, I will point out the inaccuracies in the official repository that I mentioned at the very beginning of this article. Here I'm only emphasizing that the further explanation is based on the example of the 11th version of Windows OS.
-
To begin, open the terminal application on your computer. For Windows, I recommend using Git Bash due to some commands may not be available in Windows PowerShell. Ideally, use the built-in Windows Terminal, in which you need to add Git Bash.
Let's make sure NVM is not already installed on your computer. Just enter the command:
nvm -vIf this is correct, then you will see the following response:
-
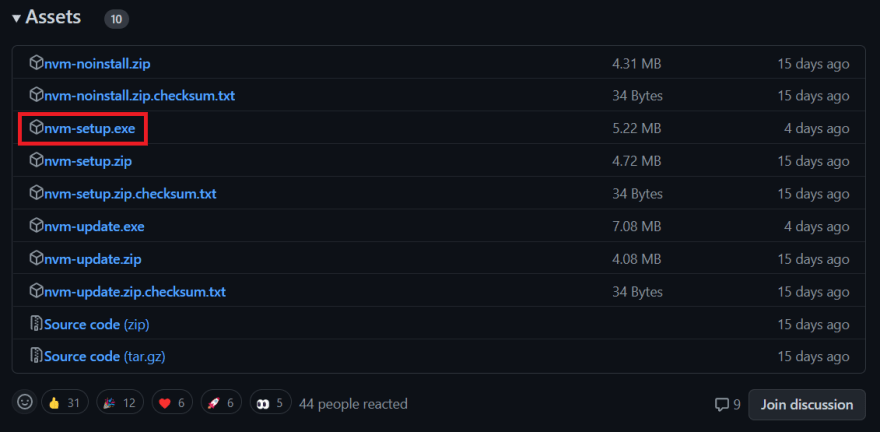
Go to the NVM for Windows releases page and select the latest version (the top one in the list), for example, it is currently 1.1.10. Then download the nvm-setup.exe file:
-
I assume that most of you already have Node.js installed at this point (if not yet, then NVM will do it for you a little later). And if we turn to the official manual, it states that before installing NVM we need to uninstall any existing versions of Node.js:
However, we will not follow this advice. Instead, run the downloaded setup file. You'll be prompted to agree with the project's terms of use (сhoose 'I accept the agreement' option), then the installer will ask where to install NVM (click on the 'Next' button).
And now attention!
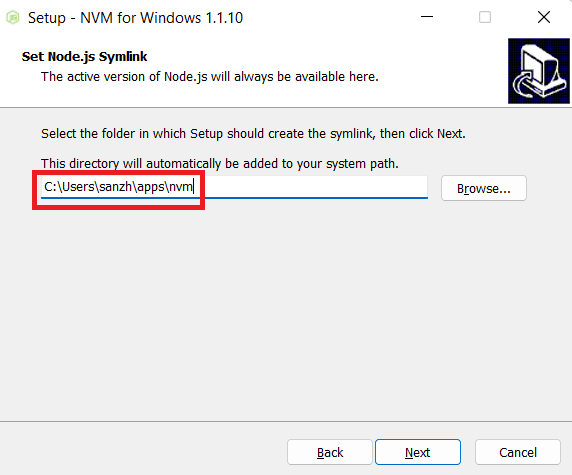
You'll be prompted to indicate where to set the Node.js Symlink. This is the next inaccuracy of the official manual because the default path
C:\Program Files\nodejsis not correct:I strongly recommend changing this path to any other, that does not contain spaces. For example, I specified the following folder in the user's home directory:
In the next window, click the 'Install' button. Immediately after installation, NVM recognizes that you already have Node.js installed and asks the following question:
Select the 'Yes' option and the installation process will complete.
-
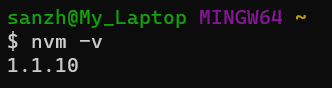
Now restart the terminal application and make sure NVM is installed:
nvm -vIf everything was successful in the previous step, you will receive the following response:
Usage 😃
-
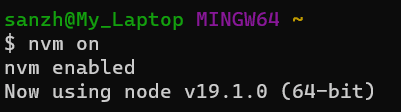
First, make sure NVM is enabled:
nvm onExpected response:
-
Check the active version of Node.js:
nvm currentExpected response (in your case it may be another version):
-
Download the latest version of Node.js:
nvm install latestExpected response (in your case it may be another version):
Also, I can download a specific version of Node.js, for example, 14.18.0:
nvm install 14.18.0Expected response:
If you want to remove a specific version use the command:
nvm uninstall <version> -
Open a list of all versions installed on your computer:
nvm listExpected response:
-
Switch to use the specified version:
nvm use 14.18.0
Expected response:
A complete list of commands can also be seen in the official repository.
Well, that's where I end. I really hope that this article will help you properly install and use this wonderful and very useful tool. If you have any questions, write them in the comments below. 👋