Inspired by the recent conversation I had at the Udacity Intersect Conference with a Senior Manager working on the Alexa AI at Amazon, Dr. Ashwin Ram, I decided to document a proof-of-concept and what became a fantastic yet-to-be-monetized product. Furthermore, I want to share my experience in creating it and the ideas of needed improvements.
I, like many, am a dreamer and a creator. I like taking ideas and turning them into realities no matter how foreign or difficult the concepts that entail creating them. This idea starts with a simple picture. Specifically, this one:
When looking at this still, black-and-white image, I imagined what it would be like to have the water running and then immediately decided I needed to make it a reality. I thought that it would be great for both children and adults to animate art at a low cost point and with minimal energy requirements. Everyone really loves those Harry Potter newspapers! I knew, however, if I wanted to make it a reality I needed to prove that it would offer the highest aesthetic and monetary value.
I worked with the concept to show the difference between static and the dynamic piece of art:
<a href="https://medium.com/media/14fa93495cd0d4416dad7e6bb9eb2a92/href">https://medium.com/media/14fa93495cd0d4416dad7e6bb9eb2a92/href</a>
So after sharing my thoughts and renderings with family and friends and getting there desire for the product the next step was how to make it? How could I create something that brings joy and happiness to the people who choose to put it in their homes?
Well using a typical screen to do it would not be energy efficient enough to make the idea viable. Mostly due to the fact that I wanted the art to be able to be hung on the wall without a power cord because at that point it is no longer an attractive product. So from there I realized that E Ink screens may be the way to go in order to achieve the low-power consumptions that I was shooting for. I spent a lot of time researching developer kits for E Ink experimentation and found the results to be all over the place in terms of price and complexity. I was looking for a screen large enough to make a decent looking prototype, something inexpensive and of course something with the highest resolution. After a few days of research, I found that Amazon uses a E Ink Carta HD display in its Kindle Paperwhite 3. To be specific, the screen is a 6-inch, 1440×1080, 300 ppi E Ink display with 16 levels of grey. As of right now E Ink displays are only able to produce 16 levels of grey (more specifically 4 bits per pixel) compared to the photo above which has 256 levels of grey (more specifically 8 bits per pixel). That became a new challenge for me. Will the 16 levels of grey be suitable enough to still be aesthetically pleasing? I dove in and did some research to test if I would be pleased with this. For those who may have a difficult time grasping what I mean with the difference between the resolution change. Here is a visualization I made in order to better illustrate it:
Now it may look like the 4 bit per pixel and the 8 bit per pixel are the same but they are not. You lose a lot of information moving from 8 bits to 4 bits. Just a quick close up comparison.
8-bit Grayscale Image
4-bit Grayscale Image
You can see near the bottom of the waterfall on the right side the effects of the loss in resolution.
After running this test, I decided that it would be okay to proceed with 16 levels of grey with applicable images and some pre-editing of the image as well as utilizing the overlay mask I will talk about shortly.
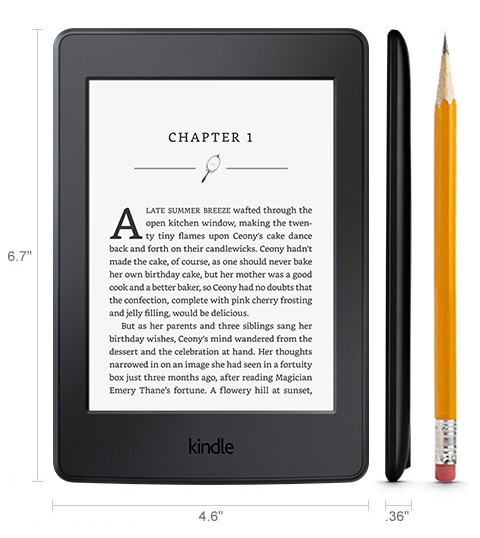
Before, I made the Kindle purchase, there was one more thing I had to figure out. Can I control the device and make it do the actions it wasn’t designed to do, but are necessary for this product? So after, a few internet searches I found out that the device is linux based. That was great to hear, for me at least, because I am comfortable in a unix based environment. The next question I had was, has the device been exploited, more specifically, was there a jailbreak available for it so I could work with a terminal. I found out that in fact there is a whole community behind it, with amazing resources and instructions! So that was it and with much excitement I bought it and eagerly awaited its arrival. It came a few days later, and for those who are still unsure of what a Kindle Paperwhite 3rd generation looks like, here you go.
So my first steps beyond the jailbreak involved adding a couple of components that I thought I would need. First off, I added a package manager that made adding new packages a lot easier. Next, I needed a terminal of sorts on the device in order to execute commands on the touch screen and allow for SSHing into the device. From there I found myself playing around with the Kindle and finding out to what extent the similarities were with the linux os, like ubuntu or fedora. Turns out a majority of the standard packages are missing and need to be installed also!
** Side Note: I am not going to link all of the packages used, but feel free to reach out if you need more information**
Onward to our first task, displaying a single photo on the Kindle. Now I knew that it would be possible because one of the packages I installed was a screensaver package and it allowed for you to upload your own images. It did this by running python scripts with the Kindle. Specifically, I found out that it actually uses a custom Amazon command to control the screen. This command is called the eips command and it is used to manipulate the Kindle’s frame buffer, or more technically the memory location used for screen display. With the eips command you can clear the screen, write an image of your own and execute a bunch of other neat tricks that can be found here.
So I was able to get an image to the correct dimensions (1072 x 1448) and to the right grayscale level in order to visualize my first overthrow of the Kindle! Below is the first photo I was able to upload. I would demonstrate on the Kindle but I did not take photos during the experimenting process and do not want to give away the final design yet!
Getting closer!
My next thoughts were could I write a script that calls this command multiple times in order to make a GIF to look like a video on the Kindle? But before I get to that lets take a step back to see where I am with the other part of this vision, more specifically, how and why did I end up with the image you see above?
Well I wanted to try and capture that river scene that you saw in the beginning but knew I would need some video in order to achieve the moving water effect. So after ample searching I decided to experiment with some footage I found on the internet. Now this footage was for testing and in the future proper licensing for all media and images would have to be taken into account, but this is what I decided to work with:
<a href="https://medium.com/media/91b5e22f8e7607c94f4883097ab6afae/href">https://medium.com/media/91b5e22f8e7607c94f4883097ab6afae/href</a>
I chose this for two main reasons, first it had the moving water I wanted and second it allowed for the static background I wanted. Again, my goal is only to have the water move and nothing else in the scene. I found this idea to be cool and another way to minimize energy usage by focusing on only changing the pixels that matter. In order to make the scene work I had to do a few things like resize the video so it can fit on the Kindle screen vertically, make it 4-bit grayscale, clean up some of the uncleanliness of the 8 to 4 bit transition and finally create the static mask that lies above the river portion. Yielding the result below:
<a href="https://medium.com/media/0aacf06274a3a5e67d5a5c76ab921498/href">https://medium.com/media/0aacf06274a3a5e67d5a5c76ab921498/href</a>
Great! I have the video/moving picture I want to play it on the Kindle, but now how do I go about playing it in an efficient manor. After being upset with the results of my bash and python scripts on the Kindle as a means to play my moving picture, I found a large contributor in the field of Kindle programming world by the name of GeekMaster who in fact built a complex video player for the Kindle using a specialized technique called ordered dithering. The reason this is important and the reason my scripts failed is because the E Ink particles desire to remain in their somewhat fixed positions (like ghosting images on a monitor). And so, when the E Ink screen is refreshing images too fast, not all of the particles change, causing it to not look good. This is why dithering is important, as it provides a better video to work with this problem.
** Side Note: Feel free to skip over the code snippets, they are intimidating to say the least! **
//====================================================
// raw2gmv 1.0a - raw to geekmaster video transcoder
// Copyright (C) 2012 by geekmaster, with MIT license:
// http://www.opensource.org/licenses/mit-license.php
//----------------------------------------------------
#include <stdio.h>  // stdin,stdout
typedef unsigned char u8; typedef unsigned int u32;
int main(void) {
   u8 o,to,tb,wb0[800*600]; u32 x,y,xi,yi,c=250,b=120;
   while (fread(wb0,800*600,1,stdin))
       for (y=0;y<800;y++) { xi=y; tb=0;
          for (x=0;x<600;x++) { yi=599-x; o=x^y;
             to=(y>>2&1|o>>1&2|y<<1&4|o<<2&8|y<<4&16|o<<5&32)-
             (wb0[yi*800+xi]*63+b)/c>>8;
             tb=(tb>>1)|(to&128);
             if (7==(x&7)) {
                fwrite(&tb,1,1,stdout); tb=0; }
          }
       }
   return 0;
}
So I got the code that GeekMaster had shared, modified it to work with the new resolution for the Kindle Paperwhite 3. After compiling GeekMaster’s video player on the Kindle, I tried out the video and it worked! But wait, the video looked much worse than the 4-bit image I tested earlier as a static background. It was the result of the ordered dithering process to make the video run smooth on the Kindle. I was unsatisfied with the result and something needed to be done. I remembered that the whole idea was to create a mask of non moving pixels, so why not use a bit-mask to map the pixels to what I want written normally and the ones I want to be ordered dithered for movement. So with a few changes of the video transcoder, a bit-mask, and a source image, I was able to write the original pixel from the image source and the ordered dither pixels accordingly!
Mask on left and source image on the right
Here is the code used for this process:
//====================================================
// raw2gmv 2.0 - raw to custom gmv
// Copyright (C) 2012 by geekmaster, with MIT license:
// http://www.opensource.org/licenses/mit-license.php
//----------------------------------------------------

#include <stdio.h>  // stdin,stdout
#include <fcntl.h>
typedef unsigned char u8; typedef unsigned int u32;

// Mask vars
unsigned char mask[1072*1448];
unsigned char fd;

// Png vars
FILE    *infile;
unsigned char img[1072*1448];
unsigned char fd2;

void readMask(void){
   fd = open("raw_bit.raw", O_RDONLY);
   read(fd, &mask, sizeof(mask));
   close(fd);}

void readImg(void){
   fd2 = open("raw_img.raw", O_RDONLY);
   read(fd2, &img, sizeof(img));
   close(fd2);}

int main(void){
    u8 o,to,tb,wb0[1448*1072]; u32 x,y,xi,yi,c=250,b=120;
    u32 pi = 0; u32 image_count = 0;
    readMask();
    readImg();
    while (fread(wb0,1448*1072,1,stdin))
       for (y=0;y<1448;y++){xi=y; tb=0;
          for (x=0;x<1072;x++){
             if ((int) mask[1072*y+x] == 0){
                 o=x^y;
                 // Image line
                 to=(y>>2&1|o>>1&2|y<<1&4|o<<2&8|y<<4&16|o<<5&32)-
                 (img[1072*y+x]*63+b)/c>>8;
                 tb=(tb>>1)|(to&128);
                 if (7==(x&7)) { fwrite(&tb,1,1,stdout); tb=0;}
                 }
            else{
                 yi=1071-x; o=x^y;
                 to=(y>>2&1|o>>1&2|y<<1&4|o<<2&8|y<<4&16|o<<5&32)-
                 (wb0[yi*1448+xi]*63+b)/c>>8;
                 tb=(tb>>1)|(to&128);
                 if (7==(x&7)) { fwrite(&tb,1,1,stdout); tb=0;}
                 }
              }
          }
     return 0;
}
Okay now that I have it working and it’s looking good, some small things had to be implemented for optimal daylight and energy saving viewing results.
Like:
#set frontlight OFF:
echo 0 > /sys/devices/platform/imx-i2c.0/i2c-0/0-003c/max77696-bl.0/backlight/max77696-bl/brightness
As a means to turn off the Kindle’s backlight to get only the E Ink screen. Note: one could elect to use the backlights as a means of lighting the screen in darker areas. After that, I stripped apart the Kindle so I can continue to make a final design that is more conducive for a home decor. Once the Kindle is apart, I cut the frame to fit the Kindle like so:
Back view of Kindle Paperwhite 3 in custom frame
Front view of Kindle Paperwhite 3 in custom frame
Fun fact! If this would be used as video art, when the Kindle dies the E Ink screen leaves the last image in place regardless if there is power to the device or not! Great marketing tool!
So before we move on to the videos playing and the end of this long journey, here is a final photo of it all together.
Final and only prototype!
Okay here are some pictures and videos of different scenes optimized in the same similar fashion as above. The frame can be controlled over the wifi and allows for switching of images and set run times.
Lets start with the main scene talked about in this article from afar and up close:
<a href="https://medium.com/media/6d9a28d0483ed2533d54fd0336edf1e2/href">https://medium.com/media/6d9a28d0483ed2533d54fd0336edf1e2/href</a>
Here is an image of the stream scene followed by its accompanying video!
Stream scene!
<a href="https://medium.com/media/d92f5f55fe5458db74c118b83dc40042/href">https://medium.com/media/d92f5f55fe5458db74c118b83dc40042/href</a>
Here is an image of the waterfall scene followed by its accompanying video!
Waterfall scene!
<a href="https://medium.com/media/fb00caeaa6f77201f7a2bf2db8e70a5c/href">https://medium.com/media/fb00caeaa6f77201f7a2bf2db8e70a5c/href</a>
Here is an image of the rocky shore scene followed by its accompanying video!
Rocky shore scene!
<a href="https://medium.com/media/fdb82e4ba2369d226022b7a34e66cf7f/href">https://medium.com/media/fdb82e4ba2369d226022b7a34e66cf7f/href</a>
Last but not least there is no need to have it play videos. One can use it as a picture frame and no power is needed to keep that image!
No excitement here just a photo!
After sharing this prototype with family and friends it was great to see their reactions and desire to own it! It was great to see an appreciation for all of my hard work!
In closing I will talk about the other ideas I was working on with this project and ultimately why I decided that it was not pursuable.
Oh the ideas! Well lets start off with the practical ones and then the ambitious ones. First of all in order to have some longevity on the wall some battery statistics were gauged with the command:
gasgauge-info
I determined after a power drainage test that with intermittent animations and a larger lithium ion cell that the art work could remain powered for around 3–4 weeks before needing to be recharged (depending on the frequency of movement activations). As for charging the frame, I thought one could either take the frame down and charge it like a phone or develop a interchangeable lithium ion battery system. Where you charge the batteries in a rotating fashion else where in the house.
In order to keep frame usage down low enough to maintain proper battery life I began to actively look into a variety of motion sensors. The biggest concern for me was how well I could blend it into the frame without making it look weird.
There was some more research done into different size E Ink screens as well. Some are found up to sizes of 32 inches and would pair well with wall art. Further research would be needed to evaluate power consumption and screen refresh rate abilities. In fact I found out that the way that the Kindle drives their E Ink screen gives it an advantage not found on the market. The information surrounding this is proprietary and was one of my first realizations that building a larger prototype and manufacturing it would be troublesome. It was clear that the Kindle did a great job at what I wanted to accomplish and although I had brought my idea to life, in the end it was only that, an idea. I am not in a position to create my own manufacturable prototype to prove to myself that my idea will effectively scale. Nor do I have have the expertise to build a custom driver for the E Ink screen. For me it seems too unknown and too uncertain to descend down that path. Furthermore, it is a hard sell with a 4-bit grayscale screen due to the lack of resolution. Although, it is not horrible to look at. I like it and get good use out of it.
For more ambitious ideas, I wanted to create an app that allowed you to upload your own videos that would get post processed, uploaded and used on the frame. Also maybe a neural network that turns photos into videos on the frames as well.
A funny thing that happened during this project is that E Ink actually announced their first E Ink picture frame (I already had done this at that point in time and felt good things were moving in a promising direction).
Overall, my experience with taking an idea and making it a reality was so fun and rewarding. I was able to take an idea, create concept marketing material for it, share that with others to gauge their repsonse and bring the product to reality. In the end this vision of mine took two weeks time and less than 200 dollars to make. My only goal was to prove to myself it was something that could be made and efficiently scaled up. In my findings, I would not have been capable to scale the device up on my own. Another prototype with non proprietary technology, a larger screen and manufacturable materials would have to be made in order for me to want to find poeple willing to invest in the idea. Overall, I can say I happily failed, in the sense that I did not achieve my goal but in the process I learned a lot, made something awesome and used no money other than my own.
Thanks for reading, hope it was of some value to you! I would like to give thanks to Ashley Hale, Patrick Kern, and Uki Lucas for their invaluable feedback on this article. Feel free to drop a comment below if you have any questions. Have a nice day!