Let me start-off by saying 2018 has been the worst year of my life. So far I’ve lost half my savings to crypto, ruined a very expensive stake, and haven't experimented with anything new at all. This loss of creativity really got me thinking - I need a break. Not to catch-up with my old pals but to put my work at Webmaons aside for a week and reconnect with my creative side.
I talked to my co-founder, Rahul about this, and how important it was to me. I kinda felt like a lazy employee asking his teammates to cover up for them. Not only did he agree, but suggested something I might find interesting. He knew about a remote degree program that was being conducted by University of Illinois on Cloud Computing, and it struck to me, that it is my second most favorite topic, after Artificial Intelligence and it aligns perfectly to my line of work. I knew it’ll be much easier for me than neural networks, and who knows when I’ll get a chance to train a model for a real project. Without second thought I enrolled for the course.
Thus it began, It was like college all over again.. assignments.. lectures.. and tests. For one of the assignments the professor told the class to draw comparisons between Globus and Openstack. Both are great solutions for implementing your own virtualized, cloud computing platform, for this article I’ll talk about how I implemented object storage using openstack, however I do encourage you to checkout Globus since its great too.
OpenStack software controls large pools of compute, storage, and networking resources throughout a datacenter, managed through a dashboard or via the OpenStack API. OpenStack works with popular enterprise and open source technologies making it ideal for heterogeneous infrastructure.
Service Architecture
After browsing through Openstack’s list of services I decided to make a distributed object store, which can store blobs inside different containers much like AWS S3, but this was one of the many services that openstack provides, and these services are controlled by a central node which also facilitates communication to these services or in our case the Object Store.
Every node in this distributed cloud needs a dedicated machine which you can either spin-off using a Virtualization software, or like I did, by creating real instances using Vultr, basically any machine that runs a fresh installation of Ubuntu(at least 3 for this article).
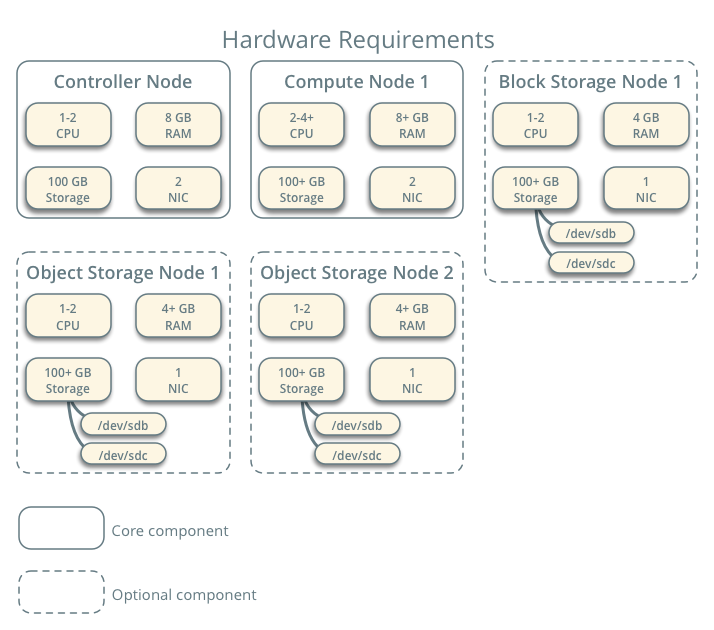
In the picture below is a sample configuration that shows various nodes that can be in a cloud network but my implementation is shorter, this gave me a basic idea on how everything is arranged.
First things first, I started by creating a Controller Node since its essential for controlling and syncing all others in our setup.
The controller node runs the Identity service, Image service, management portions of Compute, management portion of Networking, various Networking agents, and the Dashboard. It also includes supporting services such as an SQL database, message queue, and NTP.
I launched a fresh instances running the Ubuntu 16.04 for my Cloud, Compute and Object Storage respectively, 3 in total, next confirm that your machines have access to network by typing in…
# ping -c 4 amankhalid.com
You should see the following output in your terminal.
Note the IP addresses of each of the 3 nodes since they will be used for configuration. In each of the instances I edited the file /etc/hosts to to have the following values.
# controllerXXX.XX.XX.X controller
# compute1XXX.XX.XX.X compute1
# object1XXX.XX.XX.X object
I replaced **XXX.XX.XX.X** with the IP addresses of my Controller, Compute and Object nodes respectively. After making changes to all my nodes, I checked the connectivity as follows.
# ping -c 4 controller
To verify the connectivity I pinged the other two nodes through each of my instances and they returned a similar output when I pinged amankhalid.com. Now it was time to synchronize my nodes.
Synchronizing Nodes
As my professor taught, synchronization is an important issue while communicating in a distributed environment. In Open stack each node synchronizes its clock with the controller node. To define Network Time Protocol(NTP) in my setup I first installed Chrony on my Controller node.
# sudo apt-get install chrony
After this was done I had to make sure the other nodes were synced with my controller. I installed chrony on each of the nodes and added the following line in their /etc/chrony/chrony.conf file.
server controller iburst
After that I restarted the chrony service in each of the nodes and everthing was set, to further verify that my nodes were referring to the controller I ran the following command.
# chronyc sources
This command prints out the name or ip address of the source, which in my case is the controller.
Installing Openstack
Now after all that struggle, my nodes were ready for the real deal. I was a step closer to implenting my own cloud storage. But first I had to install the Openstack repositories on each of my machines. I ran the following commands to get the nodes ready.
# sudo apt-get install software-properties-common# add-apt-repository cloud-archive:queens
# sudo apt-get install software-properties-common# add-apt-repository cloud-archive:pike
Finally, update your local repository list and install the openstack python client on each of your machines.
# sudo apt-get update && apt dist-upgrade# sudo apt-get install python-openstackclient
Database Provisioning
Now it’s time to initialize data-store for Openstack that it used for its internal purpose. We will use the MySQL database although Openstack supports other data stores as well, but I decided to stick to the good ol’ MySQL. We will need to install it only on the controller node, go though this guide for basic installation steps, we only need the root user for now, make sure your password comply with the MySQL secure installation.
Message Queue
For exchanging status information among services and to coordinate operations, Openstack uses message queue. I chose rabbitMQ for this task.
RabbitMQ is only needed on the Controller Node, I installed it using the following command.
# apt install rabbitmq-server
Add the **openstack** user and finally, permit configuration, write, and read access for the **openstack** user::
# rabbitmqctl add_user openstack AMNOX_PASSWORD
# rabbitmqctl set_permissions openstack “.*” “.*” “.*” Setting permissions for user “openstack” in vhost “/” …
Replace **AMNOX_PASSWORD** with a suitable password.
Memcached
The caching service is used in Openstack to cache tokens generated by users Install memcached using the following command:
# apt install memcached python-memcache
Since there is a facility to create different users and roles and assign services to them, users need to authenticate with a token to access the services allocated to them.
Final Frontier: Object Storage
I already had my Object Storage Node in place with complete network connectivity, now its time for my controller to have an object storage service enabled. To do that I created a service and a User who had permission to access it on my controller node.
Controller Node Setup
First a proxy service needs to be decalred on the controller node that routes the incoming requests to the Object Storage node. I started by creating a User on my controller node. I further gave this User admin privileges to enable access to the service which I will create in next step.
# openstack user create --domain default --password-prompt swift
# openstack role add --project service --user swift admin
Next create the object storage service.
$ openstack service create --name swift \--description "OpenStack Object Storage" object-store
Next I configured the service endpoints and installed additional packages that enable the proxy to forward incoming requests. The additional packages can be found here.
Storage Node Setup
Now its time to setup the storage Node, using Openstack it is possible to have many such storage nodes the concept can further be extended by using horizontal scalability, which by the way is the norm in real life services.
# sudo apt-get install xfsprogs rsync
Our storage nodes will use the XFS file system, run these commands o format the storage location.
# mkfs.xfs /dev/sdb# mkfs.xfs /dev/sdc
Create the mount point directory structure:
# mkdir -p /srv/node/sdb # mkdir -p /srv/node/sdc
Edit the /etc/fstab file and add the following to it:
/dev/sdb /srv/node/sdb xfs noatime,nodiratime,nobarrier,logbufs=8 0 2/dev/sdc /srv/node/sdc xfs noatime,nodiratime,nobarrier,logbufs=8 0 2
Mount the devices:
# mount /srv/node/sdb # mount /srv/node/sdc
Create or edit the /etc/rsyncd.conf file to contain the following:
uid = swiftgid = swiftlog file = /var/log/rsyncd.logpid file = /var/run/rsyncd.pidaddress = controller
[account]max connections = 2path = /srv/node/read only = Falselock file = /var/lock/account.lock
[container]max connections = 2path = /srv/node/read only = Falselock file = /var/lock/container.lock
[object]max connections = 2path = /srv/node/read only = Falselock file = /var/lock/object.lock
Edit the /etc/default/rsync file and enable the rsync service:
RSYNC_ENABLE=true
Start the rsync service:
# sudo service rsync start
Now the storage Node is ready to install the necessary services, the packages I installed after enabling rsync and specifying storage format are listed here.
Rings: Very precious indeed
Rings in Openstack where data resides, this can be any data, say account, container or object related data. For my use case I needed all three of them because I have an account which is authorized to use the storage service, through which I will create a container, which in turn will store the objects that I want it to.
Rings basically manage how data will be stored and also control how many times it will get replicated across the setup(by default thrice). This concept is more useful when your clusters are geographically distributed, say across continents. But this mini setup needs it to in order to determine the location of our objects.
I created rings for account, container and object on the Controller node as follows.
Creating the account ring
Change to the /etc/swift directory. Create the base account.builder file:
# swift-ring-builder account.builder create 10 3 1
Add our storage node to the ring:
# swift-ring-builder container.builder \add --region 1 --zone 1 --ip object1 --port 6201 \--device sdb --weight 100
Creating the container ring
Switch to the /etc/swift directory. Initalize container.builder file:
# swift-ring-builder container.builder create 10 3 1
Next, I added storage node to the ring:
# swift-ring-builder object.builder add \--region 1 --zone 1 --ip object1 --port 6200 --device sdb --weight 100
Create object ring
The object server uses the object ring to maintain lists of object locations on local devices.
Change to the /etc/swift directory. Create the base object.builder file:
# swift-ring-builder object.builder create 10 3 1
Add the storage node to the ring
# swift-ring-builder object.builder add \ — region 1 — zone 1 — ip object1 — port 6200 — device sdb — weight 100
It’s alive!
Obtain the /etc/swift/swift.conf file from the Object Storage source repository:
# curl -o /etc/swift/swift.conf \ https://git.openstack.org/cgit/openstack/swift/plain/etc/swift.conf-sample?h=stable/newton
Edit the /etc/swift/swift.conf file and in the [swift-hash] section, configure the hash path prefix and suffix for your environment.
[swift-hash] … swift_hash_path_suffix = MY_SECRET_SUFFIX swift_hash_path_prefix = MY_SECRET_PREFIX
In the [storage-policy:0] section, configure the default storage policy:
[storage-policy:0] … name = Policy-0 default = yes
Copy the swift.conf file to the /etc/swift directory of your storage node Make sure you have ownership of the configuration directory on the Object Storage Node. Finally start the serive on the object storage node.
# chown -R root:swift /etc/swift
# swift-init all start
Storing files in the container
Login to your controller node and **echo** the authorization credentials in the environment.
export OS_USERNAME=adminexport OS_PASSWORD=9qZjkwmKUrkFn2dvexport OS_PROJECT_NAME=adminexport OS_USER_DOMAIN_NAME=Defaultexport OS_PROJECT_DOMAIN_NAME=Defaultexport OS_AUTH_URL=http://controller:35357/v3export OS_IDENTITY_API_VERSION=3
Create container1 container:
# openstack container create container1
Upload a test file to the container1 container:
# openstack object create container1 FILE
List files in the container1 container:
$ openstack object list container1
And you should see your newly created file. You can communicate with your service through the API endpoints as well, which we created earlier. You can create many such container for your openstack user and store blobs in them. Keep in mind that it is a very CPU intensive task and you might need a better instance.
Object Storage is just one of the use-cases of Openstack, it is also possible to breate your own virtualized instances using the NOVA service among many others. I also encourage you to checkout the Openstack API to access more powerful functionalities.
I hope to end this spell of bad luck haunting me since the beginning of this year by getting better at my craft. Writing this article not only helped me further my understanding of Cloud Computing, it gave me sense of making some contribution to the community that helped me grow over the years.
Thanks for reading the article, I’d really appreciate any suggestions or improvements you might have to my implementation technique.
You can reach out to me through mail for any questions regarding this article or to simply have a good conversation :)