Using multi-stage builds to optimize production Docker image for faster deployment.
In this article
- 🧑🔬 We'll discuss why and where optimizing docker image can be meaningful.
- 🙈 We'll explore how to dockerize Next.js project with a hidden feature.
- 🪄 We'll dive into the magic behind the docker image optimization.
The Problem
At work, I noticed our deployment pipeline was significantly slower than I expected. The simplified pipeline consist of the following jobs:
After some investigation, we were able to identify the performance bottleneck. The task that consistently took the longest to complete was uploading production images to the Google Cloud Artifact Registry. It was because we were uploading large, un-optimized Docker images to the registry.
Image size isn't an urgent concern like security or throughput in general. The storage and cost on the cloud are usually generous. However, it becomes problematic when it slows down the pipeline. It increases the time to market and affects our ability to continuously deliver.
What's The Impact of Optimizing Docker Image?
We'll use the DALL-E demo I built for my previous article as an example. The demo looks like this:
You can find the demo on GitHub. Feel free to take a look at the repo and try it out✨
We'll create two docker files:
- Dockerfile.local: basic image without optimization
- Dockerfile: optimized image
Let's build the images based on each docker file. The results are:
- Un-optimized image: 2.85GB
- Optimized image: 202MB
It's a 92% reduction in size. We can roughly interpret it as a 92% reduction in uploading time because the file transfer over HTTPS is linear. Now let's dive into how you can achieve the same result.
Let's go.
Before Optimizing The Image
We can start off by creating a straightforward Dockerfile like this:
# Dockerfile.local

FROM node:18-alpine
RUN apk add --no-cache libc6-compat
WORKDIR /app

COPY . ./

# Build the app
RUN yarn --frozen-lockfile
RUN yarn build

# Serve the app
CMD [ "yarn", "start" ]
In this image, we use Alpine Linux Node 18 as the base image because of its much smaller size compared to other base images. We also follow the recommendation and add libc6-compat to support the use of "process.dlopen". The rest is just like how we build and serve the project locally:
- First, we install the dependencies based on yarn.lock file,
- we generate the production build,
- and lastly, we start the server with the "yarn start" script.
Let's build the image using this docker file and this is generally what you can see in the command line:
The build was completed in 52.9s.
The Optimized Docker Image
The optimization is based on two features from Docker and Next.js:
The idea is to use a multi-stage build to select only what we need in production, stage by stage. Let's take a look at the docker file.
# Dockerfile

ARG NODE=node:18-alpine

# Stage 1: Install dependencies
FROM ${NODE} AS deps
RUN apk add --no-cache libc6-compat
WORKDIR /app

COPY package.json yarn.lock* ./
RUN yarn --frozen-lockfile

# Stage 2: Build the app
FROM ${NODE} AS builder
WORKDIR /app
COPY --from=deps /app/node_modules ./node_modules
COPY . .

RUN yarn build

# Stage 3: Run the production
FROM ${NODE} AS runner
WORKDIR /app

ENV NODE_ENV production

RUN addgroup --system --gid 1001 nodejs
RUN adduser --system --uid 1001 nextjs

# copy assets and the generated standalone server
COPY --from=builder /app/public ./public
COPY --from=builder --chown=nextjs:nodejs /app/.next/standalone ./
COPY --from=builder --chown=nextjs:nodejs /app/.next/static ./.next/static

USER nextjs

EXPOSE 3000

ENV PORT 3000

# Serve the app
CMD ["node", "server.js"]
We used the same "node:18-alpine" as the base image.
Stage 1: Install dependencies
Instead of copying everything to the image, we were only copying the "package.json" and "yarn.lock" for the installation.
Stage 2: Build the app
In order to build the project, we needed the installed dependencies, source code, and all the project configurations in the project root. So we copied the dependencies from the previous stage and everything from the project root.
Stage 3: Run the production
Output file tracing is a Next.js feature that is designed to help us reduce deployment size by tracing all the files that are needed for production in build time.
Once we enable the "standalone" output, Next.js will build and output a standalone Node server in ".next/standalone" directory.
module.exports = {
  output: 'standalone',
}
The build result looks like this:
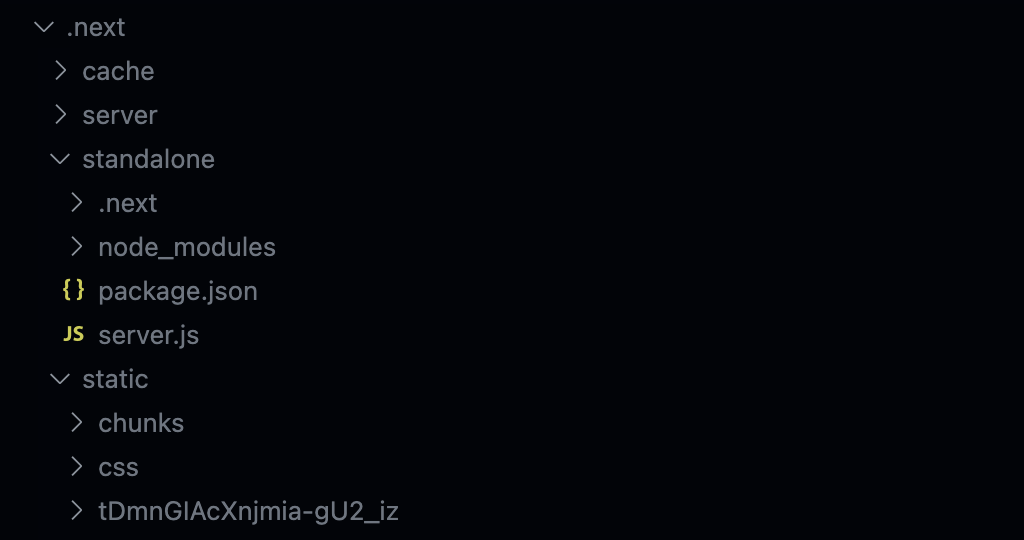
In this stage, all we did was to copy the standalone server, the assets in the "./public" folder, the JavaScript and CSS chunks from the ".next/static" folder to the working directory and start the server with port 3000.
The magic behind the output file tracing is @vercel/nft. It statically analyzes the dependency graph and outputs the list of modules in the graph. To illustrate, let's log the dependencies for our page, API, and the Node server:
import { nodeFileTrace } from "@vercel/nft";

const files = [
  "./.next/server/app/sc/page.js",
  "./.next/server/pages/api/images.js",
  "node_modules/next/dist/server/next-server.js",
];
const { fileList } = await nodeFileTrace(files);
console.log(fileList);
The output looks like this:
Final Thoughts
Now that we explored the stages and the standalone server, let's build the image and observe the result:
The build was completed in 41.3s. Compared to the un-optimized build, we didn't compromise the build time. It's a big win considering that we significantly reduced the build size by 92%.
References
- Multi-stage builds - Docker docs
- Output File Tracing - Next.js
- nodejs/docker-node - Node.js
- Docker run reference - Docker docs
- DawChihLiou/qwik-vs-next - Daw-Chih Liou
- Is Qwik Faster than React Server Component? - Daw-Chih Liou
- With Docker - Next.js
- Deployment - Next.js
- vercel/nft - Vercel
- libc6-compat - alpine Linux
- Artifact Registry - Google Cloud
- Super small Docker image based on Alpine Linux - Hacker News
- Time to market - Wikipedia
- Ex-Principal Engineer's Guide to Design Thinking and Continuous Delivery - Daw-Chih Liou
Want to Connect?
This article was originally posted on Daw-Chih’s website.