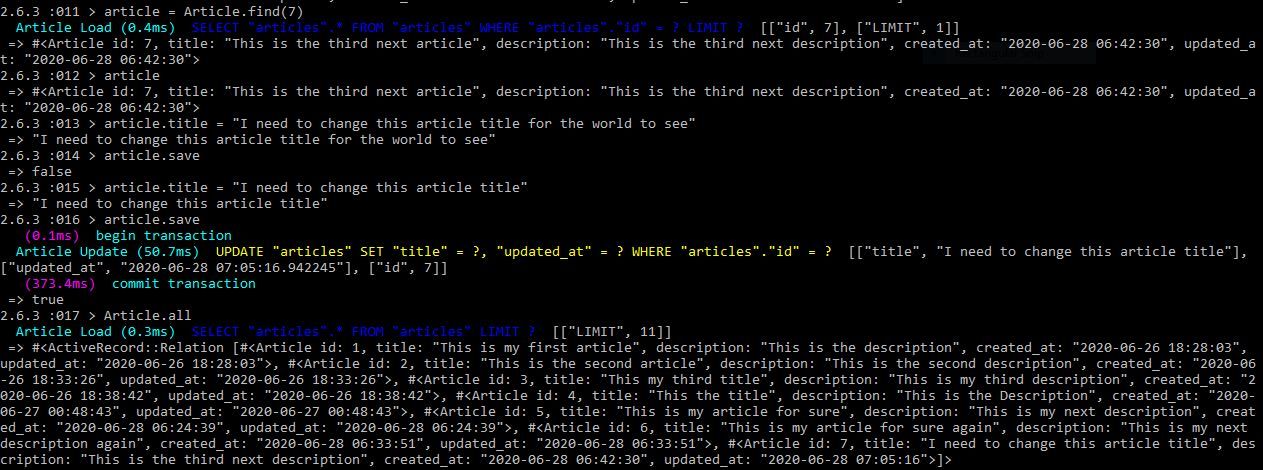
Learning to be a Full-Stack web developer in – a remote software development school domiciled in California had so much taught me a lot like , , and the to get things done the right way and at the right time. Ruby on rails web application is an application that is somewhat complicated for someone who is getting started in learning how this powerful web application works. But when you get to understand how it works and how to navigate round in building your application with it, you will be glad you did. Microverse patience resilience tenacity curiosity In this article, we will be looking at how to , , and an article from the back-end of your ruby on rails application using the console. The same thing we achieve using the console can as well be done by the user of the application from the front-end but we won’t be covering that in this article but we will mostly focus on doing that from the back-end using the rails console. create edit/update delete validate I will be sharing examples with us in this quick tutorial from one of the projects I have worked on so far so as to show us how this whole thing works. Create your application by running the rails command $ (anything you want to call your application), i called mine . Be sure to have your and file working properly. Feel free to check my article on that in order to get to see how to properly make your and database file to be in the right order to make your application work. rails new omega-app gemfile database.yml here gemfile In your pages folder from your location, add your pages file to your own discretion and their corresponding routes that link to each of the pages you would have. Here is an example of how your file will look like and its routes. views home.html.erb You can create other pages, add their routes and what you have as the content is totally at your own discretion. You can as well add an inline css styling here. Make sure to follow the normal html page format convention. Here is a quick view below of the routes from this article. Also have a look at the pages controller, Alright with that said, run this migration command in your command line in order to generate a migration in your application $ and $ so as to create your table and have it migrated properly. Your migration file from your db – database folder should look like this below: rails generate migration create_articles rails db:migrate Again run the command $ and it will create a new migration file. Then add this to your just migrated new file from your second migration table below and then run $ command. rails generate migration add_description_to_articles rails db:migrate Your file will look like this below after running your $ command as instructed above. schema.rb rails db:migrate It now has a table that has a , , and . But a model is needed so we can communicate with the database. So in the models folder, create a file that would look like this below without any validation which we will add later. title description created_at updated_at article.rb With the models now created, rails now give us and for the table, i.e. for each attribute in the table. We can now proceed to the console so as to check out what we have been working on. Rails console gives us direct access to the database. The console can be a playground where you can test anything, methods, connection to the database etc. getter setter The command $ will take you to the console. So in the console, = command will show you something like this below, nothing has been created in the new article table. rails console article Article.new To Create An Article So, to create a new article simply say: = “ ” (remember you can use anything) and press the enter button. When you type , you will see that the space has been filled leaving the space still at nil. For the , type = “ ” and press enter. To check for that, type and observe how the column has been filled up article.title This is my article for sure article title description description article.description This is my next description article description , and the would be handled by rails, what this means is that rails will provide the information about the number of the article, when it was and what time it was . So, to save type at the console . Rails would generate a sequel query that would handle the transaction which had , and added our as we can see from the pix below which is committed to the table by rails. Created_at updated_at id id created updated article.save updated created id The command will show all the data that has been created in the database. Article.all This whole thing we did here can be done in just one line of command which is known as mass assignment instead of doing it one after the other as we just did above. To do this, create a new article variable as = ( : “This is my article for sure again”, : “This is my next description again”), command saves the information to the database. article Article.new title description article.save Rails method creates an article that directly gets to the database without the developer having to save after creating the article. create So shows all the articles that have been created so far. There are seven articles from our table here which we have in all including the one I have added from my previous work. So the one we just created started from article no 5 from our database. Article.all To Edit/Update An Article To or an article, type = . What this means is that you want to grab article number seven or anyone you want and then press enter. Type in and it will take the article number seven. So supposing we want to or the article or of the article, we can type either of it in either of this way: for either or : = “ ” and press enter and then type to save it. When you run the command , you will observe from the article no 7 that the has changed. edit update article Article.find(7) article edit update title description title description article.title I need to change this article title article.save Article.all id title So that’s how to or an article from the console and same can be done for the . edit update title description To Destroy An article We can as well follow the same method we followed while trying to an article to achieve the same thing when trying to destroy an article. For example: = , remember you can use any article you want. Follow the normal process as we had it in the steps but use command to remove the article from the article table. Run the command and see that the article has been removed from the article table. edit article Article.find(7) id edit article.destroy Article.all Article Validation To maintain data standard, we need to add some to our file so that we can be able to create a data that has a , some and other information like minimum and maximum length of characters. If not we will create data in the database without and . So from the information we have below, fill in your file with all the validation information as described. Based on your experience with Ruby On Rails, you can add more validations depending on what you want your application to do. validations article.rb title description title description article.rb So what this validation information will do is to make sure that your article and maintains the standard of what it has been assigned to do. Your article will not be more than 50 characters maximum while the minimum will not be less than 3 characters. So the same thing goes for the description. title description title Try creating an article without or and see the error message or try to use characters against what is required from the validation and see the result. title description But make sure to reload your console with the command Or the console and start all over. Check the error messages using the command and type this command next: and get to get the error message that will be given to you. reload! exit article.errors.any? article.errors.full_messages And so you are done! The is working. You have been able to , , and information in your database from the console in your Ruby On Rails application. validation create edit/update delete/destroy validate Finally, commit your work using the git command $ , $ “(your commit message)” and $ (name of your branch). Hope you found this article very helpful. Thanks for taking your time to read the article. git add . git commit –m git push origin – Full-Stack web developer student at – a remote software development school based in California. Kingsley McSimon Ogbonna Microverse You can check my , Connect with me on and follow me on Portfolio LinkedIn Twitter