paint-brush
Create a Podcast Player with React and AG Gridby@aggrid
184 reads

Create a Podcast Player with React and AG Grid

by AG GridDecember 4th, 2021
Read on Terminal Reader
Read this story w/o Javascript
tldt arrow

Too Long; Didn't Read

In this post we will iteratively create a simple Podcast listening app using React and AG Grid. The main GUI for the app will be AG Grid so you can see how simple it is to get a prototype application up and running, leaning on the React Data Grid to do much of the heavy lifting for us. Each increment allows us to expand on our knowledge of React and with one or two small code changes we can add a lot of value very quickly to the user. Along the way we will see some of the decision processes involved in designing the app, and learn about Controlled and Uncontrolled Components in React.

People Mentioned

Mention Thumbnail

Companies Mentioned

Mention Thumbnail
Mention Thumbnail
featured image - Create a Podcast Player with React and AG Grid
AG Grid HackerNoon profile picture


In this post we will create a simple Podcast listening app using React. The main GUI for the app will be AG Grid so you can see how simple it is to get a prototype application up and running, leaning on the React Data Grid to do much of the heavy lifting for us.


We'll build in small increments:


  • Create a basic Data Grid
  • Load and render an RSS Feed in the Grid
  • Add an Audio Control to Play the podcast using a custom cell renderer
  • Allow the user to add the Podcast URL
  • Adding Sorting, Filtering, including filtering on data not displayed on the grid.


Each increment allows us to expand on our knowledge of AG Grid and with one or two small code changes we can add a lot of value very quickly to the user. Along the way we will see some of the decision processes involved in designing the app, and learn about Controlled and Uncontrolled Components in React.


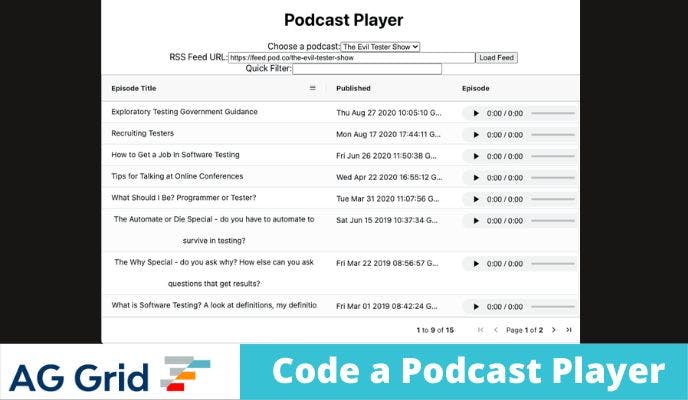
This is what we will be building:

How to Write a Podcast App Using React and AG Grid

Let's Create a Simple Podcast Listener in React with AG Grid

You can find the source code for this project at:


In the podcast-player folder.


The root of the podcast-player folder has the current version of the app, and you can run it with:


npm install
npm start


You do need to have node.js installed as a pre-requisite.


The project contains sub-folders for the different stages listed in this post e.g. folder 'v1' is the code for the 'Version 1' section. To run any of the intermediate versions, cd into the subfolder and run npm install followed by npm start.

Getting Started

I created the project using Create React App.


npx create-react-app podcast-player
cd podcast-player


This creates a bunch of extra files that I won't be using, but I tend not to delete any of these on the assumption that even if I am prototyping an application, I can go back later and add unit tests.


I'm going to use the community edition of AG Grid and the AG Grid React UI and add those to my project using npm install


npm install --save ag-grid-community ag-grid-react

These are the basic setup instructions that you can find on the AG Grid React Getting Started Page.

Version 1 - Create a Grid to Render Podcasts

The first iteration of my application is designed to de-risk the technology. I want to make sure that I can create a running application that displays a page to the user with a React Data Grid

containing the information I want to display.


Building in small increments means that I can identify any issues early and more easily because I haven't added a lot of code to my project. We'll start by creating all the scaffolding necessary to render a grid, ready to display a Podcast.


I have in mind a Data Grid that shows all the episodes in the grid with the:

  • Title
  • Date
  • Playable MP3

I will amend the App.js generated by create-react-app so that it renders a PodcastGrid, and we'll work on the PodcastGrid during through this tutorial.

Specify the React Data Grid Interface

The temptation at this point could be to directly use the AgGridReact component at my App level, but I want to create a simple re-usable component that cuts down on the configuration options available.


And this Data Grid is going to be special since it will take an rssfeed as a property. To keep things simple, I'm hardcoding the RSS feed.


import './App.css';
import {PodcastGrid} from './PodcastGrid';

function App() {
  return (
    <div className="App">
      <h1>Podcast Player</h1>
      <PodcastGrid
        rssfeed = "https://feeds.simplecast.com/tOjNXec5"
        height= "500px"
        width="100%"
      ></PodcastGrid>
    </div>
  );
}

export default App;


Because I'm using React, and passing in the feed URL as a property, the PodcastGrid will have the responsibility to load the RSS feed and populate the grid.


I'm also choosing to configure the height and width of the grid via properties.


This code obviously won't work since I haven't created the PodcastGrid component yet. But I've specified what I want the interface of the component to look and act like, so the next step is to implement it.

Create a React Data Grid Component

I will create a PodcastGrid.js file for our React Grid Component which will render podcasts.

Initially, this will just be boilerplate code necessary to compile and render a simple grid with test data.


While I know that my Grid will be created with a property for the RSS Feed, I'm going to ignore that technicality at the moment and render the Grid with hardcoded data because I don't want to have to code an RSS parser before I've even rendered a Grid on the screen. I'll start simple and incrementally build the application.


I'll start with the basic boilerplate for a React component, just so that everything compiles, and when I run npm start at the command line I can see a running application and implementation of the Grid.


The basic React boilerplate for a component is:

  • import React and useState, I usually import useEffect at the same time

  • import AgGridReact so that I can use AG Grid as my Data Grid

  • import some CSS styling for the grid


import React, {useEffect, useState} from 'react';
import {AgGridReact} from 'ag-grid-react';

import 'ag-grid-community/dist/styles/ag-grid.css';
import 'ag-grid-community/dist/styles/ag-theme-alpine.css';

export function PodcastGrid(props) {

return (
       <div className="ag-theme-alpine"
            style={{height: props.height, width: props.width}}>   
           <AgGridReact
                >
           </AgGridReact>
       </div>
    )
}


At this point, my Grid won't display anything, but it should be visible on the screen and I know that I have correctly added AG Grid into my React project.


If anything fails, I will check my React installation, and possibly work through the AG Grid React Getting Started Documentation or Tutorial Blog Post.

Rendering Data on the Grid

The next step of working iteratively for me is to create a grid that will render some data, using the columns that I specified earlier.

  • Title

  • Date

  • Playable MP3


I'm not going to name them like that though, I'm going to show the headings on the grid as:

  • Episode Title
  • Published
  • Episode


In AG Grid, I configure the columns using an array of Column Definition objects.


var columnDefs = [
    {
      headerName: 'Episode Title',
      field: 'title',
    },
    {
      headerName: 'Published',
      field: 'pubDate',
    },
    {
      headerName: 'Episode',
      field: 'mp3',
    }
  ];


And then add them to the Grid as properties.


<AgGridReact
    columnDefs ={columnDefs}
    >
</AgGridReact>


At this point, my Grid will now have headers, but will still say [loading...] because I haven't supplied the Grid with any data to show in the rows. I'll hard code some data for the rows and use useState to store the data.


const [rowData, setRowData] = useState([
                                {title: "my episode", 
                                pubDate: new Date(), 
                                mp3: "https://mypodcast/episode.mp3"}]);


My data uses the field names that I added in the columnDefs as the names of the properties in my rowData.


I've added pubDate as a Date object to make sure that AG Grid will render the date, the title is just a String and my mp3 is also just a String but it represents a Url.


I've created data in the format that I expect to receive it when I parse a podcast RSS feed. I'm making sure that my grid can handle the basic data formats that I want to work with as early as I can.


The next thing to do is to add the data into the grid, which I can do by adding a rowData property to the Grid.


<AgGridReact
    rowData={rowData}
    columnDefs ={columnDefs}
    >
</AgGridReact>


My Grid will now show the hardcoded rowData that I created, and use the column headers that I configured in the columnDefs. If anything went wrong at this point I'll double-check that my columnDefs were using the same field names as I created as properties in my rowData.


The benefit of doing this with hard-coded data is that when I dynamically load the data, should something go wrong, then I know it is related to the array of data dynamically generated, and not my Grid configuration.


The full version of PodcastGrid, after following these steps looks like the code below:


import React, {useEffect, useState} from 'react';
import {AgGridReact} from 'ag-grid-react';

import 'ag-grid-community/dist/styles/ag-grid.css';
import 'ag-grid-community/dist/styles/ag-theme-alpine.css';

export function PodcastGrid(props) {

    const [rowData, setRowData] = useState([
                                {title: "my episode", 
                                pubDate: new Date(), 
                                mp3: "https://mypodcast/episode.mp3"}]);

    var columnDefs = [
        {
          headerName: 'Episode Title',
          field: 'title',
        },
        {
          headerName: 'Published',
          field: 'pubDate',
        },
        {
          headerName: 'Episode',
          field: 'mp3',
        }
      ];

    return (
       <div className="ag-theme-alpine"
              style={{height: props.height, width: props.width}}>   
           <AgGridReact
                rowData={rowData}
                columnDefs ={columnDefs}
                >
           </AgGridReact>
       </div>
    )
}


The next step is to move from hard-coded data, to dynamically loading the data from an RSS Feed.

At this point our player is very simple:

How to Write a Podcast App Using React and AG Grid

Version 2 - Render an RSS feed in AG Grid

The next thing I want to do is load an RSS feed into the grid.

What is the Podcast RSS Format?

RSS is a standard format to specify syndication data e.g. for a blog, or a podcast. The RSS feed is an XML document. See https://validator.w3.org/feed/docs/rss2.html


This is a very flexible standard and has been adapted for use with Podcasts, e.g. Google has a page describing the RSS Podcast format https://support.google.com/podcast -publishers/answer/9889544


Apple also provides an RSS specification: https://podcasters.apple.com/support/823-podcast-requirements. We can open the RSS feed that we have been using in a browser and it will render the RSS for us - https://feeds.simplecast.com/tOjNXec5


This is the RSS feed for the WebRush podcast. A podcast covering real-world experiences using JavaScript and Modern Web Development. By looking at the podcast feed in the browser we can see that, to fill the Grid, we need to pull out all the <item> elements in the RSS feed, and then the <title>, pubDate and enclosure details:


<rss>
   <channel>
      <item>
         <title>my episode</title>
         <pubDate>Thu, 16 Sep 2021 10:00:00 +0000</pubDate>
         <enclosure 
             length="20495"
             type="audio/mpeg"
             url="https://mypodcast/episode.mp3" />
      </item>
   </channel>
</rss>   


The code snippet above removes most of the data from the RSS feed that we are not interested in to demonstrate the basic structure of a Podcast RSS feed. There are more fields in the data so it is worth reading the specification and looking at the raw feeds. Then you can see data that would be easy to add to the Grid when you experiment with the source code.

Parsing XML in the Browser with JavaScript

XML often seems painful to work with, and it might be more convenient to look for a JSON feed, but not every podcast offers a JSON feed. But XML parsing is built into most browsers, given that HTML is basically XML. We can use the DOMParser from the window object. You can read about the DOMParser in the MDN Web Docs. It provides a parseFromString method which will parse a String of XML or HTML and allow us to use normal querySelector operations to find the data.


e.g. if I create a DOMParser

const parser = new window.DOMParser();


I can parse an RSS feed, stored in a String called rssfeed.

const data = parser.parseFromString(rssfeed, 'text/xml'))


Then use normal DOM search methods to navigate the XML.

I could return all the item elements in the RSS feed with.

const itemList = data.querySelectorAll('item');


And from each of the items in the array, I could retrive the title data:

const aTitle = itemList[0].querySelector('title').innerHTML;


I'm using the innerHTML to get the value from the element.

And I can get an attribute using the normal getAttribute method.

const mp3Url = itemList[0].querySelector('enclosure').getAttribute('url');

We don't need a very sophisticated parsing approach to get the data from an RSS Podcast feed.

Fetching and Parsing RSS Feed Data

I will want to fetch the URL, and then parse it:

fetch(props.rssfeed)
        .then(response => response.text())
        .then(str => new window.DOMParser().
                parseFromString(str, 'text/xml'))


This would then return an object which I can apply querySelector to:


fetch(props.rssfeed)
        .then(response => response.text())
        .then(str => new window.DOMParser().
              parseFromString(str, 'text/xml'))
        .then(data => {            
            const itemList = data.querySelectorAll('item');
            ...


Because I'm using React, I'll wrap all of this in a useEffect method which would trigger when the rssfeed in the props changes.


useEffect(()=>{

  fetch(props.rssfeed)
    ...
},[props.rssfeed]);        


During the final then of the fetch I'll build up an array of objects which matches the test data used earlier and then setRowData to add the data to the Grid.


const itemList = data.querySelectorAll('item');

const items=[];
itemList.forEach(el => {
    items.push({
    pubDate: new Date(el.querySelector('pubDate').textContent),
    title: el.querySelector('title').innerHTML,
    mp3: el.querySelector('enclosure').getAttribute('url')
    });
});

setRowData(items)


That's the basic theory. Now to implement it.

Rendering RSS Feed in React Data Grid

So I'll remove my test data:

    const [rowData, setRowData] = useState([]);

The basic steps to loading an RSS Feed into AG Grid are:

  • load from an RSS feed,

  • parse the feed using DOMParser

  • find all the item elements and store in an array of itemList

  • iterate over the list to extract the title, pubDate, and mp3 url

  • then add all the data into an array called items

  • which I use to setRowData


As you can see below:


    useEffect(()=>{

      fetch(props.rssfeed)
        .then(response => response.text())
        .then(str => new window.DOMParser().parseFromString(str, 'text/xml'))
        .then(data => {            
            const itemList = data.querySelectorAll('item');

            const items=[];
            itemList.forEach(el => {
                items.push({
                pubDate: new Date(el.querySelector('pubDate').textContent),
                title: el.querySelector('title').innerHTML,
                mp3: el.querySelector('enclosure').getAttribute('url')
                });
            });

            setRowData(items)
        });

    },[props.rssfeed]);


This would actually be enough to load the planned data into the Grid.

Formatting the Grid

And when I do I can see that it would be useful to format the grid columns.


The Episode Title can be quite long so I want to make the text wrap, and format the cell height to allow all of the title to render. I can configure this with some additional column definition properties.


wrapText: true,
autoHeight: true,


I also want the column to be resizable to give the user the option to control the rendering. Again this is a boolean property on the column definition.


resizable: true,


I think it would be useful to allow the user to sort the grid to find the most recent podcast. I can implement this using a property on the pubDate column.

sortable: true,


And then to control the column sizes, relative to each other, I will use the flex property to make both the title and mp3 twice the size of the date

flex: 2,


The full column definitions are below to enable, sizing, resizing and sorting.

var columnDefs = [
    {
      headerName: 'Episode Title',
      field: 'title',
      wrapText: true,
      autoHeight: true,
      flex: 2,
      resizable: true,
    },
    {
      headerName: 'Published',
      field: 'pubDate',
      sortable: true,
    },
    {
      headerName: 'Episode',
      field: 'mp3',
      flex: 2,
    }
  ];


At this point I can't play podcasts, I've actually built a very simple RSS Reader which allows sorting by published episode data.


Here's the code for version 2 in PodcastGrid.js :

import React, {useEffect, useState} from 'react';
import {AgGridReact} from 'ag-grid-react';

import 'ag-grid-community/dist/styles/ag-grid.css';
import 'ag-grid-community/dist/styles/ag-theme-alpine.css';

export function PodcastGrid(props) {

    const [rowData, setRowData] = useState([]);

    useEffect(()=>{

      fetch(props.rssfeed)
                .then(response => response.text())
                .then(str => new window.DOMParser().parseFromString(str, 'text/xml'))
                .then(data => {            
                    const itemList = data.querySelectorAll('item');
            
                    const items=[];
                    itemList.forEach(el => {
                        items.push({
                        pubDate: new Date(el.querySelector('pubDate').textContent),
                        title: el.querySelector('title').innerHTML,
                        mp3: el.querySelector('enclosure').getAttribute('url')
                        });
                    });

                    setRowData(items)
                });

    },[props.rssfeed]);

    var columnDefs = [
        {
          headerName: 'Episode Title',
          field: 'title',
          wrapText: true,
          autoHeight: true,
          flex: 2,
          resizable: true,
        },
        {
          headerName: 'Published',
          field: 'pubDate',
          sortable: true,
        },
        {
          headerName: 'Episode',
          field: 'mp3',
          flex: 2,
        }
      ];

    return (
       <div className="ag-theme-alpine"
            style={{height: props.height, width: props.width}}>   
           <AgGridReact
                rowData={rowData}
                columnDefs ={columnDefs}
                >
           </AgGridReact>
       </div>
    )
};


The next step is to support playing the podcast.

version 2 code

live deployed version 2


We are now displaying the RSS details

How to Write a Podcast App Using React and AG Grid

Version 3 - Play The Podcast

For Version 3, to allow people to play the podcast audio, I'm going to do this as simply as possible and create a custom cell renderer for the mp3 field.

AG Grid allows us to use full React Components to render cells, but rather than starting there, I will start by adding an inline cellRenderer to the mp3 field.

A cellRenderer allows us to create custom HTML that will render in the cell.

So instead of showing the URL text, I will display an HTML5 audio element.

e.g.

<audio controls preload="none">
   <source src="https://mypodcast/episode.mp3" type="audio/mpeg" />
</audio>


The simplest way to implement this is to use a cellRenderer directly in the column definition, and I will provide a little styling to adjust the height and vertical positioning.


cellRenderer: ((params)=>`
      <audio controls preload="none"
          style="height:2em; vertical-align: middle;">
          <source src=${params.value} type="audio/mpeg" />
      </audio>`)


And I add this cellRenderer to the mp3 column definition.

{
    headerName: 'Episode',
    field: 'mp3',
    flex: 2,
    autoHeight: true,
    cellRenderer: ((params)=>`
          <audio controls preload="none"
              style="height:2em; vertical-align: middle;">
              <source src=${params.value} type="audio/mpeg" />
          </audio>`)
}


Making the grid now a functional Podcast player.


After adding the audio player:

How to Write a Podcast App Using React and AG Grid

Version 4 - Customising the RSS Feed

The RSS Feed is still hardcoded, so the next step is to allow the feed URL to be customized.


Once again, I'll do the simplest thing that will work so I'll add a text field with a default value in the App.js.


My first step is to 'reactify' the App and have the RSS URL stored as state. I'll add the necessary React imports:

import React, {useState} from 'react';


Then set the state to our hardcoded default.

const [rssFeed, setRssFeed] = useState("https://feeds.simplecast.com/tOjNXec5");


And use the rssFeed state in the JSX to setup the property for the PodcastGrid:

<PodcastGrid
    rssfeed = {rssFeed}


Giving me an App.js that looks like this:


import './App.css';
import React, {useState} from 'react';
import {PodcastGrid} from './PodcastGrid';

function App() {

  const [rssFeed, setRssFeed] = useState("https://feeds.simplecast.com/tOjNXec5");

  return (
    <div className="App">
      <h1>Podcast Player</h1>
      <PodcastGrid
        rssfeed = {rssFeed}
        height= "500px"
        width="100%"
      ></PodcastGrid>
    </div>
  );
}

export default App;


The simplest way I can think of to make this configurable is to add an input field, with a button to trigger loading the feed.

<div>
    <label htmlFor="rssFeedUrl">RSS Feed URL:</label>
    <input type="text" id="rssFeedUrl" name="rssFeedUrl"
        style="width:'80%'" defaultValue={rssFeed}/>
    <button onClick={handleLoadFeedClick}>Load Feed</button>
</div>


Note that I'm using defaultValue in the JSX so that once the value has been set by React, the DOM is then allowed to manage it from then on. If I had used value then I would have to take control over the change events. By using defaultValue I'm doing the simplest thing that will work to add the basic feature.


Also, when working with JSX I have to use htmlFor instead of for in the label element.


And to handle the button click:

const handleLoadFeedClick = ()=>{
    const inputRssFeed = document.getElementById("rssFeedUrl").value;
    setRssFeed(inputRssFeed);
}

Now I have the ability to:

  • Type in a Podcast RSS Feed URL

  • Click a button

  • Load the feed into a React Data Grid

  • Play the podcast episode

  • Sort the feed to order the episodes


For your reference:

Now with the ability to add a URL:

How to Write a Podcast App Using React and AG Grid

Testing Library App.test.js

One thing to do at this point is to amend the App.test.js class. A full introduction to the React Testing Library is beyond the scope of this tutorial, but we can keep the default test created by create-react-app working.


By default the create-react-app creates a single test for the App.js component. This is in the App.test.js file. Having changed App.js if we run npm test we will be told that our project is failing to pass its test.


This is because the default test checks the header displayed on the screen.


import { render, screen } from '@testing-library/react';
import App from './App';

test('renders learn react link', () => {
  render(<App />);
  const linkElement = screen.getByText(/learn react/i);
  expect(linkElement).toBeInTheDocument();
});


The default test, shown above:

  • Is called renders learn react link.
  • Renders the App component.
  • Gets the element on the screen which contains the text "learn react".
  • Asserts that the element (linkElement) is present, and if not, fails the test.


Because I changed the output from the App.js, and even though I'm not doing TDD, I can still amend the test to keep the project build working.


I amended the test to be:

test('renders the app', () => {
  render(<App />);
  const headerElement = screen.getByText(/Podcast Player/i);
  expect(headerElement).toBeInTheDocument();
});


This finds the header title and asserts that it is in the document. Admittedly it isn't much of a test, but it keeps the tests running until we are ready to expand them out to cover the application behavior.

CORS

This RSS reader will not work with all Podcast feeds. Cross-Origin Resource Sharing (CORS) has to be configured to allow other sites to fetch the data from a browser. Some Podcasts may be on hosting services that do not allow browser-based JavaScript to access the feed.


If a feed does not load, then have a look in your browser console and if you see a message like blocked by CORS policy: No 'Access-Control-Allow-Origin' header is present on the requested resource. then you know that the site has not been configured to allow websites to pull the RSS feed.


Most Podcast feed based applications are not browser based so they don't encounter this limitation. I've listed a few of our favorite JavaScript and technical podcast feeds below, so if you want to experiment with the Podcast player application, you don't have to hunt out a bunch of feed URLs.


Version 5 - Searching and Filtering

Having used the app, I realized that I really wanted some sort of searching and filtering functionality to find episodes on a specific topic. The easiest way to add that quickly is to add a 'filter' to the columns.

Filter on Title

The title is a String so I can use an in-built AG Grid filter to allow me to text search and filter the data in the title column. The built-in text filter is called agTextColumnFilter and I add it to the column definition as a property:

filter: `agGridTextFilter`


The title column definition now looks as follows:

var columnDefs = [
    {
      headerName: 'Episode Title',
      field: 'title',
      wrapText: true,
      autoHeight: true,
      flex: 2,
      resizable: true,
      filter: `agGridTextFilter`
    },


This provides me with an out-of-the-box searching and filtering capability for the data in the title.

Filter on Date

Since it is no extra work for me, I'm going to add a filter to date. There is an inbuilt Date filter in AG Grid, the agDateColumnFilter which I can add as a property to the pubDate column.


{
  headerName: 'Published',
  field: 'pubDate',
  sortable: true,
  filter: 'agDateColumnFilter'
},


With this property added, the user now has the ability to search for podcasts for date ranges.

Text Filter on Description

The titles of podcasts don't contain as much information as the description. It would be useful to allow searching through the description as well.

The easiest way to add that would be to create a description column and then allow filtering on the column.

I iterated through a few experiments before finding one approach I liked.

  • Display the full description from the RSS feed
  • Use cellRenderer to display description HTML in the cell
  • Strip HTML tags from RSS feed data
  • Show a subset of data using a valueFormatter
  • Use a Quick Filter

Display the full description from the RSS feed

I added an additional parsing query in the rss fetch to create a description property.

description: el.querySelector('description')
             .textContent


And then added a Description column to my Data Grid. While that worked, the problem is that the description can often be rather large and has embedded HTML formatting.

{
  headerName: 'Description',
  field: 'description',
  wrapText: true,
  autoHeight: true,
  flex: 2,
  resizable: true,
  filter: `agGridTextFilter`
},

The resulting Grid wasn't very aesthetic.

Use cellRenderer to display HTML in the cell

Since the data that is retrieved in the description is HTML, I could render the HTML directly in the table by creating a cellRenderer. By default, the cell shows the data values as text. The output from a cellRenderer is rendered as HTML.


Adding a cellRenderer property causes the cell to render the supplied HTML, but this was often too large and had embedded images.

cellRenderer: ((params)=>params.value)

Strip HTML tags from RSS feed data

My next thought was to strip all the HTML tags out of the description and render the raw text.

I could do that by removing the cellRenderer and adding a regex when parsing the description field.

descriptionTxt: el.querySelector('description')
                .textContent.replace(/(<([^>]+)>)/gi, ''),


This was the best option so far, but still showed too much text in the cell.

Show a subset of data using a valueFormatter

The filter for the columns operates on the rowData, not the displayed data, so I could still use a column filter and simply cut down on the data displayed to the user. I could do that by using a valueFormatter rather than a cellRenderer.


A valueFormatter amends the value and returns it as a String to display on the grid. The cellRenderer returns HTML. By showing only a trimmed version of the description, the cell in the Data Grid does not get too large but still gives me the ability to filter on the complete text.


valueFormatter: params => params.data.description.length>125 ?
                     params.data.description.substr(0,125) + "..." :
                     params.data.description


This would give me a description column definition of:

{
  headerName: 'Description',
  field: 'description',
  wrapText: true,
  autoHeight: true,
  flex: 2,
  resizable: true,
  filter: `agGridTextFilter`,
  valueFormatter: params => params.data.description.length>125 ?
                         params.data.description.substr(0,125) + "..." :
                         params.data.description
},

Use a QuickFilter

A quick filter is a filtering mechanism that matches any of the data in the Data Grid's row data. e.g. using api.setQuickFilter("testing"); would match any row with "testing" in the title or description field. The data does not even have to be rendered to the Data Grid itself, it just has to be present in the data. So I could remove the description column and just add an input field to search the contents. That would make the whole grid simpler and the user experience cleaner.


I'll start by removing the description from the columnDefs, but keeping the description data in the rowData, and I'll use the version with the HTML tags stripped because we are using a text search.

description: el
    .querySelector('description')
    .textContent.replace(/(<([^>]+)>)/gi, ''),
});

#App.js changes for QuickFilter

I first need to make changes to the App.js to add a 'search' input box.

<div>
    <label htmlFor="quickfilter">Quick Filter:</label>
    <input type="text" id="quickfilter" name="quickfilter"
           value={quickFilter} onChange={handleFilterChange}/>        
</div>


I then need to create the state for quickFilter and write a handleFilterChange function that will store the state when we change it in the input field.


const [quickFilter, setQuickFilter] = useState("");


And then write the handleFilterChange function.

const handleFilterChange = (event)=>{
    setQuickFilter(event.target.value);
}


The next step is to pass the quick filter text to the PodcastGrid as a new property.

<PodcastGrid
    rssfeed = {rssFeed}
    height= "800px"
    width="100%"     
    quickFilter = {quickFilter}   
></PodcastGrid>
Use QuickFilter API in React Data Grid

The PodcastGrid component has not yet needed to use the AG Grid API, everything has been achieved through properties on the Grid or the Column Definitions. To be able to access the API I need too hook into the Data Grid's onGridReady event, and store the API access as state.


I'll create the state variable first:

const [gridApi, setGridApi] = useState();


Then amend the Grid declartion to hook into the onGridReady callback.

<AgGridReact
    onGridReady={onGridReady}
    rowData={rowData}
    columnDefs ={columnDefs}
    >
</AgGridReact>


The onGridReady handler will store a reference to the Grid API:

const onGridReady = (params) => {
  setGridApi(params.api);
}


Finally, to use the props variable quickFilter that has been passed in:

useEffect(()=>{
  if(gridApi){
    gridApi.setQuickFilter(props.quickFilter);
  }
}, [gridApi, props.quickFilter])


And add the description data, to the grid as a hidden column:

{
    field: 'description',
    hide: true
},


When the gridApi has been set, and the property quickFilter changes, we will call the setQuickFilter method on the API to filter the Grid. This provides a very dynamic and clean way of identifying podcasts that include certain words in the description.


Find online:


Ability to search and filter podcasts:

How to Write a Podcast App Using React and AG Grid

Version 6 - Pagination

After using the app I realized that with so many podcast episodes in a feed, having all of the episodes in a single table was useful but I would have preferred the ability to page through them, and I'd like to see a count of all of the podcast episodes that are available in the feed.


Fortunately, we can get all of that functionality from a single AG Grid property.

The property applies to the Grid. I can add it in the Grid declaration:

<AgGridReact
    onGridReady={onGridReady}
    rowData={rowData}
    columnDefs ={columnDefs}
    pagination={true}
    >
</AgGridReact>


This immediately shows me the count of podcast episodes available and makes navigating through the list easier. I also want to take advantage of another feature of the AG Grid pagination and set the page size, the default page size is 100, and 10 seems better for this app:

paginationPageSize={10}


Or I could allow the Grid to choose the best page size for the data and the size of the grid:

paginationAutoPageSize={true}


Again, I've only added a few extra properties to the Data Grid, but have immediately made the application more usable, with the minimal development effort.

Find online:


Pagination added:

How to Write a Podcast App Using React and AG Grid

Version 7 - Podcast List

I think it would be useful to create a list of podcasts that I listen to, so I don't have to type in the URL each time. Initially, this will be a hard-coded list, but longer-term it would add more benefit to the user if the list was persisted in some way, either in Local Storage or some online mechanism. But since this tutorial is about getting as much value out to the user with as little coding effort as we can, I'll start with a dropdown. My initial thought is to create a drop-down and then set the RSS Feed input with the value:


<div>
  <label htmlFor="podcasts">Choose a podcast:</label>
  <select name="podcasts" id="podcasts" onchange={handleChooseAPodcast}>
    <option value="https://feeds.simplecast.com/tOjNXec5">WebRush</option>
    <option value="https://feed.pod.co/the-evil-tester-show">The Evil Tester Show</option>  
  </select>
</div>


To do that I will need to change my app from using an uncontrolled component, to a controlled component.

Editing Input Field Value with React

The current implementation for the RSS Feed input is uncontrolled:

  • Once loaded the state of the input field is managed by the browser through normal user interaction
  • The value in the input field is set using defaultValue. This is only available to programmatic control during initial setup.
  • We want the drop down selection to change the value of the input field
  • To do that, we need to write the event handlers to manage the input field state.


I'll create a state for inputFeedUrl to distinguish it from the rssFeed which is set when the user clicks the Load Feed button.

const [inputFeedUrl, setInputFeedUrl] = 
        useState("https://feeds.simplecast.com/tOjNXec5");


Then change the text input to a controlled component by setting the value with the state, rather than the defaultValue.

<input type="text" id="rssFeedUrl" name="rssFeedUrl" style={{width:"80%"}} 
        value={inputFeedUrl}/>


The input field is now a controlled component and is read only because we haven't added any onChange handling.

<input type="text" id="rssFeedUrl" name="rssFeedUrl" style={{width:"80%"}} 
        value={inputFeedUrl}
        onChange={(event)=>setInputFeedUrl(event.target.value)}/>


The drop-down for Choose a podcast can now use the state handler to set the inputFeedUrl.

<select name="podcasts" id="podcasts" 
      onChange={(event)=>setInputFeedUrl(event.target.value)}>


Now we have an input field controlled with React to allow the user to input an RSS Url, and which we can change the value of from a drop-down of hardcoded feed URLs.

Loading a Select element option from an Array

It will be easier to maintain the drop-down if the values were taken from an array. This would also open up the application to amending the URLs more easily at run time.

const [feedUrls, setFeedUrls] = useState(
  [
    {name: "WebRush", url:"https://feeds.simplecast.com/tOjNXec5"},
    {name: "The Evil Tester Show", url:"https://feed.pod.co/the-evil-tester-show"},
  ]
);


Because JSX supports arrays we can directly convert this feedUrls array into a set of option elements.

{feedUrls.map((feed) =>
  <option value={feed.url} key={feed.url}>
    {feed.name}</option>)}


I add a key property because when creating JSX components from an array, React uses the key property to help determine which parts of the HTML need to be re-rendered. The final thing to do is to set the selected value in the options based on the inputFeedUrl.


If I was using JavaScript directly then I would set the selected attribute on the option.

{feedUrls.map((feed) =>
  <option value={feed.url} key={feed.url}
    selected={feed.url===inputFeedUrl}
  >{feed.name}</option>)}


With React and JSX, to set the selected value for a select we set the value of the select element.

<select name="podcasts" id="podcasts" value={inputFeedUrl}
      onChange={(event)=>setInputFeedUrl(event.target.value)}>


The full JSX for the podcast drop down looks like this:

<div>
  <label htmlFor="podcasts">Choose a podcast:</label>
  <select name="podcasts" id="podcasts" value={inputFeedUrl}
        onChange={(event)=>setInputFeedUrl(event.target.value)}>
        {feedUrls.map((feed) =>
          <option value={feed.url} key={feed.url}
          >{feed.name}</option>)}
  </select>
</div>


Now it is easier to build up a list of recommended podcasts, which we know have feeds that are CORS compatible:


I do recommend some other excellent podcasts but they I couldn't find a CORS compatible RSS feed e.g. JavaScript Jabber


My final App.js looks like the following

import './App.css';
import React, {useState} from 'react';
import {PodcastGrid} from './PodcastGrid';

function App() {

  const [inputFeedUrl, setInputFeedUrl] = useState("https://feeds.simplecast.com/tOjNXec5");
  const [rssFeed, setRssFeed] = useState("");
  const [quickFilter, setQuickFilter] = useState("");
  const [feedUrls, setFeedUrls] = useState(
            [
              {name: "WebRush", url:"https://feeds.simplecast.com/tOjNXec5"},
              {name: "The Evil Tester Show", url:"https://feed.pod.co/the-evil-tester-show"},
              {name: "The Change log", url:"https://changelog.com/podcast/feed"},
              {name: "JS Party", url: "https://changelog.com/jsparty/feed"},
              {name: "Founders Talk", url:"https://changelog.com/founderstalk/feed"}
            ]
  );

  const handleLoadFeedClick = ()=>{
    const inputRssFeed = document.getElementById("rssFeedUrl").value;
    setRssFeed(inputRssFeed);
  }

  const handleFilterChange = (event)=>{
    setQuickFilter(event.target.value);
  }

  return (
    <div className="App">
      <h1>Podcast Player</h1>
      <div>
        <label htmlFor="podcasts">Choose a podcast:</label>
        <select name="podcasts" id="podcasts" 
              onChange={(event)=>setInputFeedUrl(event.target.value)}>
              {feedUrls.map((feed) =>
                <option value={feed.url}
                  selected={feed.url===inputFeedUrl}
                >{feed.name}</option>)}
        </select>
      </div>
      <div>
        <label htmlFor="rssFeedUrl">RSS Feed URL:</label>
        <input type="text" id="rssFeedUrl" name="rssFeedUrl" style={{width:"50%"}} 
                value={inputFeedUrl}
                onChange={(event)=>setInputFeedUrl(event.target.value)}/>
        <button onClick={handleLoadFeedClick}>Load Feed</button>
      </div>
      <div>
      <label htmlFor="quickfilter">Quick Filter:</label>
        <input type="text" id="quickfilter" name="quickfilter" style={{width:"30%"}} value={quickFilter}
              onChange={handleFilterChange}/>        
      </div>
      <div>
        <PodcastGrid rssfeed = {rssFeed}
                     height="500px" width="100%"     
                     quickFilter = {quickFilter}   
      ></PodcastGrid>
      </div>
    </div>
  );
}

export default App;

Find online:


With a list of podcasts:

How to Write a Podcast App Using React and AG Grid

Summary

Obviously, there is a lot more that we can improve, but so long as you type in the correct URL, and the URL feed supports CORS access from other sites then, this is a very simple podcast reader. We saw that AG Grid made it very easy to experiment with different ways of filtering and interacting with the data, and I was able to explore alternatives with minimal development time.


Most of the functionality I was adding to the application was via out-of-box Data Grid features configured through properties. When we did need slightly more interactive functionality, the API was easy to get hold of.


What we learned:

  • Incremental development using AG Grid.
  • Using fetch to populate an AG Grid.
  • Using AG Grid in React.
  • Adding a cell renderer in the column definitions.
  • Parsing RSS and XML using DOMParser.
  • Impact of Cross-Origin Resource Sharing (CORS) from JavaScript.
  • Some top podcasts to listen to.
  • Filtering column data.
  • Using the AG Grid API in react.
  • quickFilter operates on all rowData, not just the displayed data.
  • Adding pagination and row count to a Data Grid.


To learn more about AG Grid and the React UI. You can find all the source code on Github:

  • code

    • The player was built iteratively and you can try each version:


Since this article is quite long, we created two videos walking through the process:


https://www.youtube.com/watch?v=2TDIWOubvp0

https://www.youtube.com/watch?v=rsamoG6bD4Y