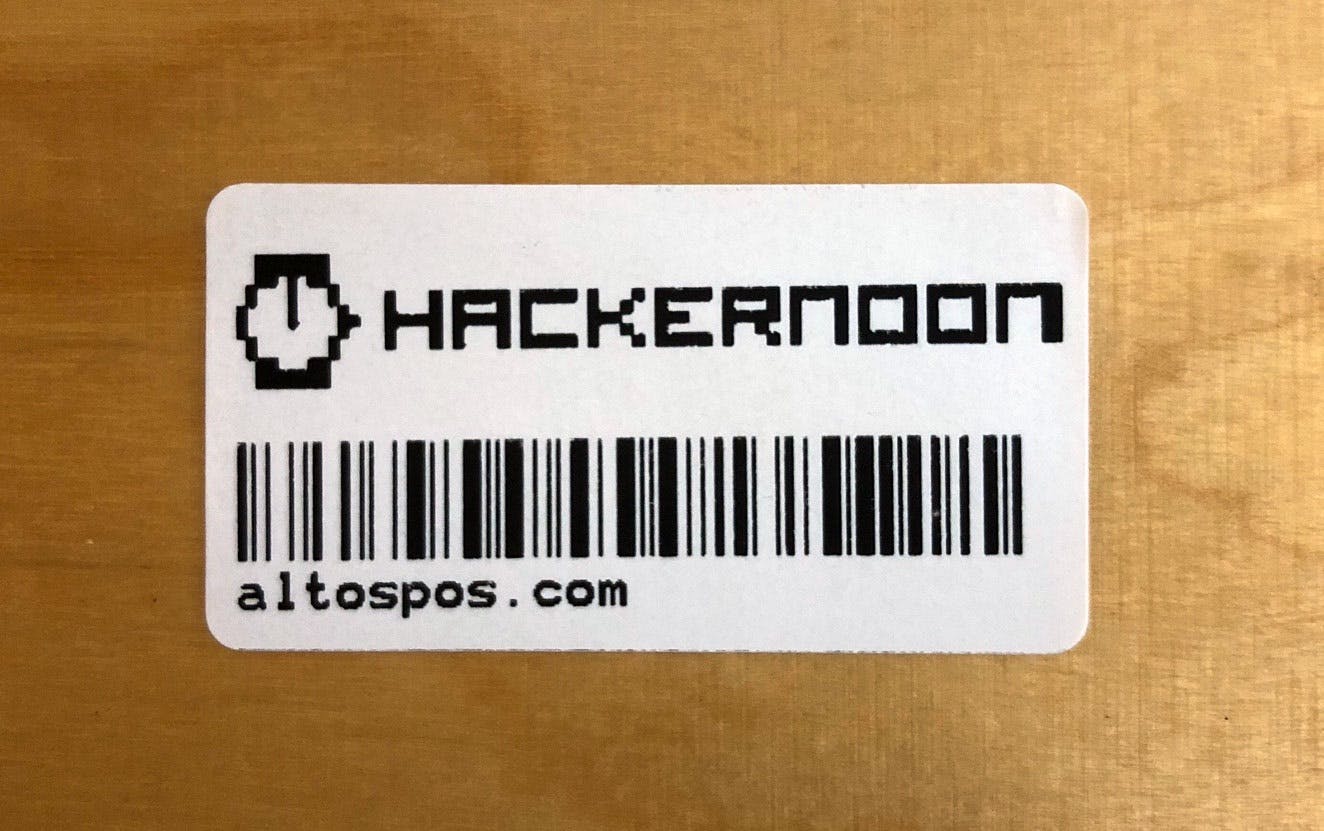
We can build labels using TSPL commands like , , and . You can first to learn more about printing labels using TSPL commands. Today we are going to overview only one command ( ) to understand how to print labels with images. TEXT BARCODE BITMAP read the previous article BITMAP We can add an image to the label with the command : BITMAP BITMAP X,Y,width,height,mode,data Parameter Description x, y x and y-coordinate width Image width (in bytes) height Image height (in dots) mode 0: OVERWRITE 1: OR 2: XOR data Bitmap data In short, if we want to add an image to the label we need to set the coordinates of the image set the size of the image and set the bitmap data which is basically a set of data that says which dot should be empty and which dot should be painted. Let’s say we want to print a simple arrow with the size of 16x16 dots: For every dot, we have only two options: “painted“ or “not painted“. So we can mark every dot as “one“-not painted or “zero“-painted like this: As we can see, a single bit can hold information about a dot. One byte is equivalent to eight bits, so we need to convert every eight dots into a byte. The converted data of our image looks like this: y-axis ---- 1.byte ---------- 2.byte ---------- Result ---- 1 2 3 4 5 6 7 8 9 10 11 12 13 14 15 16 00000000 00000000 00000000 00000111 00000011 00010001 00011000 00011100 00011110 00011111 00011111 00011111 00011111 00011111 00011111 00011111 00000000 00000000 00000000 11111111 11111111 11111111 11111111 01111111 00111111 00011111 10001111 11000111 11100011 11110111 11111111 11111111 0, 0, 0, 0, 0, 0, 7, 255, 3, 255, 17, 255, 24, 255, 28, 127, 30, 63, 31, 31, 31, 143, 31, 199, 31, 227, 31, 247, 31, 255, 31, 255 The width must be given in bytes, in our case, it is two bytes. Height is a number of dots on the y-axis, in our case, it is 16 dots. And our bitmap data is [0, 0, 0, 0, 0, 0, 7, 255, 3, 255, 17…]. Now according to these data, we can build the command: BITMAP 0,0,2,16,0,”bitmap data” Creating a label with our image using JavaScript: Buffer.concat([ Buffer.from('SIZE 48 mm,25 mm\r\n'), Buffer.from('CLS\r\n'), Buffer.from(`BITMAP 10,10,2,16,0,`), Buffer.from([0, 0, 0, 0, 0, 0, 7, 255, 3, 255, 17 ...]), Buffer.from('PRINT 1\r\n'), Buffer.from('END\r\n'), ]); Printing with JavaScript (Node.js) Generated commands can be sent to the printer over Serial or Bluetooth. To demonstrate how to print an image, I created a simple code using Node.js. I used the ‘ ’ package to connect and send the commands (On Windows, you may need to install a driver, ). usb to learn more visit the package’s page I also used the ‘ ‘ package to read the color of every pixel of the image. I used a simple condition like if the pixel is not transparent then it must be painted. But you may need to check the color and alpha value to determine if the pixel is visible enough to be painted. jimp const usb = require('usb'); const Jimp = require('jimp'); function getImageData(path, cb) { Jimp.read(path, (err, img) => { const widthInBytes = Math.ceil(img.getWidth() / 8); const data = new Array(img.getHeight()); for (let y = 0; y < img.getHeight(); y++) { const row = new Array(widthInBytes); for (let b = 0; b < widthInBytes; b++) { let byte = 0; let mask = 128; for (let x = b*8; x < (b+1)*8; x++) { const color = Jimp.intToRGBA(img.getPixelColor(x, y)); if (color.a < 65) byte = byte ^ mask; // empty dot (1) mask = mask >> 1; } row[b] = byte; } data[y] = row; } cb(data); }); } function print(buffer) { // you can get all available devices with usb.getDeviceList() let device = usb.findByIds(/*vid*/8137, /*pid*/8214); device.open(); device.interfaces[0].claim(); const outEndpoint = device.interfaces[0].endpoints.find(e => e.direction === 'out'); outEndpoint.transferType = 2; outEndpoint.transfer(buffer, (err) => { device.close(); }); } getImageData('hn-logo.png', (data) => { const widthInBytes = data[0].length; const heightInDots = data.length; const buffer = Buffer.concat([ Buffer.from('SIZE 48 mm,25 mm\r\n'), Buffer.from('CLS\r\n'), Buffer.from(`BITMAP 10,20,${widthInBytes},${heightInDots},0,`), Buffer.from(data.flat()), Buffer.from('BARCODE 10,100,"128",50,1,0,2,2,"altospos.com"\r\n'), Buffer.from('PRINT 1\r\n'), Buffer.from('END\r\n'), ]); print(buffer); }); And the result: I had to gather information piece by piece when I implement the printing labels feature on project. So I wrote this and the in hope that it will be the starting point for someone in a similar situation. Alto's POS & Inventory previous article You can find the code . here No War! ✋🏽