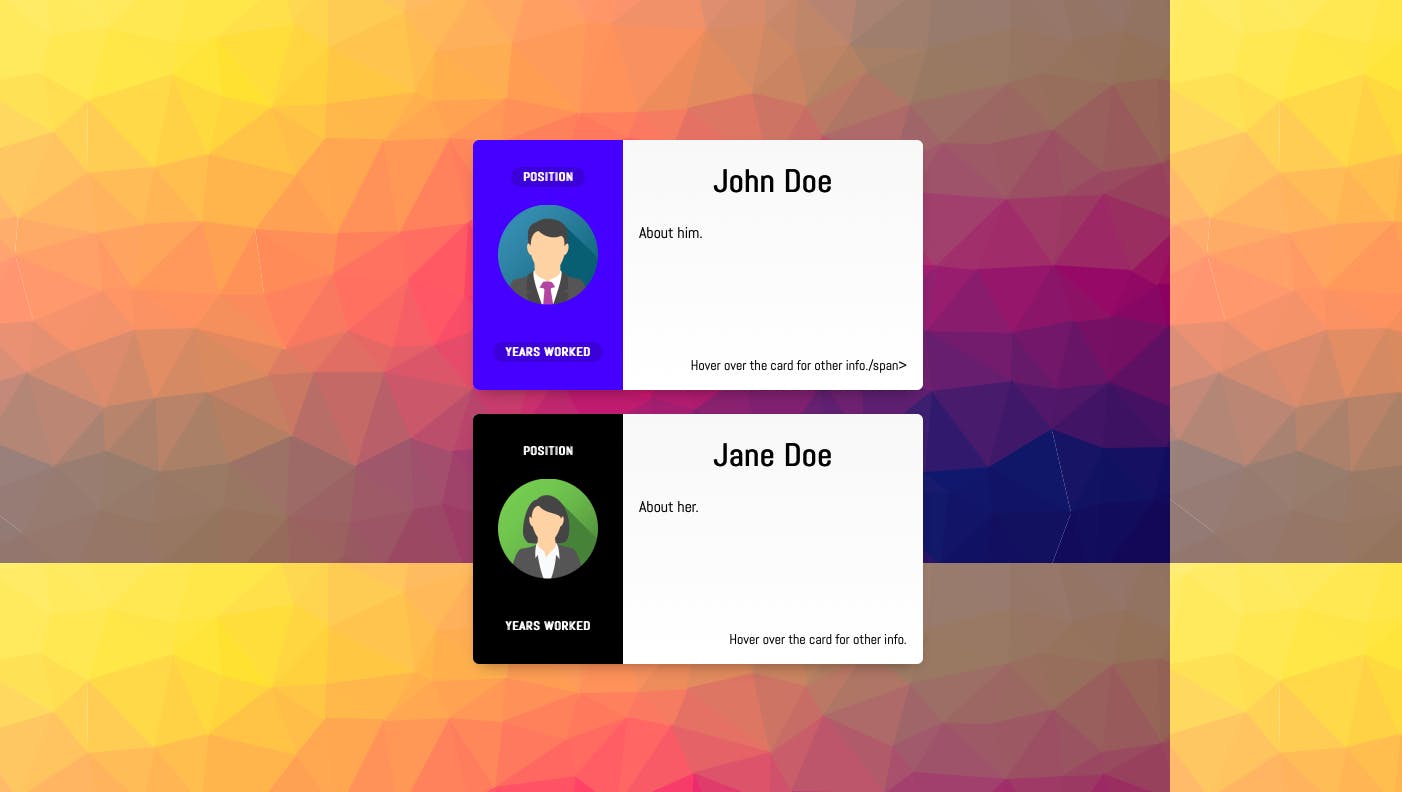
Let’s make a cool looking card intro website of our own, using CSS and HTML. Have you ever thought of making a for yourself that summarises your experiences in brief? simple, clean, cool and short website Have you ever tried making simple yet that is stunningly professional looking too? impressive website If yes, you’re at the right page. Here we will make a simple and website for ourselves that will not take much code too. cool looking Let’s to make the website, by the . kick off our inspiration result itself Here is how it looks, when complete. Don’t want to go to a new link? Well, you might miss , but still, here is the image. something amazing Looks cool enough? , you’d find them when you visit the link itself. It has animations too You can add your image, your professional details and this will serve as your animated, creative website of your own, for other people. Want to build this for yourself? The code is simple and elegant and is not very complex either. . So, let’s dive into some code First off, let’s make an , which holds the information we want to store in a meticulous way. HTML file Open your . Make a simple html file, and add the following basic code in it. VSC or Sublime text or any other text editor of your choice **index.html** <html><head><title>Your Name</title><link rel="stylesheet" href="index.css" /></head><body> </body></html> Now let’s add some in it. working code Add the . You can also you want to add in the card here. following code here to make a simple card in html edit the details <div class="center"> <div class="card"><div class="additional"><div class="user-card"><div class="level center">Position</div><div class="points center">Years worked</div><img src="img_avatar.png" alt="Avatar"></div><div class="more-info"><h1>John Doe</h1><div class="coords"><span>Software Engineer</span><span>Joined: 2007</span></div><div class="coords"><span>Front End Developer</span><span>Planet Earth</span></div><div class="stats"><div><div class="title">Awards</div><div class="value">2019</div></div><div><div class="title">Projects Number</div><div class="value">2019</div></div><div><div class="title">Years</div><div class="value">2019</div></div></div></div></div><div class="general"><h1>John Doe</h1><p>About him.</p><span class="more">Hover over the card for other info./span></div></div> The above code should be inside the tags, as you might know. **<body> </body>** Now let’s design the cards, with animations and colours. Of course, into your project 😄. Welcome CSS Make another file with name to add the css code for the file, we made above. **index.css** **index.html** Now, let’s add the CSS code to design the card. It’s simple too. Just add the following code to design your card. url(' ); @import https://fonts.googleapis.com/css?family=Abel' html, body {background: grey;font-family: Abel, Arial, Verdana, sans-serif;} .center {position: absolute;top: 50%;left: 50%;-webkit-transform: translate(-50%, -50%);} .card {width: 450px;height: 250px;background-color: blue;background: linear-gradient(#f8f8f8, #fff);box-shadow: 0 8px 16px -8px rgba(0,0,0,0.4);border-radius: 6px;overflow: hidden;position: relative;margin: 1.5rem;} .card h1 {text-align: center;} .card .additional {position: absolute;width: 150px;height: 100%;background: blue;transition: width 0.4s;overflow: hidden;z-index: 2;} .card.black .additional {background: black;} .card:hover .additional {width: 100%;border-radius: 0 5px 5px 0;} .card .additional .user-card {width: 150px;height: 100%;position: relative;float: left;} .card .additional .user-card::after {content: "";display: block;position: absolute;top: 10%;right: -2px;height: 80%;border-left: 2px solid rgba(0,0,0,0.025);*/} .card .additional .user-card .level,.card .additional .user-card .points {top: 15%;color: #fff;text-transform: uppercase;font-size: 0.75em;font-weight: bold;background: rgba(0,0,0,0.15);padding: 0.125rem 0.75rem;border-radius: 100px;white-space: nowrap;} .card .additional .user-card .points {top: 85%;} .card .additional .user-card svg {top: 50%;} .card .additional .more-info {width: 300px;float: left;position: absolute;left: 150px;height: 100%;} .card .additional .more-info h1 {color: white;margin-bottom: 0;} .card.black .additional .more-info h1 {color: white;} .card .additional .coords {margin: 0 1rem;color: white;font-size: 1rem;} .card.black .additional .coords {color: white;} .card .additional .coords span + span {float: right;} .card .additional .stats {font-size: 2rem;display: flex;position: absolute;bottom: 1rem;left: 1rem;right: 1rem;top: auto;color: white;} .card.black .additional .stats {color: white;} .card .additional .stats > div {flex: 1;text-align: center;} .card .additional .stats i {display: block;} .card .additional .stats div.title {font-size: 0.75rem;font-weight: bold;text-transform: uppercase;} .card .additional .stats div.value {font-size: 1.5rem;font-weight: bold;line-height: 1.5rem;} .card .additional .stats div.value.infinity {font-size: 2.5rem;} .card .general {width: 300px;height: 100%;position: absolute;top: 0;right: 0;z-index: 1;box-sizing: border-box;padding: 1rem;padding-top: 0;} .card .general .more {position: absolute;bottom: 1rem;right: 1rem;font-size: 0.9em;} .card .additional img {position: relative;top: 65px;left: 25px;border-radius: 50%;width: 100px;height: auto;} This will , as you wanted in your webpage. completely design and animate your card If you’re having some difficulties, here is the full source code on GitHub. And yes, that’s it! What are you waiting for? Go and show off ! Read my previous post about making a making an eye tracking and face detection app as a beginner.