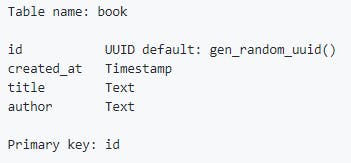
Before you start this project, i assume that you have basic idea about Next.js and Hasura. In this blog i will be showing how to integrate Next.js and Hasura. What is Next.Js ? is a JavaScript framework created by . It lets you build server-side rendering and static web applications using React. It’s a great tool to build your next website. It has many great features and advantages, which can make Nextjs your first option for building your next web application. Next.js Zeit You don’t need any configuration of webpack or similar to start using Next.js. It comes with its configuration. All you need is to run and start building your application 😃. yarn run dev Now that you are ready let’s get started! How to setup a Next.Js app ? I hope you will be aware of create-react-app, just like that we have create-next-app which will do all the work which is required to setup a Next.js Project 😉. if you are using yarn or npx, there is inbuilt package to create a next.js app which are : yarn create next-app my-app npx create-next-app my-app if you are using npm then package should be installed and using that package a new project can be setup. create-next-app npm install -g create-next-app create-next-app my-app create-next-app As you see in the image with one command all the project files are prepared and ready to go. Once the project is setup the commands which will be required to start and build the project will be shown. To build the project run yarn build To start a local server run yarn dev To start a server in production run yarn start Now that we have our basic project ready, lets setup hasura graphQL engine. We can easily setup hasura-graphQL engine using the the deploy option. Once it is deployed you can go to the deployed url and you will have something like this. one-click Note down the url at the top of the homepage. https://hasuragraphql-engine.herokuapp.com/v1alpha1/graphql Click on Data in the top bar and create a new table as follows author table Add a dummy data in the table Adding a dummy author Once hasura engine is setup, we can move onto connecting Hasura and Next.js. For that we have to install , and graphql-tag next-apollo react-apollo. yarn add graphql-tag next-apollo react-apollo Once the above packages are installed, create a config.js file in the root directory and add the following code Replace the uri with the url to which your deployed engine.This will configure with an to connect to a valid GraphQL server URL. withData httpLink Next task is to wrap your page component with component from so that appropriate data can be fetched while the page is Server Side Rendered. Query react-apollo GraphQL query const query = gql`query {author {idname}}` Wrap your component with Query <Query query={ query } fetchPolicy={ 'cache-and-network' }>{({ loading, data: { author:authors }}) => {return (<div><div>{authors.map((a, i) => (<div key={i}><h2>{a.name}</h2></div>))}</div></div>);}}</Query> Once these code are combined we’ll have something like this 👇. Run and your hasura-next.js app is up and running. yarn run dev Open in your browser and you will get the author that we created in the hasura engine in the homepage. http://localhost:3000 Authors page And that’s it, it’s that easy to create a Next.js app with Hasura Graphql Engine 🙌 . You can extend it to include more features and a better look and feel. Deploy your app using which will give you the static version which can be deployed easily either using Github or Netlify . yarn build About Me My name is . I am an undergraduate student at the Indian , pursuing my B.Tech degree in Information Technology. Aswin VB Institute of Information Technology, Allahabad I love creating and learning new things which i always do when i have free time. I love to code in J . avaScript and Python You can follow me on and . Twitter GitHub