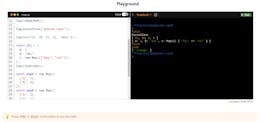
By Hassan Djirdeh (@djirdehh) What We’re Building Most of us use an online streaming service (e.g. Netflix) to watch our favourite shows/movies. This post will highlight how to build a similarly styled movie streaming interface, with Vue.js 2.0 (see image above). The final product: . https://codepen.io/itslit/full/MvvjZr Though was used as the framework for my application, this post will focus primarily on the usage of Vue.js and will glance over any styling/CSS. If you wish to tag along, I’ve set up a starting pen that has all the custom SCSS, the initial data object and the necessary external CDN libraries (vue-router, etc.). Starting pen: Bulma CSS https://codepen.io/itslit/pen/QMzRev Requirements Let’s note down the requirements for the application. An Intro (landing) screen A footer of sorts that allows the user to select his/her desired movie of choice A Movie screen that displays the movie’s title/description and a ‘Play now’ prompt A Movie Trailer screen that displays a trailer of the movie when the movie is ‘played’ The ability to add movies to favourites We’ll create the application to have the footer present at all times while the Home, Movie and Movie Trailer screens will share the same real estate. Data For the sake of simplicity we’ll start with a simple/reliable data object (of objects) that would act as the main store for all of our components. The store will have all the movie information we need and would be focused around Christopher Nolan’s awesome films. Here’s a portion of the data object: const movies = {"dunkirk": {"id": 'dunkirk'"title": 'Dunkirk',"subtitle": 'Dunkirk',"description": 'Miraculous evacuation of Allied soldiers from Belgium, Britain, Canada, and France, who were cut off and surrounded by the German army from the beaches and harbor of Dunkirk, France, during the Battle of France in World War II.',"largeImgSrc": `url('https://image.tmdb.org/t/p/w780/fudEG1VUWuOqleXv6NwCExK0VLy.jpg')`,"smallImgSrc': 'https://image.tmdb.org/t/p/w185/fudEG1VUWuOqleXv6NwCExK0VLy.jpg',"releaseDate": 'July 21 2017',"duration": '1hr 46min',"genre": 'Action, Drama, History',"trailerPath": 'https://www.youtube.com/embed/F-eMt3SrfFU',"favorite": false},"interstellar": {...},"the-dark-knight-rises": {...},"inception": {...},"the-prestige": {...}} Let’s start building Now that we have the main store object created and an understanding of how all our components are laid out, we can start building the interface. Let’s first create the Vue instance. We’ll mount/attach our instance to the DOM element and return the global store as part of the instance’s data object to be accessed in our HTML. app movies const rootApp = new Vue({el: '#app',data() {return {movieChoices: movies}}}) We can now start to work on each of the separate components. Footer Section Let’s begin with the fixed Footer section that lists all the movies present in the data store. <div ><section class="hero is-primary is-medium"><div class="hero-foot"><div class="columns is-mobile"><div class="column"><li class="movie-choice"><img class="desktop"/><p class="mobile"> </p></li></div></div></div></section></div> id="app" v-for="movieChoice in movieChoices" :src="`${movieChoice.smallImgSrc}`" {{ movieChoice.subtitle }} Addressing the fields that have been bolded in the snippet of code above: We’ve created the DOM element with , where our Vue instance will be mounted upon. id="app" We use the native directive to render a list from the data source . v-for movieChoices Within every listed : - We an image to the url within our movie object (for desktop browsers). - We use the syntax for data binding to display the as text for mobile screens. movieChoice bind src smallImgSrc Mustache movieChoice.subtitle With all the styles/CSS magic applied, our app should currently look like this: Desktop Display Mobile Display Intro Component (and Vue-Router) So we’ve created the footer and now aim to create an Intro component that has our app title and description. We’ve mentioned the Intro component will be sharing the same real estate as the upcoming Movie and MovieTrailer components (i.e. the user would be able to direct himself from Intro -> Movie -> MovieComponent by clicking the appropriate links in our app). This is a perfect use case to add the library. is the and deeply integrates to allow for component-based router configuration, nested/view mapping, etc. vue-router vue-router official router for Vue.js We’ll set up the basics of routing in the JS file: = {template:`<div class="hero-body" style="background: #1e1d1d"><div class="container has-text-centered"><div class="columns"><div class="column is-half is-offset-one-quarter vertical-align"><h1 class="home-intro">VueFlix</h1><p class="home-subintro">Select a movie below from the list of critically acclaimed Christopher Nolan films.</p></div></div></div></div>`} const Intro = [{ path: '/', component: Intro },] const routes = new VueRouter({routes}) const router Up above you can see we’ve defined our first route component , our route for that component and instantiated our router . Intro { path: '/', component: Intro } new VueRouter({ routes }) There are multiple ways as to how component templates can be defined with Vue. The Intro and subsequent components use ES6’s template literals to define the template across multiple lines. Here’s a great post by Anthony Gore on highlighting the different ways -> Note: 7 Ways To Define A Component Template in Vue.js We now need to inject our to the Vue instance to make our whole app router aware and render our route component in our DOM with . router <router-view></router-view> Injecting our to the Vue instance: router const rootApp = new Vue({el: '#app', data() {return {movieChoices: movies}}}) router: router, Rendering our route component in the DOM: <div id="app"><section class="hero is-primary is-medium"> <router-view></router-view> <div class="hero-foot"><div class="columns"><div v-for="movieChoice in movieChoices" class="column"><li class="movie-choice"><img :src="`${movieChoice.smallImgSrc}`" class="desktop"/><p class="mobile">{{ movieChoice.subtitle }}</p></li></div></div></div></section></div> So we’ve successfully created our first root route to display our . With all the styles we’ve added, our app should look like this: path: '/' IntroComponent Looking good 🎉 Movie Component (and more routing) We now have our main route specified and our footer section laid out. Let’s work on extending the route to a Movie component that displays all the information about a particular movie. First, let’s get our navigation set up properly. As mentioned before, we want our footer to be the section that allows the user to navigate between movies. We’ll use 's to enable navigation and provide the appropriate target location. vue-router router-link component Going back to our HTML and making a small edit to the footer section: <div id="app"><section class="hero is-primary is-medium"><router-view></router-view> <div class="hero-foot"><div class="columns"><div v-for="movieChoice in movieChoices" class="column"> <img :src="`${movieChoice.smallImgSrc}`" class="desktop"/><p class="mobile">{{ movieChoice.subtitle }}</p> </div></div></div></section></div> <router-link :to="`/${movieChoice.id}`"tag="li"class="movie-choice"> </router-link> We’ve established a target location of which uses ES6 template literals to label the target url as the id’s of each respective movie (e.g. the path for The Dark Knight Rises would be ). The argument dictates that we want our to render as a while still listening for click events. `/${movieChoice.id}` /the-dark-knight-rises tag router-link li To complement our new navigation paths, we’ll need to set a dynamic route for our Movie component. Going back to where we’ve set up our routes: const routes = [{ path: '/', component: Intro }, ] { path: '/:id', component: Movie } We’ve denoted a dynamic segment with every route to the same component . We’ll now be able to read the different dynamic segments within our component by using . :id Movie $route.params.id Now that we have our routes set up for the Movie component, let’s quickly draft the component and make sure our routes work appropriately. The first draft of the Movie Component: const Movie = {template:`<div><div class="hero-body"><div class="container has-text-centered"><div class="columns"><div class="column is-half is-offset-one-quarter vertical-align"><h1 class="home-intro"> </h1></div></div></div></div></div>`, {return {selectedMovie: movies[this.$route.params.id]}}, {$route () {this.selectMovie()}}, {selectMovie () {this.selectedMovie = movies[this.$route.params.id]}}} {{ selectedMovie.title }} data () watch: methods: There’s a few things to note here. data () {return {selectedMovie: movies[this.$route.params.id]}} The function sets the property within the component to be an object from the global store, based on the . So assuming the movie choice was The Dark Knight Rises, the property would be . data selectedMovie movies $route.params.id selectedMovie movies[the-dark-knight-rises] watch**:** {$route () {this.selectMovie()}},methods**:** {selectMovie () {this.selectedMovie = movies[this.$route.params.id]}} We use the property to watch for any changes in the route which will then call the component’s method. The method simply updates the parameter again with the new movie selected. This is necessary to handle as the user changes from one Movie component to another (i.e. switches movies). watch selectMovie selectMovie selectedMovie Testing everything out we should be able to see the routes working: It routes! 🎉 Now that we know our routes work appropriately, we’ll update the template in our Movie component to display all the desired information about a movie. (I’ve only bolded the lines that I’ll further address) const Movie = {template:`<div class="hero-body":style="{ 'background-image': selectedMovie.largeImgSrc }"><header class="nav"><div class="container"><div class="nav-left"><a class="nav-item"><i class="fa fa-bars" aria-hidden="true"></i></a> Home <a class="nav-item is-active"><span class="tag is-rounded">Films</span></a><a class="nav-item is-active">Shows</a><a class="nav-item is-active">Music</a></div><div class="nav-right desktop"><span class="nav-item"><a class="title">VueFlix</a></span></div></div></header> <router-link to="/" class="nav-item is-active"> </router-link> <div class="container description-container"> <div class="columns"> <div class="column is-three-quarters"> <h1 class="title">{{ selectedMovie.title }}</h1> <h4 class="subtitle"> <p class="subtitle-tag">{{ selectedMovie.duration }}</p> <p class="subtitle-tag">{{ selectedMovie.genre }}</p> <p class="subtitle-tag">{{ selectedMovie.releaseDate }}</p> </h4> <p class="description">{{ selectedMovie.description }}</p> <div class="links"> **<router-link :to="{path: '/' + $route.params.id + '/trailer'}" class="button play-button"> Play <i class="fa fa-play"></i> </router-link>** </div> </div> </div> </div> </div>`,} We’ve established a component in the Home link within the navbar to direct the user back to the root path (Intro component). router-link / We’ve introduced another , within a movie’s Play button, that creates a target location of . This basically extends the current route of the movie id with and is the navigation to our final Movie Trailer component. router-link '/' + $route.params.id + '/trailer' /trailer As of now, the Movie component within our app should look like this: 🎥 Awesome. Since we’ve established the appropriate to direct a user from Movie to Movie Trailer, we now need to create the Movie Trailer component and the accompanying dynamic route. router-link The Movie Trailer component: const MovieTrailer = {template: `<div class="trailer-body" style="background: #1e1d1d"><div class="has-text-centered"><div class="columns"><div class="column vertical-align"><iframeallowFullScreenframeborder="0"height="376" style="width: 100%; min-width: 536px"/></div></div></div></div>`, {return {trailerUrlPath: movies[this.$route.params.id].trailerPath}}} :src="trailerUrlPath" data () We’re using a simple iframe to display the trailers from YouTube. We’re binding the iframe to the component property set in the data function. The simply accesses the global store and obtains the appropriate trailer url based on the the . src trailerUrlPath trailerUrlPath movies $route.params.id The accompanying dynamic route: const routes = [{ path: '/', component: Intro },{ path: '/:id', component: Movie }, ] { path: '/:id/trailer', component: MovieTrailer } Our app at this moment: It plays! 🎉 We’re almost done! We’ll just address a simple visual indicator of adding movies to favorites and would then be complete. VueFlix Add to favorites Every movie object within the main store has a boolean. We’ll be using this as the trigger to represent whether a movie has been added to favorites. movies favorite With regards to visual display, we’ll have two visual cues: - A yellow box-shadow around the Movie component - A yellow checkmark within a list item in the Footer component We have the and classes set up in our SCSS already to help us with this. favorite-shadow favourite-check .favorite-shadow {box-shadow: 0 0 50px 15px rgba(251, 255, 15, 0.25);} .favorite-check {position: absolute;right: 5px;top: 5px;z-index: 1;color: #fcff4c; (max-width: $medium) {position: initial;display: block;}} @media Now, we need to apply within our Movie component template and our Footer section. We’ll also need to create the event handler for the add to favorites button in our Movie component. conditional class bindings For our Movie component: const Movie = {template:`<div :style="{ 'background-image': selectedMovie.largeImgSrc }"><header class="nav">...</header> :class="[{ 'favorite-shadow': selectedMovie.favorite }, 'hero-body']" <div class="container description-container"> ... ... ... <div class="links"> <router-link :to="{path: '/' + $route.params.id + '/trailer'}" class="button play-button"> Play <i class="fa fa-play"></i> </router-link> **<a class="button is-link favorites-button" @click="addToFavorites"> <span :class="\[{ 'hide': selectedMovie.favorite }\]"> Add to </span> <span :class="\[{ 'hide': !selectedMovie.favorite }\]"> Remove from </span> &nbsp;favorites <i class="fa fa-plus-square-o"></i> </a>** </div> </div> </div>`,data() {...},watch: {},methods: {selectMovie() {...}, } addToFavorites() {movies[this.$route.params.id].favorite =!movies[this.$route.params.id].favorite} The class binding specified above dictates that the class is determined by the boolean while the class should always be present. favorite-shadow selectedMovie.favorite hero-body We’ve also introduced an ‘Add to/Remove from’ favorites button right after the original Play button. The ‘Add to/Remove from’ favorites button listens to the method handler which simply toggles the boolean for a particular movie on click. The text toggles between ‘Add to’ and ‘Remove from’ based on whether the movie has been added or removed from favorites (the class is a created class with a property). addToFavorites() favorite hide display:none Similarly, we need to introduce the conditional class binding for a check-mark in the footer as well: <div id="app"><section class="hero is-primary is-medium"><router-view></router-view> <div class="hero-foot"><div class="columns is-mobile"><div v-for="movieChoice in movieChoices" class="column"><router-link :to="`/${movieChoice.id}`"tag="li"class="movie-choice"> <img :src="`${movieChoice.smallImgSrc}`" class="desktop"/><p class="mobile movie-title">{{ movieChoice.subtitle }}</p></router-link></div></div></div></section></div> <i :class="[{ 'fa fa-check-circle favorite-check': movieChoice.favorite }]"></i> Now we should be able to add movies to our favourites list! It favorites! 🎉 Cheers! Thanks for taking the time to go through this. I hope this was informative and you learned something. If you have any questions/comments/opinions, I’ll be happy to hear them! — — — — — — — — — — — — — — — ♥ — — — — — — — — — — — — — — —If you enjoyed my style of writing and are interested in learning how to build Vue applications, I’ve just helped release ! Fullstack Vue is a project driven approach to learning Vue.js since everything is explained within the context of building a larger application. Fullstack Vue is currently available and you can download the first chapter for from the main website: Fullstack Vue free https://www.fullstack.io/vue