paint-brush
A complete beginners guide to installing a Bitcoin Full Node on Linux (2018 Edition)by@stopanddecrypt
29,410 reads
29,410 reads

A complete beginners guide to installing a Bitcoin Full Node on Linux (2018 Edition)

by StopAndDecryptMay 3rd, 2018
Read on Terminal Reader
Read this story w/o Javascript
tldt arrow

Too Long; Didn't Read

I recently installed a new SSD so I wouldn’t have to prune on my laptop and figured I’d give creating a tutorial a shot.

Companies Mentioned

Mention Thumbnail
Mention Thumbnail
featured image - A complete beginners guide to installing a Bitcoin Full Node on Linux (2018 Edition)
StopAndDecrypt HackerNoon profile picture

How to compile a Bitcoin Full Node on a fresh installation of Kubuntu 18.04 without any Linux experience whatsoever.

Preface

I recently installed a new SSD so I wouldn’t have to prune on my laptop and figured I’d give creating a tutorial a shot.

Never used Linux? Don’t know what “prune” means? Perfect. This one’s for you. I want you to learn Linux, and I want Bitcoin to motivate you to switch. This will be as much a “Linux for Dummies” guide as it is a guide to setting up a Bitcoin node.

If you already know a thing or two and want to skip all the useless words:

Just copy and paste the commands at the bottom of this article.

Most tutorials just give you the steps, and while some are actually pretty good at elaborating a bit this one is literally going to spoon feed you all the questions you might have, down to what each command does. The only precursor knowledge I’ll assume you have is the ability to figure out how to download & mount the ISO image I link below, boot it, and follow the default install instructions. I’ll be making no major changes to the default install configuration except for encrypting my entire drive and importing my desktop preferences and theme. We want to avoid complications, which is why I won’t be installing anything else first, just Bitcoin and the screen capturing software, so any dependency issues along the way we should both have. If you run into any other issues, got confused somewhere, or think I should include something, just comment below or reach out to me on Twitter and I’ll try to assist or amend the article.

This tutorial was semi-inspired by Grubles Lightning Network tutorial.

Part I — Setting Up

Skip this section entirely if you’re already on Linux.

Download Kubuntu ISO image

Kubuntu is Ubuntu, but shiny. The most recent LTS release is 18.04.

Install ISO image to USB or CD

Follow Ubuntu’s official tutorial for Windows or macOS.

Install the OS

You’ll set up a computer name, user, and password. My username for this tutorial will be satoshi, and the computer name will be nakamoto.

Log In

After installation and a successful login, your desktop should look like the screenshot below. Feel free to play around and get accustomed, but at some point navigate to the Application Launcher and run Terminal (Konsole).

We’re going to be working within this single window for the majority of this tutorial until we get to the end, but I’m going to open up the File Manager, called Dolphin, as well as import my theme and desktop preferences.

Before we enter anything into the terminal let’s take a look at what we already see. At the top of the terminal window it says “Konsole”. That’s just the name of the software specific to this desktop environment. Sometimes you’ll see it referred to as Terminal, Command Line, or just the shell.

**satoshi** is the username. **nakamoto** is the computer’s hostname and will show up on whatever network you may be connected to. Yours will be whatever you selected during the installation.

In between the **:** and **$** you’ll see a **~** . This is an abbreviation for your /home/<username> directory. /home/<username> is like “My Documents” in Windows.

These two mean the same thing, but you’ll always just see **~** when in there:

**satoshi@nakamoto:~$**

**satoshi@nakamoto:/home/satoshi$**

Part II — Prerequisites & Dependencies

Skim this section for the commands if you’re already on Linux. I’ll even condense them all at the bottom of this article for those who don’t need the explanations.

The first thing we’re going to do in the terminal is check for updates. Type the following and hit enter (along the way you’ll be prompted to type “y” for yes, and your password):

**satoshi@nakamoto:~$** sudo apt-get update

sudo is sometimes called “superuser do”. It’s kind of like using “Run as administrator” in Windows, but better. It’s necessary throughout this tutorial because the commands that follow it will try to do things that require superuser privileges.

apt-get lets you interface with available software libraries so you can download software straight from the terminal.

update is one of a few commands that must follow the use of apt-get, and it will check for updates to any packages you have installed and install them.

Next we’re going to install Git. It’s widely used open source-software designed for handling other open-source (and closed) projects. We’ll be using Git to access the Bitcoin repository and download its code.

**satoshi@nakamoto:~$** sudo apt-get install git

install should be self explanatory, it’s like update, but for when you’re installing a specific package for the first time. It requires a package name.

git is the name of the Git package, and is recognized as such by the list of sources the apt-get command refers to. It will also function as a command after it is installed.

— — — —

Now we’re going to make a folder within our home directory and then change to that directory so we can copy the files we need right into it. We could clone this into any folder we want, this is just the path I chose to create within the home folder.

First, enter the following line:

**satoshi@nakamoto:~$** mkdir -p bitcoin-source && cd bitcoin-source

Now it should look like:

**satoshi@nakamoto:/home/satoshi/bitcoin-source$**

mkdir makes a directory. This is like right clicking on the desktop or in a window and selecting “New > Folder”.

-p is a flag. Flags are command-line options and will start with a **—** . Each command (like mkdir) has their own set of options, so -p may do something else for another command. In this case -p overrides some errors you might get when trying to create a directory, and actually does what you’d probably want mkdir to do in the first place. If you wanted to create the directory /test1/abc123/haha , without -p, it thinks you just want /haha and you would get an error saying /test1 and /abc123 don’t exist. With -p those errors are ignored and both parent directories that “don’t exist” are created as well.

bitcoin-source is just the directory/folder name we’re going to create.

&& allows you to execute another command on the same line, but will only execute the second command if the first command doesn’t fail with an error.

cd will change the current directory to the one you specify. In this case it will change to the /bitcoin-source directory we just created.

Then enter:

**$** git clone [https://github.com/bitcoin/bitcoin.git](https://github.com/bitcoin/bitcoin.git)

git clone will copy the Bitcoin repository from Github.com into the directory you’re in when you enter the command. Since were in ~/bitcoin-source, this will create the directory ~/bitcoin-source/bitcoin and place all the necessary files in there.

— — — —

You can check to see if the files installed by using the ls command, or you can browse to that directory in the File Manager.

**$** ls bitcoin

ls will output all the non-hidden folders in the directory you’re currently in.

ls bitcoin will look for a /bitcoin folder within the directory you’re in, and then output all the non-hidden folders in that directory.

ls -a will output all folders, including hidden folders if any exist. Hidden folders begin with a **.** and will look like this: /home/satoshi**/.abc123**

Navigate to this folder and stay here, you’ll see files get created later when we run some other commands.

— — — —

Now we need to install some libraries, along with the Berkeley Database. When installing libraries you can sometimes list many in a single command and separate them with a single space. In this tutorial I’ve split them into groups per the build documentation on Github for Ubuntu, as I’ve tried to combine them before and have gotten errors:

Libraries:

$ sudo apt-get install build-essential libtool autotools-dev automake pkg-config libssl-dev libevent-dev bsdmainutils python3

$ sudo apt-get install libboost-all-dev

Videos I took longer than 60’s are getting cut by the host site, not much of an issue here though.

— — — —

This will download and verify the Berkeley Database is legitimate:

$ wget http://download.oracle.com/berkeley-db/db-4.8.30.NC.tar.gz$ echo '12edc0df75bf9abd7f82f821795bcee50f42cb2e5f76a6a281b85732798364ef  db-4.8.30.NC.tar.gz' | sha256sum -c

After entering the echo command you should get this response back:

db-4.8.30.NC.tar.gz: O`K

I cut the video during the download here, it took about 6 minutes for me.

— — — —

The following commands will extract (tar -xvf)the Berkley Database we just downloaded and checked, then build and install it. It will also set a path shortcut so only BDB_PREFIX needs to be typed when referencing the dependency. Normally when entering a command, if you’re already halfway into the path you only need to reference to the remaining path, but when you’re compiling you want to ensure the full path gets referenced:

$ tar -xvf db-4.8.30.NC.tar.gz$ cd db-4.8.30.NC/build_unix$ mkdir -p build$ BDB_PREFIX=$(pwd)/build$ ../dist/configure --disable-shared --enable-cxx --with-pic --prefix=$BDB_PREFIX$ sudo make install$ cd ../..

The database took about 2 minutes during sudo make install. I cut that out.

— — — —

More Libraries:

$ sudo apt-get install libminiupnpc-dev$ sudo apt-get install libzmq3-dev$ sudo apt-get install libqt5gui5 libqt5core5a libqt5dbus5 qttools5-dev qttools5-dev-tools libprotobuf-dev protobuf-compiler$ sudo apt-get install libqrencode-dev

That concludes the prerequisites, now onto actually installing Bitcoin.

Part III — Compiling Bitcoin Core 0.16.3

(This was originally written for 0.16.0, but a critical bug was detected and patched in 0.16.3. There should be no installation complications otherwise.)

We’re still in /home/satoshi/bitcoin-source so let’s move into the /bitcoin directory, compile, and install:

$ cd bitcoin$ git checkout tags/v0.16.3$ ./autogen.sh$ ./configure CPPFLAGS="-I${BDB_PREFIX}/include/ -O2" LDFLAGS="-L${BDB_PREFIX}/lib/" --with-gui


$ make$ sudo make install

git checkout tags/v0.16.3 will reference the specific “commit” from the git history. “Branches” can change as updates occur so referencing a branch may make the command not work in the future.

./autgen.sh will, simply put, prepare the build files for install.

The video cut short before the make & sudo make install commands, but it took about 25 minutes to complete.

Once that completes you have Bitcoin Core installed.

Part IV — Configuring and familiarizing yourself with your new node

Much of this section isn’t required to run the software. In the future you’ll likely just run it in the background and let it be. Again, this just to help you get a feel for what’s going on behind the scenes, not just trusting a background process to work.

The first thing I want you to do is set up a few windows before we run Bitcoin for the first time. We’re going to run the GUI version first, called bitcoin-qt, then we’ll exit it and run the non-GUI version called bitcoind, and then back to bitcoin-qt, with some steps and configuration in between so you can understand what’s really happening and feel comfortable starting and stopping the software when you need to.

Close all open windows, and open two brand new terminal windows and the file manager. In the file manager navigate to /home/satoshi/. You only have to click Home on the sidebar. Then from the menu bar at the top select Control and check the box for Hidden Files. In one of the terminal windows enter the following:


$ mkdir ~/.bitcoin**$** cd ~/.bitcoin

You should now see a folder named .bitcoin appear in the file manager as well. Navigate into that folder, and we’re now redundantly in this directory both in the terminal and file manager, but for a reason.

— — — —

Now we’re going to create a file called debug.log. When you first launch Bitcoin, both this hidden folder, and the debug.log file are automatically created, but you’ll see why I want to do this ahead of time in a moment:

**$** touch ~/.bitcoin/debug.log

Now we’re going to tail the debug.log file. Log files get updated continuously with new lines of information as the program takes a log of it’s actions. The tail command shows you the most recent entries into that file, but only once. Using the -f flag will give you a continuously running stream of those updates. When you enter the following command you’ll see nothing because Bitcoin isn’t running yet, but we’ll leave it like this for now:

**$** tail -f ~/.bitcoin/debug.log

In the other terminal window we opened, run Bitcoin by entering the following:

**$** bitcoin-qt

You’ll see the loading image and then the GUI with a message that shows the syncing status. If we never created that .bitcoin folder you also see the setup screen where you’d select the location you want to store the blockchain data and other files. The default location is the folder we just created (/home/satoshi/.bitcoin) so it won’t ask and just assume.

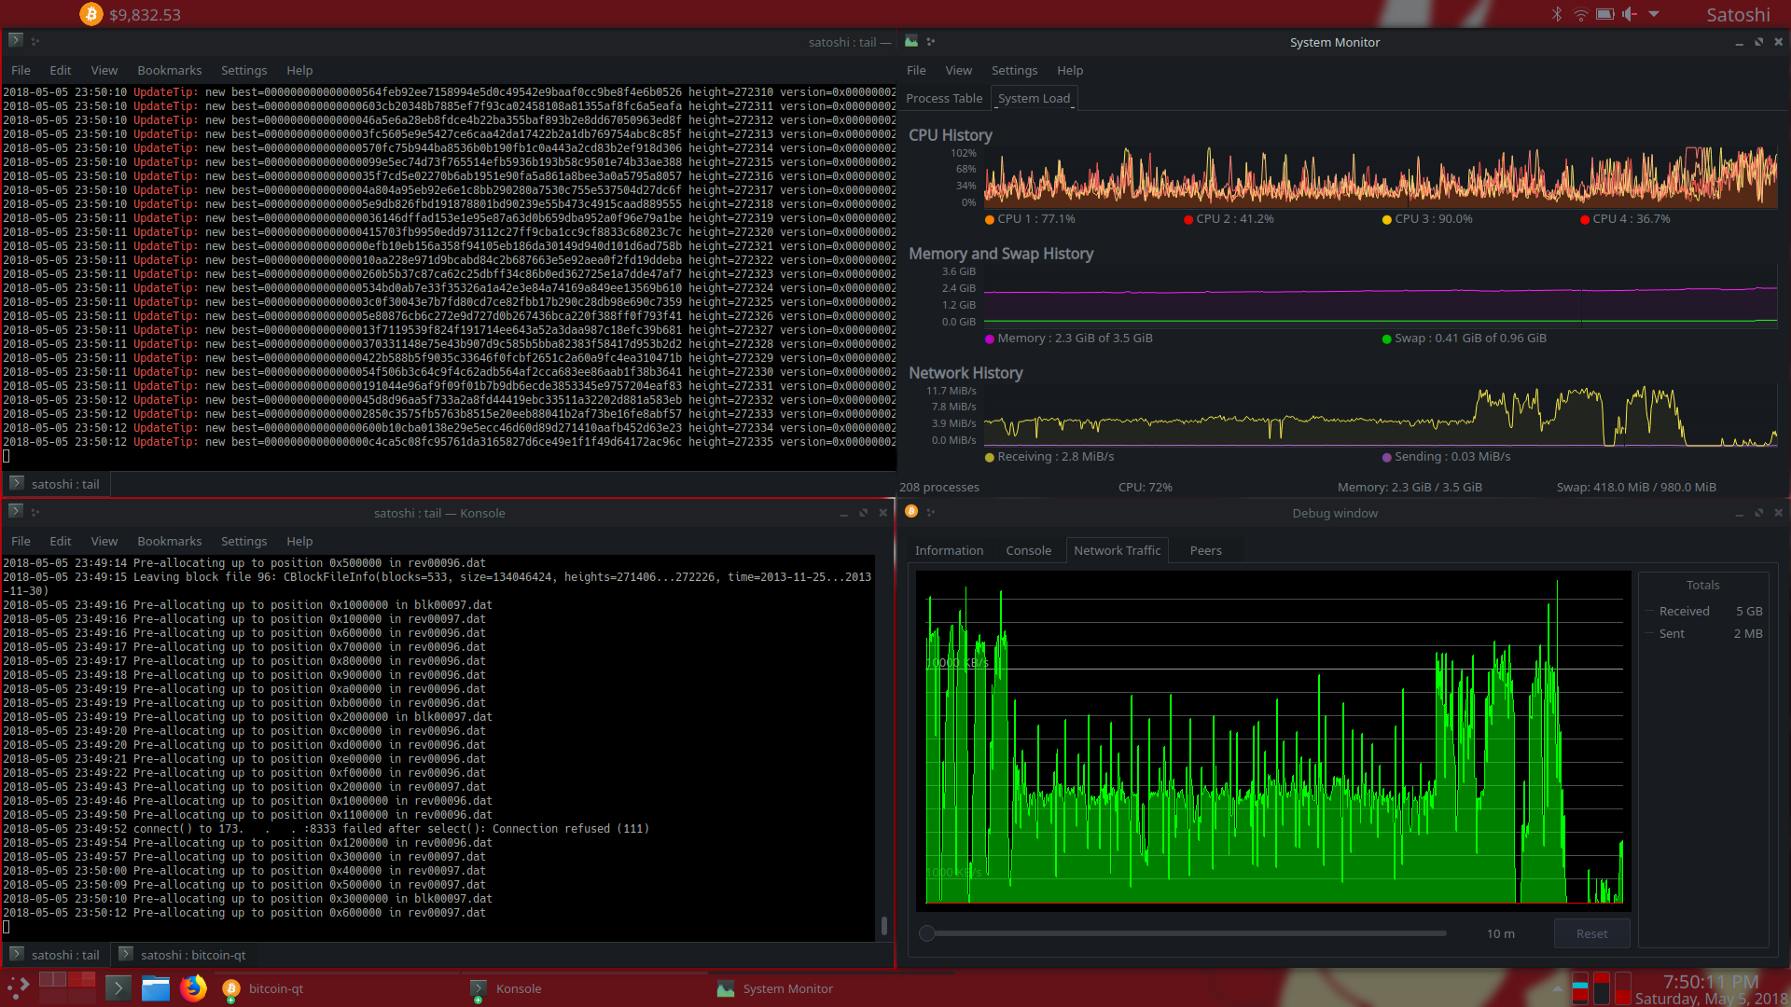
You’ll start to see activity in the terminal where you tailed the debug.log file. All of the above should look like this on your screen:

I had to record over the recording here to block out my IP address, so you’ll see another taskbar pop up.

You can watch this for however long you want because it will take a long time to sync, but at some point, in the terminal window you entered bitcoin-qt on, press CONTROL+C. You’ll see the GUI close down, and the log file will stop. You can read the exit messages in the log, and you can scroll up and read all the different events that occurred. Now that it’s stopped, in the same terminal you ran bitcoin-qt in, type the following:

**$** bitcoind

You should see the log tail going again, but this time you won’t see the GUI. Bitcoin is running in the background. Hit CONTROL+C again and let it stop.

— — — —

We need to create a configuration file now so n the file explorer create a file called bitcoin.conf . Open it, type the following and save the file:

debug=net

By default, not all the debug information is included in the log file. Setting it to **1** will include all of it, but there’s way too much to that all the info flies by too fast. All the options you can set are: net, tor, mempool, http, bench, zmq, db, rpc, estimatefee, addrman, selectcoins, reindex, cmpctblock, rand, prune, proxy, mempoolrej, libevent, coindb, qt, leveldb.

Disclaimer: Do not leave debug set to 1 indefinitely or your log file will grow larger than the entire blockchain and fill up your hard drive.

This is also where you can optionally set your node to prune the blockchain as it goes along. Right now the entire blockchain is about 160 GB in size. If you don’t have enough storage space, you could prune the data down to under 5 GB at the moment. I don’t recommend doing that unless you need to, but this is what you would enter on it’s own line to bring it down to 10 GB:


debug=netprune=10000

Your config file can have many options set, and it doesn’t matter what order they’re in, so it could also look like this if you hypothetically want to restrict your nodes mempool to 100 MB worth of transactions:


maxmempool=100prune=10000debug=net

For now just save the bitcoin.conf file with debug set to net and pruned if you need it. Originally when I recorded this for the tutorial, I made some mistakes and set it to 1, but the steps are the same:

— — — —

Open a third terminal and enter the following:

**$** tail -f ~/.bitcoin/debug.log | grep "UpdateTip:"

Again because it’s a tail, you’ll see nothing until you re-run bitcoin-qt or bitcoind.

grep is a command that has a few functions, but in this context, it will take the output from the first command and filter it so it only shows lines that include the text within the quotes. UpdateTip: is specific verbiage that only appears when a new block is added. The | is commonly called a “pipe”, and all it really means is “take the output of the first command and send it through the second command”. You’ll hear people say terms like “pipe it to grep” or “pipe it to more”, and this is what they mean.

In the other terminal enter the following:

**$** tail -f ~/.bitcoin/debug.log | grep -v "UpdateTip:\|Requesting block\|sending getdata\|recieved block\|received: block"

This is the same command but with the -v flag, and will do the opposite of the previous command and filter out any line with the text we specify.

UpdateTip: is included first, because we’re already pulling that specific information into a different window. What you’ll see next are the two symbols **\|**and what these do is tell the grep command “filter out x and y and z and …”

So now we’ve effectively split a single log file up into two outputs so we can more accurately watch what’s going on, and filter out some redundant info I’ve chosen so you have a slower scrolling output. This way you can keep direct track of the blocks coming in with the second tail command without it forcing the other information out of the way. Feel free to play around with what you want to include and exclude until you’re comfortable using the command.

Now that you have two terminals with tail commands “waiting”, go ahead and run bitcoin-qt again, and this time let it run so it actually starts making sync progress:

That’s it! Just let it sync. Depending on your hardware/bandwidth it could take anywhere from a handful of hours to multiple weeks (unlikely).

When it’s finally synced, blocks will start coming in once every ~10 minutes on average and the the debug.log file will start showing a lot more activity, including transaction relaying information which doesn’t begin until after the IBD (Initial Block Download) period.

Part 0 — For those here who just need the commands:


sudo apt-get update;sudo apt-get install git;mkdir -p bitcoin-source && cd bitcoin-source git clone https://github.com/bitcoin/bitcoin.git;sudo apt-get install build-essential libtool autotools-dev automake pkg-config libssl-dev libevent-dev bsdmainutils python3;sudo apt-get install libboost-all-dev;wget http://download.oracle.com/berkeley-db/db-4.8.30.NC.tar.gz;echo '12edc0df75bf9abd7f82f821795bcee50f42cb2e5f76a6a281b85732798364ef db-4.8.30.NC.tar.gz' | sha256sum -c;tar -xvf db-4.8.30.NC.tar.gz;cd db-4.8.30.NC/build_unix;mkdir -p build;BDB_PREFIX=$(pwd)/build;../dist/configure --disable-shared --enable-cxx --with-pic --prefix=$BDB_PREFIX;sudo make install;cd ../..;sudo apt-get install libminiupnpc-dev;sudo apt-get install libzmq3-dev;sudo apt-get install libqt5gui5 libqt5core5a libqt5dbus5 qttools5-dev qttools5-dev-tools libprotobuf-dev protobuf-compiler;sudo apt-get install libqrencode-dev;cd bitcoin;git checkout tags/v0.16.3;./autogen.sh;./configure CPPFLAGS="-I${BDB_PREFIX}/include/ -O2" LDFLAGS="-L${BDB_PREFIX}/lib/" --with-gui;make;sudo make install;

bitcoin-qt

UPDATE: Upgrading from 0.16.0 to 0.16.3

If you installed Bitcoin via this tutorial, the following will explain how to go about upgrading to 0.16.3. If you’re looking to install 0.16.3 from scratch, follow the tutorial above from the beginning and don’t worry about these steps, which will be as follows:

  • Make sure Bitcoin Core is no longer running
  • Renaming the installation folder
  • Downloading and installing the new client

There are some specific details you will need to pay attention too, but otherwise it will be pretty straightforward. First…

Do Not Delete: /home/[user]/.bitcoin

Let’s make this clear in case you’re reviewing this and need a refresher.

There are two directories:

  • /home/[user]/.bitcoin — Which is the hidden folder (the period before the b) in your home directory that holds your wallet and configuration files, along with other data that you want to keep.
  • /home/[user]/bitcoin-source/bitcoin — Which is the normal folder where 0.16.0 is installed. This is the one we want to rename so we can install 0.16.3 in its place.

You can either do this in the file manager:

Or you can run the following commands in the shell, which I recommend doing anyway because we then need redownload the Bitcoin binaries. Do not make a new folder named “bitcoin”, this will be done automatically with the clone command:


$ cd ~/bitcoin-source$ mv bitcoin bitcoin-old-16.0 **$** git clone [https://github.com/bitcoin/bitcoin.git](https://github.com/bitcoin/bitcoin.git)

Next we’re going to recreate a prefix (directory shortcut) that we set up in the original tutorial. This doesn’t have to be done this way, but for simplicity sake we’re going to. Please note that this prefix is only temporary, if you close out the shell after this, you will have to follow this step again:


$ cd ~/bitcoin-source/db-4.8.30.NC/build_unix$ BDB_PREFIX=$(pwd)/build

Now we’re going to proceed like normal from the beginning of Part III:

$ cd ~/bitcoin-source/bitcoin$ git checkout tags/v0.16.3$ ./autogen.sh$ ./configure CPPFLAGS="-I${BDB_PREFIX}/include/ -O2" LDFLAGS="-L${BDB_PREFIX}/lib/" --with-gui


$ make$ sudo make install

That should be all you need to do. If you have any questions just reach out to me on Twitter or Reddit.


🅂🅃🄾🄿 (@StopAndDecrypt) | Twitter_The latest Tweets from 🅂🅃🄾🄿 (@StopAndDecrypt). Fullstack Social Engineer: 10% FUD, 20% memes, 15% concentrated…_twitter.com