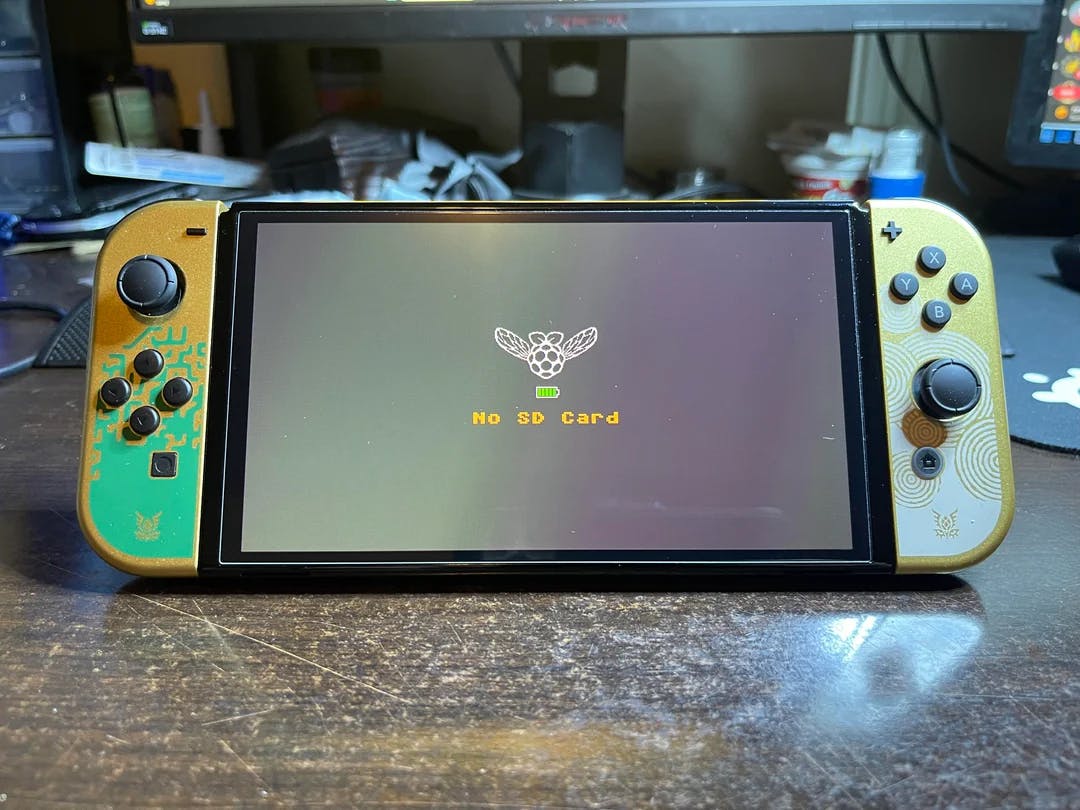
The featured image can be confusing and elitist for newcomers, so I wrote an overview of various sources to provide a better orientation and share my experience. Disclaimer I disapprove of using modified hardware and software for copyright infringement. This tutorial deals with hardware and software modification purely for educational reasons. Modifications to change the style, operating system, ability to backup your own files or similar are not considered copyright infringement. Modifying hardware you own in the Czech Republic, where I am located, is legal I do not cause any loss to nintendo, I purchased all the games I play. See the results of two courts in European countries that have dealt with this: [1]: https://web.archive.org/web/20060324123541/http://management.silicon.com/government/0%2C39024677%2C39117891%2C00.htm [2]: https://www.theregister.com/2004/04/27/spanish_xbox_modding_ruling/ Needed components - modchip Nintendo Switch Modchip (4$); I used this , but it was overpriced. one Soldering iron (15$), something like this SD card, at least 16GB, recommended 64GB and more. (10$) USB C to USB 2.0 cable. Soldering flux is recommended but not required. Electrical tape Heat sink paste Hack - hardest part I don't provide a detailed tutorial, there are enough of them. This post is to improve the orientation in this scene, at the same time provide a collection of various guides. How to start If you have a Nintendo Switch V1 and belong to the lucky 12% (see hackable serial numbers[1]) who have an unpatched switch, you can get by with tinfoil and an SD card. There are plenty of jailbreak tutorials[2]. The hack is more complicated if you have a patched Switch, Switch Lite, or OLED version. What to do after determining version of my switch? You have to solder a modchip, often or , which are very cheap on Aliexpress, to a Nintendo motherboard. They work on the principle of voltage changes on the processor, which skips the integrity check mechanism to check unauthorized software. PICOFLY HWFLY The easiest is the V1 version, then Switch Lite, then OLED. The USB C connector is often included with the modchip, through which the chip's firmware must be uploaded. This consists of dragging only a few files to the modchip. The firmware can be found on . GitHub My experience In my situation, I used the PICOFLY chip purchased from AliExpress to modify my Nintendo V1 Switch. Without a microscope or any experience in micro-soldering. I used a budget soldering iron. Although I suggested using flux, I neglected to utilize it myself, leading to an dirty solder. While the installation eventually worked, the process was tedious and stresfull. What to do after the hack You must load the software that starts after boot and must be on the SD card. Easy route You can use , which is a package of different tools. The community will tell you that you must install individual tools to understand how they work. The reality is that copy-pasting different tools to the SD card will not help you understand the tools, so don't be afraid to take the easy way out. This is very common in the community, where people claim the only correct way is without using the script. Of course, this is wrong. HATS linux arch archinstall Where do I find Hats? The HATS source code has been taken down but can be found in various mirrors; use Google. https://www.youtube.com/watch?v=jfJIVzeJSyE&embedable=true The following section describes some tools used in HATS, and you would probably set up these tools even if you went the manual route. The recommended starting point is this guide: https://nh-server.github.io/switch-guide/ Other options - Ubuntu https://www.s31bz.com/linux-on-my-nintendo-switch - Android 10 https://wiki.switchroot.org/wiki/android/10-q-setup-guide Also, you can dualboot between multiple operating systems on your SD card. Toolset - The most used bootloader that allows you to boot custom firmware (CFW). Hekate - Tinfoil allows you to access the SD card via USB C and install software. Tinfoil - Menu for launching homebrew applications. This menu will be available via the album icon on Switch. nx-hbmenu - This is an industry-standard tool for managing various emulators. RetroArch - OS for the switch. You will probably be using this one. Otherwise, you can use multiple linux distributions. also works on Switch. Atmosphere RetroPie - Install software via USB C. This is helpful because some games are bigger than 4GB, which is the maximum file size for FAT32. DBI - Tool for managing game save files. JKSV - Switch sysmodule allowing you to set cpu/gpu/mem clocks according to the running application and docked state. sys-clk - Use controllers from other consoles natively on your Nintendo Switch via Bluetooth. No dongles or other external hardware neccessary. MissionControl How to restore game save files from Yuzu/Ryujinx on Nintendo Switch This process apply if you want to dump Switch saves to other location. Go to the emulator and click on “open save files“ Copy files to the JKSV folder on the SD card path will be something like: SD:/JKSV/<game>/<save_name>/ In JKSV, click restore save and hold the button. A JKSV has to be correctly set up. See the JKSV . Note: guide Also, run the game at least once. Otherwise, it won’t show up in JKSV, What is X? - This is a memory chip with the original firmware on the Switch motherboard. Switch NAND - emulated NAND saved on SD card. emuMMC - custom firmware cfw - custom console software not provided with original homebrew - a program that gets executed after exploiting a vulnerability payload - a format of programs that can be run with CFW .nro Links [1]: https://suchmememanyskill.github.io/guides/switchserials/ [2]: https://www.youtube.com/watch?v=zX7eBg2gIzI Featured image source . here