


5,252 reads
Easily Formatting Markdown Files in VS Code
by Tyler HawkinsJune 13th, 2022


Too Long; Didn't Read
This markdown tool is incredibly simple, but it’s often the simple things that make the developer experience better. The SalesforceDocs Markdown Assistant looks like a VS Code extension I’ll be keeping around!

Every respectable software project needs a README. This file provides crucial information about what the project is, how to work with it, and other relevant information for developers. README files are written in markdown, a special markup syntax. The syntax for markdown is simple enough, but it can be a pain to manually type out, and it’s easy to make simple mistakes and typos.
Wouldn’t you like to just use the Cmd+B keyboard shortcut to bold some text instead of typing ** around your text? Or what about creating a nicely formatted table in your README, especially when editing an existing table? Wouldn’t it be nice if the table formatting and column width adjustments were taken care of for us? Markdown is wonderful, but it’s not exactly as easy as working with a Google doc when applying formatting.
The SFDocs Markdown Assistant VS Code extension is here to help!
Common Use Cases
In this article, we’ll look at some common use cases when writing a markdown file. We’ll first look at simple text formatting like bold, italic, or strikethrough. Next, we’ll look at writing numbered lists. Finally, we’ll look at creating and modifying tables.
Let’s get started!
Bold, Italic, and Strikethrough Text
Let’s start with the simple stuff. In markdown syntax, you can make your text bold by wrapping your text in **, italic by wrapping your text in _, and strikethrough by wrapping your text in ~~. It’s not a huge burden to type out these characters, but it’d be really nice if we could just use keyboard shortcuts to format the text in the same way that we can when working with a Google doc.
Here’s the markdown we’ll use to apply these styles:


And here’s what the output looks like when viewing the markdown file:
Now, let’s show how easy it is to apply these various styles when using the VS Code extension! We can make our text bold using Cmd+B, italic using Cmd+I, and strikethrough using Option/Alt+S.


Numbered Lists
Next, let’s take a look at lists. When creating a numbered list in a Google doc, hitting the Enter key after typing your first list item creates the second list item with the 2. prefix already in place. In a markdown file, however, you have to manually type the number prefix for each item. It’d be nice if we could have that done for us automatically!
Here’s the markdown we’ll use to create a numbered list:


And here’s what the output looks like when viewing the markdown file:


Now, let’s show how easy it is to create a numbered list when using the VS Code extension! We start by typing 1. Bread to create the first item in our list. Then when we hit the Enter key, the next number prefix is added for us automatically!


Tables
Finally, let’s look at creating and modifying tables in markdown. Tables are easy enough to create, but a pain to modify, especially as the column widths change.
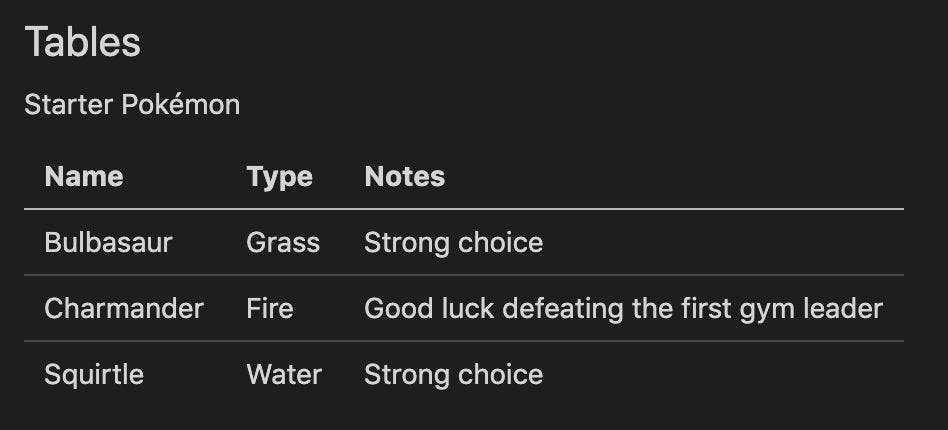
Here’s the markdown we’ll use to create a table:


And here’s what the output looks like when viewing the markdown file:

Now, let’s see a demo of how long it takes to create the table from scratch without using the VS Code extension. Note how much time we spend modifying the column widths, and we’re only doing this for a table with three rows! Imagine doing this with a much larger dataset and how much of a headache this would be.


Now, let’s show how easy it is to create and modify a table when using the VS Code extension. For starters, we can insert an empty table by right-clicking in our file to open the context menu and then selecting “Table >> Table: Add.” We can then specify the number of columns and rows and hit Enter to create the dummy layout.
Then, as we enter text into the table, we can navigate from cell to cell using Tab and Shift+Tab. Whenever those keys are pressed to navigate to a different table cell, the column widths automatically adjust. This is probably my favorite feature!

You can find even more cool features in the right-click context menu or by reading the extension’s docs.
Conclusion
This markdown tool is incredibly simple, but it’s often the simple things that make the developer experience better. The SFDocs Markdown Assistant looks like a VS Code extension I’ll be keeping around!
Also Published Here

L O A D I N G
. . . comments & more!
. . . comments & more!
About Author

TOPICS
THIS ARTICLE WAS FEATURED IN...


RELATED STORIES


Uderstanding the Basic Structure of a Website #html5
Aug 13, 2021

28 Stories To Learn About Markdown #markdown
May 17, 2023

