paint-brush
A Guide to Building an Image Generator with React and OpenAIby@wise4rmgod
3,063 reads
3,063 reads

A Guide to Building an Image Generator with React and OpenAI

by Wisdom NwokochaSeptember 4th, 2023
Read on Terminal Reader
Read this story w/o Javascript
tldt arrow

Too Long; Didn't Read

This guide has discussed the steps involved in building an image generator with React and OpenAI. We have covered the basics of image generation, how to use the OpenAI API in React, and how to create an image generator component. We have also provided some additional tips for building an image generator.
featured image - A Guide to Building an Image Generator with React and OpenAI
Wisdom Nwokocha HackerNoon profile picture

Have you ever wanted to create your own images but didn't have the artistic skills? Or maybe you wanted to generate images of things that don't exist in the real world?


If so, then you're in luck! In this guide, you'll learn how to build an AI image generator with React and OpenAI.


With this guide, you can create images of anything you can imagine. You can generate images of your favorite characters, places, or things.


You can even generate images of things that don't exist in the real world, like dragons or unicorns.

What is AI image generation?

AI image generation is an artificial intelligence (AI) that creates images from scratch or text descriptions. It is a rapidly growing field of research, and there are many different ways to generate images using AI.


One common approach is to use Generative adversarial networks (GANs), like two artists trying to trick each other. One artist, the generator, creates new images.


The other artist, the discriminator, tries to tell if the images are real or fake. The generator gets better at creating realistic images over time, and the discriminator gets better at telling them apart.


Another AI image generation approach uses Variational autoencoders (VAEs), like a machine that can take apart an image and put it back together again.


The machine can take an image as input and create a code representing the image. The machine can also take the code as input and create a new image similar to the original image.


Lastly, Diffusion models are like a machine that slowly makes an image more and more realistic. The machine starts with a random image and then adds noise to it.


The machine removes the noise one step at a time until the image is as realistic as possible.


Image generation AI is a rapidly growing field of artificial intelligence capable of creating realistic and creative images from scratch.


This technology can potentially revolutionize how we create and consume content, with applications in art, design, marketing, education, healthcare, and entertainment.

How does image generation AI work?

Image generation AI works by training a machine learning model on a large dataset of images. The model learns the patterns and relationships between the pixels in the images and then uses this knowledge to generate new images.


HypotenuseAI


Now, let's look at the distinct methodologies employed by various image generation techniques.


  1. Generative adversarial networks (GANs): GANs are a machine learning model that pits two neural networks against each other. One network, the generator, is responsible for creating new images.

    The other network, the discriminator, distinguishes between real and fake images.


    The two networks compete, and over time, the generator becomes better at creating realistic images that can fool the discriminator.


    For example, the generator might start by creating a random image. The discriminator would then look at the image and try to decide if it is real or fake.


    If the discriminator says that the image is fake, the generator will learn from its mistake and create a new image that is more realistic.


    This process continues until the generator can create images that are so realistic that the discriminator cannot tell them apart from real images.


  2. Variational autoencoders (VAEs) are a machine learning model that learns to encode and decode images. The encoder takes an image as input and produces a latent representation of the image.


    The decoder takes the latent representation as input and produces a new image. The VAE learns to encode and decode images so that the new images are similar to the original images.


    For example, the encoder might take an image of a cat as input and produce a latent representation of the image.


    The decoder would then take the latent representation as input and produce a new image of a cat. The VAE would learn to encode and decode images so that the new image is as close to the original.


  3. Diffusion model is a generative model in machine learning that creates new data, such as images or sounds, by imitating the data they have been trained on.


    They accomplish this by applying a process similar to diffusion, hence the name. They progressively add noise to the data and then learn how to reverse it to create new, similar data.


  4. For example, the diffusion model might start with a random image of a cat. The model would then add noise to the image, one step at a time.


    Each time the noise is added, the model would try to remove the noise and make the image more realistic. This process would continue until the model can generate an image of a cat that is as realistic as possible.

Popular AI image generators

  • DALL-E 2 is a diffusion model developed by OpenAI. It can generate images from text descriptions, such as "a cat riding a unicycle" or "a painting of a sunset over the ocean."
  • Midjourney: Midjourney is a diffusion model developed by Google AI. It can generate images from text descriptions, sketches, and paintings.
  • VQGAN+CLIP is a hybrid model that combines a variational autoencoder (VQGAN) with a text-to-image model (CLIP). It can generate images from text descriptions and translate styles from one image to another.
  • Dream by Wombo is a mobile app that uses a diffusion model to generate images from text descriptions. It is known for its ability to generate images with a dreamy or surreal style.
  • Artbreeder is a web application that allows users to create and share images using a variational autoencoder. It is known for its ability to generate images in various styles, including portraits, landscapes, and abstract art.


Create an Image generator using OpenAI

Prerequisites

  • You should have a basic understanding of React and JavaScript.
  • You should have Tailwind and Axios installed.
  • You should have an OpenAI API key. You can get one for free from the OpenAI website.


Step 1: Create a React project

You can use any React framework or library you like. In this tutorial, we will use Vite.


npx create-vite my-app
cd openai-image-demo


This will create a new React project called my-app.


Step 2: Install the OpenAI API client

You will use the OpenAI package to interact with the OpenAI API.


npm install openai@^4.0.0


Step 3: Imports and Variables


import React, { useState } from 'react';
import axios from 'axios';
const OPENAI_API_KEY = 'YOUR_OPENAI_API_KEY'; // Replace with your actual API key

function App() {
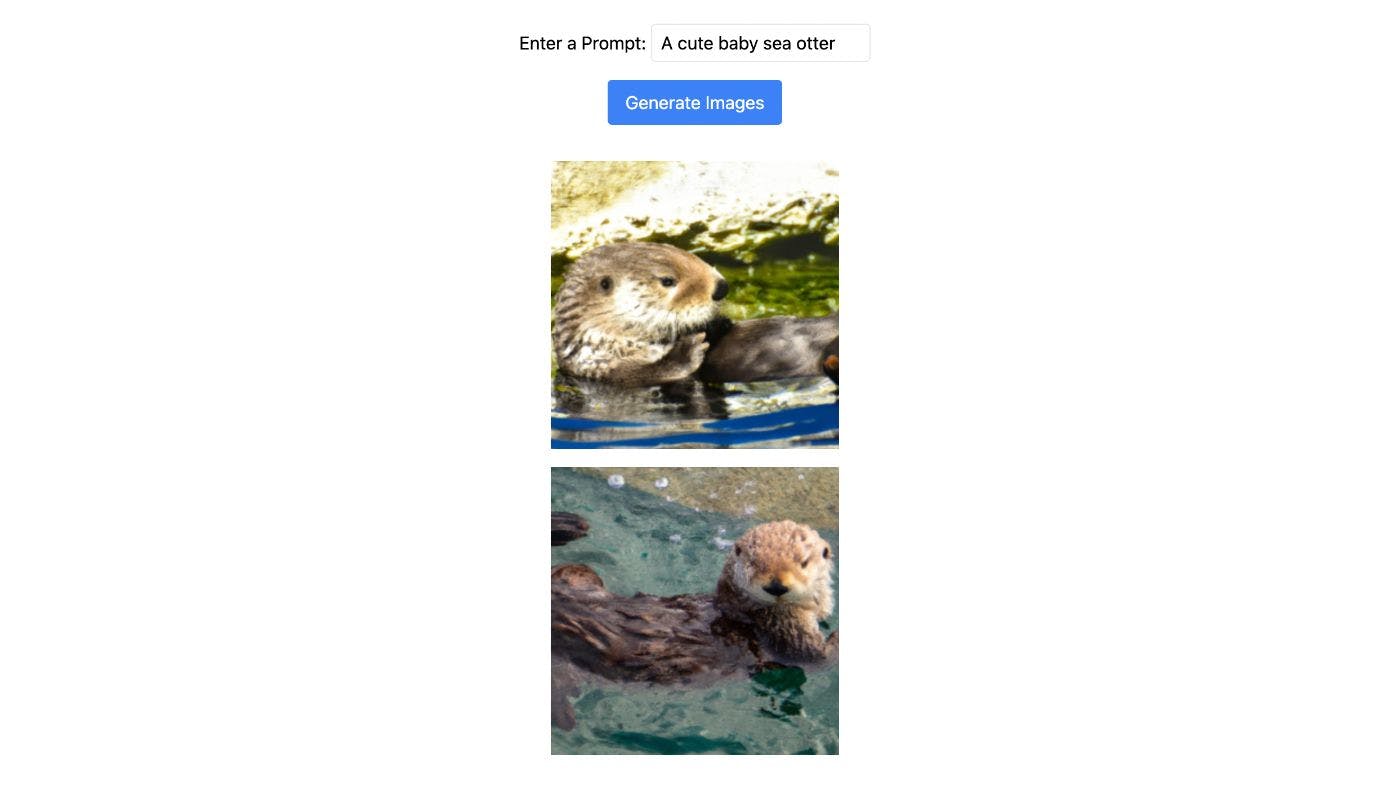
const [prompt, setPrompt] = useState('A cute baby sea otter');
const [generatedImages, setGeneratedImages] = useState([]);
const [isLoading, setIsLoading] = useState(false);


You import the necessary modules: React, useState for managing state and axios for making HTTP requests.

Now, define a constant OPENAI_API_KEY that you replace YOUR_OPENAI_API_KEY with your OpenAI API key.


Then, you use the useState hook to manage state variables:


  • prompt: Stores the prompt text.
  • generatedImages: Stores the generated images.
  • isLoading: Tracks whether the image generation process is in progress.


Step 4: generateImages Function


async function generateImages() {
setIsLoading(true);

try {
   const requestData = {
   prompt: prompt,
   n: 2,
   size: '256x256', // Set the desired image size here
};

const headers = {
  'Content-Type': 'application/json',
   Authorization: `Bearer ${OPENAI_API_KEY}`,
  };
  
  const response = await axios.post('https://api.openai.com/v1/images/generations', requestData, {
     headers: headers,
  });
  
  setGeneratedImages(response.data.data);
  } catch (error) {
      console.error('Error generating images:', error);
   } finally {
     setIsLoading(false);
     }
   }


The generateImages is an asynchronous function that handles image generation.

You set isLoading to true to indicate that the generation process is starting, create a request object requestData with the provided prompt, the number of images n, and the desired image size.


Now, define the headers for the HTTP request, including the OpenAI API key, and use axios.post to make a POST request to the OpenAI API for image generation.

If successful, the response is stored in generatedImages, and isLoading is set to false. If there's an error, you log it.


Step 5: Design the UI


<div className="flex flex-col items-center justify-center min-h-screen">
<div>
  <label htmlFor="prompt">Enter a Prompt: </label>
  <input
    type="text"
    id="prompt"
    value={prompt}
     onChange={(e) => setPrompt(e.target.value)}
     className="border rounded px-2 py-1"
     />
    </div>


You use flex, flex-col, items-center, and justify-center to center the content vertically and horizontally on the page and min-h-screen ensures that the content spans at least the full height of the screen.


Step 6: Create an input field for entering the prompt.


<div>
  <label htmlFor="prompt">Enter a Prompt: </label>
  <input
    type="text"
    id="prompt"
    value={prompt}
    onChange={(e) => setPrompt(e.target.value)}
    className="border rounded px-2 py-1"
  />
  </div>


The value of the input is controlled by the prompt state and the onChange event handler updates the prompt state when the user types.


Step 7: Create a button for generating images


<button onClick={generateImages} disabled={isLoading} className="mt-4 px-4 py-2 bg-blue-500 text-white rounded hover:bg-blue-600">
{isLoading ? 'Generating...' : 'Generate Images'}
</button>


The onClick event handler calls the generateImages function and the disabled attribute is set to true when isLoading is true, preventing multiple requests.


Step 8: Display Generated Images


{generatedImages.length > 0 && (
   <div className="mt-4">
    {generatedImages.map((image, index) => (
       <div key={index} className="mt-4">
         <img
           src={image.url}
           alt={`Generated Image ${index}`}
           style={{ maxWidth: '100%', height: 'auto' }}
           />
          </div>
        ))}
      </div>
      )}


When generatedImages contains images, you map over them and display each image.

The maxWidth and height styles are applied to ensure the images fit within the container while maintaining their aspect ratio.


Step 9: Start the Development Server


Run the development server to view your React app:


npm run dev


Complete codebase

https://gist.github.com/wise4rmgod/2adc72234e88dce9e0941f64736a3ab5

Conclusion

This guide has discussed the steps involved in building an image generator with React and OpenAI. We have covered the basics of image generation, how to use the OpenAI API in React, and how to create an image generator component. We have also provided some additional tips for building an image generator.


Building an image generator is a complex task, but it is also a rewarding one. You can create a powerful application to generate realistic and creative images with the right tools and knowledge.