2,567 reads
AI Generates Realistic 3D Models Using Only a Handful of Images
by Louis BouchardFebruary 14th, 2022


Too Long; Didn't Read
Snapchat and the University of Southern California attacked in this new research. Neural Rendering is the ability to generate a photorealistic model in space just like this one, from pictures of the object, person, or scene of interest. It’s great that the generated model looks accurate with realistic shapes, but what about how it blends in the new scene? And what if the lighting conditions vary in the pictures taken and the generated. model looks different depending on the angle you look at it? This would automatically seem weird and unrealistic to us.Company Mentioned


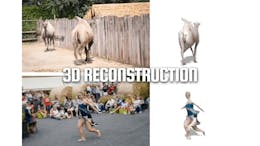
Neural Rendering is the ability to generate a photorealistic model in space just like this one, from pictures of the object, person, or scene of interest. In this case, you’d have a handful of pictures of this sculpture and ask the machine to understand what the object in these pictures should look like in space.
You are basically asking a machine to understand physics and shapes out of images. This is quite easy for us since we only know the real world and depths, but it’s a whole other challenge for a machine that only sees pixels.
It’s great that the generated model looks accurate with realistic shapes, but what about how it blends in the new scene?
And what if the lighting conditions vary in the pictures taken and the generated model looks different depending on the angle you look at it?
This would automatically seem weird and unrealistic to us. These are the challenges Snapchat and the University of Southern California attacked in this new research.
Watch to learn more:
References:
►Read the full article: https://www.louisbouchard.ai/neroic/
►Kuang, Z., Olszewski, K., Chai, M., Huang, Z., Achlioptas, P. and
Tulyakov, S., 2022. NeROIC: Neural Rendering of Objects from Online
Image Collections. https://arxiv.org/pdf/2201.02533.pdf
►Project link with great video demo: https://formyfamily.github.io/NeROIC/
►Code: https://github.com/snap-research/NeROIC
►My Newsletter (A new AI application explained weekly to your emails!): https://www.louisbouchard.ai/newsletter/
Video Transcript
00:00
neural rendering neural rendering is the
00:03
ability to generate a photorealistic
00:05
model in space just like this one from
00:07
pictures of the object person or scene
00:10
of interest in this case you'll have a
00:13
handful of pictures of this sculpture
00:15
and ask the machine to understand what
00:17
the object in these pictures should look
00:19
like in space you are basically asking a
00:21
machine to understand physics and shapes
00:23
out of images this is quite easy for us
00:26
since we only know the real world and
00:28
depth but it's a whole other challenge
00:30
for a machine that only sees pixels then
00:33
you might ask why do we even want to do
00:35
this i'd say that the answer is pretty
00:37
obvious to me there are many cool
00:39
applications from having an app that
00:41
could simply take a few pictures of an
00:43
object and perfectly synthesize the 3d
00:45
model to put it in images 3d scenes or
00:48
even video games this is really
00:50
promising but for these models to be
00:52
realistic lighting is another challenge
00:54
that comes with these applications it's
00:56
great that the generated model looks
00:58
accurate with realistic shapes but what
01:00
about how it blends in the new scene and
01:02
what if the lighting conditions vary in
01:05
the pictures taken and the generated
01:07
model looks different depending on the
01:09
angle you look at it this will
01:11
automatically seem weird and unrealistic
01:13
to us these are the challenges snapchat
01:15
and the university of southern
01:17
california attacked in this new research
01:19
but first a word from this episode
01:21
sponsor weights and biases weight and
01:24
biases allows you to easily keep track
01:26
of the input hyperparameters output
01:28
matrix and any insights that you and
01:30
your team have with only a handful of
01:32
lines added to your code one aspect
01:34
that's great for speeding up your
01:36
experiments is sweeps sweeps automate
01:38
hyperparameter optimization and explore
01:40
the space of all possible models without
01:42
any effort on your end it will simply
01:45
run all tests tweaking the parameters
01:47
and reporting the effect of all
01:48
parameters in clear graphs and reports
01:51
you can share with your team to explain
01:53
your final results easily i love to do
01:55
my best trying to make research look
01:57
simple and clear for you all and this is
01:59
a big reason why i love weights and
02:01
biases they are doing the same thing
02:04
with their platform making your research
02:06
look simple and reproducible i'd love
02:09
for you to check them out with the first
02:10
link below because they are helping me
02:12
continue making these videos and growing
02:14
this channel
02:16
now let's see how these researchers
02:17
tackle the lighting and realism
02:19
challenges that come with creating a
02:21
virtual object out of images the
02:23
technique builds upon neural radiance
02:25
fields which are largely used for
02:27
reconstruction with many models such as
02:30
nerf that we already covered on the
02:32
channel typically neural regions fields
02:34
need images taken in the same ideal
02:37
conditions but this is not what we want
02:39
here their approach starts with nerf and
02:42
as i said i already covered it on my
02:44
channel so i won't cover it again but
02:46
feel free to take a break and watch the
02:47
video to better understand how nerf
02:50
works in short nerf is a neural network
02:52
that is trained to infer the color
02:54
opacity and radiance of each pixel using
02:57
the images as inputs and guess the
03:00
missing pixels for the small parts of
03:02
the objects that aren't present in the
03:04
images but this approach doesn't work
03:06
for large missing parts or different
03:08
lighting conditions as it can only
03:10
interpolate from the input images here
03:13
we need something more to extrapolate
03:16
from it and make assumptions on what
03:18
should appear here and there or how
03:20
these pixels should look like under this
03:22
lighting or that one many approaches
03:25
build upon nerf to fix this but always
03:27
require more inputs from the user which
03:30
is not what we want and is hard to have
03:32
in many cases especially when we want to
03:34
build a good data set to train our model
03:37
on in short these models do not really
03:39
understand the object nor the
03:41
environment the object is in so we
03:43
always come back to the lighting problem
03:46
here the goal is to use this
03:47
architecture in online images or in
03:50
other words images with varying lighting
03:52
cameras environments and poses something
03:55
nerf can hardly do with realism the only
03:59
few things they will need other than the
04:01
images of the object themselves are a
04:03
rough foreground segmentation and an
04:06
estimation of the camera parameters
04:08
which can both be obtained with other
04:10
models available the foreground
04:12
estimation is basically just a mask that
04:14
tells you where the object of interest
04:17
is in your image like this
04:19
what they did differently is that they
04:21
separate the rendering of the object
04:23
from the environment lighting in the
04:25
input images they focus on two things
04:28
which are done in two stages first is
04:30
the object's shape or its geometry which
04:33
is the part that is most similar to nerf
04:35
here called the geometry network it will
04:38
take the input images segmentation mask
04:40
and camera parameters estimation we
04:42
discussed build a radiance field and
04:44
find the first guess of the density and
04:46
colors of each pixel as in nerf but
04:49
adapt with varying lighting conditions
04:51
in the input images this difference
04:53
relies on the two branches you see here
04:55
splitting the static content from the
04:57
varying parameters like camera or
04:59
shadows this will allow us to teach our
05:02
model how to correctly isolate the
05:04
static content from other unwanted
05:06
parameters like lighting but we are not
05:08
finished here we will estimate the
05:10
surface normals from this learned
05:13
density field which will be our textures
05:16
or in other words it will take the
05:18
results we just produced and find how
05:20
our object will react to light it will
05:23
find unbiased material properties of the
05:25
object at this stage or at least an
05:28
estimation of it using a 3d convolution
05:31
with a sobol kernel it's basically a
05:33
filter that we apply in three dimensions
05:35
to find all edges and how sharp they are
05:38
which can look like this on a
05:40
two-dimensional image and this on a
05:42
three-dimensional rendering giving us
05:44
essential information about the
05:46
different textures and shapes of the
05:48
object
05:49
the next stage is where they will fix
05:51
the long geometry and optimize the
05:53
normals we just produced using the
05:55
rendering network which is very similar
05:57
to the first geometry network here again
05:59
there are two branches one for the
06:01
material and another for the lighting
06:03
they will use spherical harmonics to
06:06
represent the lighting model and
06:08
optimize its coefficients during
06:09
training as they explain in the paper
06:11
with more information if you are
06:13
interested spherical harmonics are used
06:15
here to represent a group of basis
06:17
functions defined on the sphere surface
06:20
we can find on wikipedia that each
06:22
function defined on the surface of a
06:24
sphere can be written as a sum of these
06:27
spherical harmonics this technique is
06:29
often used for calculating the lighting
06:31
on 3d models it produces highly
06:34
realistic shading and shadowing with
06:36
comparatively little overhead in short
06:39
it will simply reduce the number of
06:40
parameters to estimate but keep the same
06:42
amount of information so instead of
06:44
learning how to render the appropriate
06:46
lighting for the whole object from
06:48
scratch the model will instead be
06:50
learning the correct coefficients to use
06:52
in the spherical harmonics that will
06:54
estimate the lighting coming out of the
06:56
surface of each pixel simplifying the
06:58
problem to a few parameters the other
07:00
branch will be trained to improve the
07:02
surface normals of the object following
07:04
the same trick using the standard foam
07:06
brdf which will model the object
07:09
material properties based on a few
07:11
parameters to find finally the outputs
07:13
of the two branches so the final
07:15
rendering and lighting will be merged to
07:18
find the final color of each pixel this
07:20
disentanglement of light and materials
07:23
is why they are able to apply any
07:25
lighting to the object and have it react
07:27
realistically remember this is done
07:30
using only a couple of images from the
07:32
internet and could all have different
07:34
lighting conditions this is amazing and
07:37
voila this is how this new paper from
07:40
quang and collaborators at snapchat
07:42
created neroic a neural rendering model
07:45
for objects from online images i hope
07:47
you enjoyed this short overview of the
07:49
paper all the references are linked
07:51
below as well as a link to the official
07:54
project and their code let me know what
07:56
you think of the explanation the
07:57
technique and how do you use it in the
08:00
real world if you are still here and
08:02
enjoy the video please don't forget to
08:04
leave a like and subscribe to the
08:06
channel it both means a lot and helps a
08:08
lot thank you for watching

L O A D I N G
. . . comments & more!
. . . comments & more!